Thursday, September 28, 2017
Turn of Thumbnail Caching for Faster Computer Performance
Turn of Thumbnail Caching for Faster Computer Performance

Today I have developed an interesting computer tricks for you. By default, Windows creates additional files in your memory. When the computer is on, these additional files to make your computer slow.
If you have enough disk space or if you are interested in creating thumbnails for each folder, you can pull these unnecessary files from your computer following this computer tricks:
Thumbnail Shutdown cache / Removing Thumbs.db files
A thumbnail cache is used to store the thumbnail images to view thumbnails in Windows Explorer in Windows. Each time you go to a folder containing the images and movies, Windows creates a model with a Thumbs.db file. So you can see what the picture / movie. This speeds thumbnails for displaying images such how are you do not need smaller images to recalculate each time the user sees the folder. But every photo is taken in a folder of approximately 2 kb.
To disable this function, do the following:
1. Go to "Start -> Control Panel"
2. Double-click "Folder Options"
3. Click the "View" tab
4. Check the "Do not cache thumbnails (Windows XP) Alternatively, turn off the icon show previews of files "check box (in Windows 7)
5. Click Apply and then click OK
Clear thumbnail cache recovery in Windows
On Windows, the thumbnail cache db files can be found in the hidden system folder:
C: Users username AppData Local Microsoft Windows Explorer
If the thumbnails in Windows Explorer is damaged and does not display correctly, you may need to clear the cache of the image or thumbnail cache files has become too big and wants to free hard disk space. To do this, you can follow these steps:1. Open Disk Cleanup (Go to Run, type cleanmgr)2. Select thumbnail and then click OK.3. Click on the Delete Files button.4. Disk Cleanup now clear the thumbnail cache and close.
download file now
Tuesday, September 26, 2017
Turn Your Ubuntu Hardy to Mac OSX Leopard
Turn Your Ubuntu Hardy to Mac OSX Leopard
There is many steps you have to make, but definitely deserve it.
If you want to change this:


Before we start�
First, create a folder in your Home and name it Mac_files. Download the following files to the Mac_files folder.
- Modified Mac4Lin theme
- Mac4Lin icon set
- Mac4Lin wallpaper
- Avant Windows Manager elegant glass theme
Using Archive manager, extract the three Mac4Lin zip files to the Mac_files folder.
Apply Mac OSX Leopard Theme
Go to System->Preferences->Appearance.

Select Install and select the Mac4Lin GTK theme (/home/username/Mac_files/Mac4Lin_v0.4/GTK Metacity Theme/Mac4Lin_GTK_v0.4.tar.gz).

Next, click Install again and select the Mac4Lin icon theme. (/home/username/Mac_files/Mac4Lin_Icons_Part2_v0.4.tar.gz). When prompted, select �Apply new themes�.
Click Install again and select the Mac4Lin mouse cursor theme. (/home/username/Mac_files/Mac4Lin_v0.4/GTK Cursor Theme/Mac4Lin_Cursors_v0.4.tar.gz). Select �Apply new themes� when prompted.

Click �customize� and choose Mac4Lin_GTK_v0.4. Go to the �Window border� tab, choose Mac4Lin_GTK_v0.4. Click Close.

On the top, go to the Background tab. Click Add and select the Leopard wallpaper. (/home/username/Mac_files/Wallpapers/Leopard.jpg). Click Close to terminate the Appearance window

Install the Dock (Avant Window Navigator)
Open a terminal (Applications->Accessories->Terminal) and type
gksu gedit /etc/apt/sources.list
and add the following lines to the end of the file:
deb http://ppa.launchpad.net/awn-testing/ubuntu hardy main
deb-src http://ppa.launchpad.net/awn-testing/ubuntu hardy main
Save and close the file. In your terminal, type
sudo apt-get update
sudo apt-get install avant-window-navigator-trunk awn-manager-trunk awn-extras-applets-trunk
Go to System->Preferences->AWN manager. On the left, click on the Theme. On the right, click Add and navigate to the Mac_files folder. Select the Elegant_glass.tgz file. Check the bullet beside the Elegant glass theme and click Apply.

Next on the left, click on the Applet icon. On the right, scroll down to the stack Applet. Highlight it, then click Activate. This will add the Mac Leopard stack to your dock.

Before you launch the AWN, remove the bottom panel from the desktop first. Right click on the bottom panel and select �delete this panel�. Open AWN via Applications->Accessories->Avant Window Navigator. Once it is activated, you can simply drag and drop the applications into the dock.
Install OSX Fonts
Open a terminal and type the following:
sudo apt-get install msttcorefonts
This will Install the Microsoft core fonts.
Next, copy the OSX fonts to the fonts folder
cd /usr/share/fonts
sudo tar xvzf /home/username/Mac_files/Mac4Lin_v0.4/Fonts/OSX_Fonts.tar.gz
Configure the fonts:
cd/
sudo tar xvjpf /home/username/Mac_files/Mac4Lin_v0.4/Fonts/fontconfig.tbz -C /etc/fonts
Open the Appearance window (System->Preferences->Appearance) and select Fonts tab. Select the following fonts according to the image below. Click Close.

Change the traffic light window control to the left
In the terminal, type
gconf-editor
This will bring up the gconf-editor window. Scroll down to App->Metacity->general. On the right, double click on the button_layout and change the content to �close,minimize,maximize:menu� (without the quote). Click Ok and close the gconf-editor.


Change the menubar
Remove all the icon and applications on the left side of the top panel. Right-click on the icon and select �Remove from panel�. You will left with something like this:
On the right of the top panel, remove the logout icon. Still on the right hand side of the top panel, right click and select �Add to panel�. Scroll down the list and add �Search for files�. This will add the spotlight icon to the panel.

On the extreme left, right-click and select �Add to panel�. Scroll down the list and add �Main Menu�. This will add the apple icon on the left. You can now log out and shut down from the Apple dropdown menu (same as Mac OSX).

Next, we are going to install globalmenu so as to display the menubar for each application. In your terminal, (Updated: The globalmenu only works in 32bit machines.)
cd Mac_files
wget http://gnome2-globalmenu.googlecode.com/files/gnome-globalmenu-0.4-svn964.tar.gz
tar zxvf gnome-globalmenu-0.4-svn964.tar.gz
cd globalmenu
sudo dpkg -i *.deb
If you have any errors when installing the package, try
sudo dpkg -i �force-overwrite *.deb
If you are having some installation problems with the gnome-globalmenu-applet, try
sudo apt-get install -f
Once finished, right click on the top panel and select �Add to panel�. Scroll down the list and add �Global Menu Applet�.

You might not see anything initially. Log out and log in again, you should now see the menubar for each application showing on the panel.
If your globalmenu is of a different shade of grey from the rest of the panel (as shown in the image below), right click on any empty space on the panel and select �Properties�. Go to Background tab and select �Background image�. Under the selection, go to /home/username/.themes/Mac4Lin_GTK_v0.4/gtk-2.0/Panel and select panel-bg.png. Click OK.
Drag the globalmenu to the left just beside the Apple icon. Right click on the globalmenu and select �Preferences�. Tick the box beside �Display the title of the current application� and put maximum width 100. Select the font to be Lucida Grande Bold. Click Apply and OK. You should now have a desktop that resemble Mac Leopard.

Configuring the Login screen
Click on the Apple icon, go to System->Administration->Login Window. On the Local tab, click Add. Navigate to the path /filesystem/home/username/Mac_files/Mac4Lin_v0.4/GDM Theme and select the file Mac4Lin_GDM_v0.4.tar.gz. Check the box beside the newly installed theme to activate it.

Underneath, there is a color selection field, select it and key in the number E5E5E5 into the color code field.

Click Ok. Log out. You should see the login screen as the diagram below.

Configure usplash screen
usplash is the screen that you see when your computer is booting up. We are going to change it to show the white apple screen. In your terminal,
sudo apt-get install startupmanager
Go to System->Administration->Start-Up Manager Go to Appearance tab. Click on the �Manage bootloader theme�. Click Add and navigate to the file /filesystem/home/username/Mac_files/Mac4Lin_v0.4/GRUB Splash/appleblack.xpm.gz. Check the box �Use background image for bootloader menu� and select �appleblack�.


Next, click �Manage usplash theme�. Click Add and add the file /filesystem/home/username/Mac_files/Mac4Lin_v0.4/USplash Theme/osx-splash.so. Click OK. Select OSX-splash from the dropdown box.
Now reboot. You should see the following images:


Creating Dashboard effect
We will use a combination of screenlets and Compiz widget plugin to achieve the dashboard effect.
Install Screenlets
sudo apt-get install screenlets compizconfig-settings-manager
Go to System->Preferences->Advanced Desktop Effect Setting. On the Left, click on Desktop. On the right, put a check beside �Widget layer�

Go to Accessories->Screenlets. Activate the widgets that you want to display. Right click on the widget and select �Properties�. Go to Options tab and select �Treat as widget�. Do this for all the widgets that you have activated.

You can now see your dashboard in action by pressing F9.

Done. You have completed the transformation of your Ubuntu desktop to Mac OSX Leopard.
Some screenshots:


download file now
Turn Your Mouse Pointer Into a SpotLight for Presentations
Turn Your Mouse Pointer Into a SpotLight for Presentations
MouseLight has borrowed the concept from theatres and applied it your computer where the actor is the mouse cursor and the stage is the desktop screen.
Also see: More useful tools for presenters
When you are doing a PowerPoint presentation or a software demonstration and want the audience to focus on some specific area of the screen, MouseLight puts a circular spotlight around your cursor and highlights that area allowing your audience to follow you - the rest of the screen outside the spotlight circle is dimmed automatically.
Theres another advantage of MouseLight - If you are work on a large screen or a dual monitor, its so common that you keep losing track of the mouse pointer. With MouseLight, just press the hotkey and youll immediately know where the cursor is placed on the screen. No guesswork required.
MouseLight is available for Windows only, Mac users have a similar application called Mousepos�.
Related: Do Live Presentations without a Projector
download file now
Friday, September 22, 2017
Turn Any Photo Into Enscape Content In a Matter of Minutes
Turn Any Photo Into Enscape Content In a Matter of Minutes
With the newly announced partnership between Archvision and Enscape, some interesting possibilities have opened up. If you own both Archvision Dashboard and Enscape, you can rapidly create custom RPC and view it in your Enscape presentations, including in VR.
 |
| Overview of the process |
You can also read the full media release here.
Heres how to do it:
Edit your image...
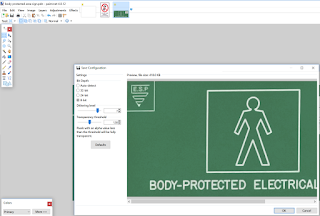
Save as PNG with Transparency (I used Irfanview here)
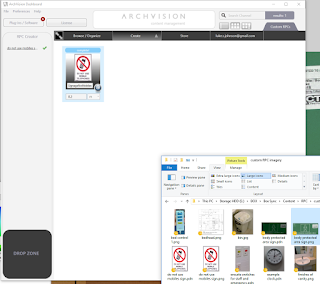
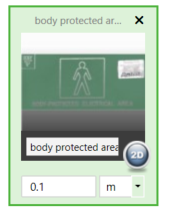
Then drag and drop to Revit,
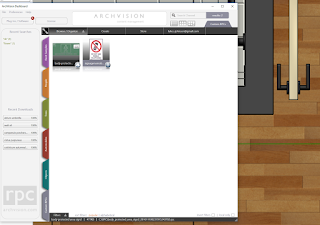
Locate it correctly,
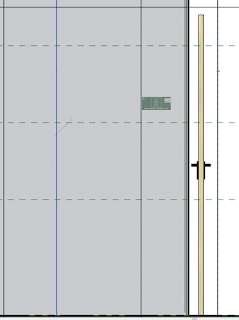
and start Enscape...
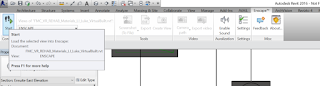
Enjoy!
download file now
Saturday, September 16, 2017
Turn on RF switch Acer Travelmate 290 WIFI
Turn on RF switch Acer Travelmate 290 WIFI
http://ubuntuforums.org/showthread.php?t=541953
http://rfswitch.sourceforge.net/?page=laptop_matrix
download file now
Friday, September 15, 2017
Saturday, September 9, 2017
Turn On One or More Computers Remotely Through WakeOnLAN
Turn On One or More Computers Remotely Through WakeOnLAN
 Due to Surfing and Internet Research, I found out that you can really shut it down other computer by using LAN or Internet. PowerOff is one of the powerful tools in performing this kind of job. So, I research again and find out the best software I will use to turn it back on other computers by using my computer as a remote. And I found it, from this small and user friendly application called �WOL� (Wake-on-LAN). WOL is only 32KB size but it can Turn On your Pc in one click just Paste the right Mac Address of PC you want to turn On.
 In finding Mac address the remote computer must be ONLINE to find and trace the right Mac Address. Click the link to download the software in which you can find the right Mac address of your Workgroup or LAN. Download �WakeOnLAN[CodeCatcher]� now. I hope this can help. Have Fun..Thanks...
Note: Before you continue and try my all stuff, I warn you to make a backup all of your data file first in case of errors and bugs you may be encounter. This Site is not liable of damage due to insufficient understanding. Like as I always said �Use at your on Risk�. Thanks.
Download WakeOnLAN[CodeCatcher]: Here
More Tags: Angry Bird, Blogger, Fate , Plants Vs Zombie, Special Force, Point Blank, Ai Maps, Deep Freeze UnFreezer, Ninja Saga, Deep Freeze, Samsung SGH, Guitar Pro, USB XP Install, Yahoo 443 Problem, Turtle Odyssey, GTA San-Andreas, PlayStation, Tips Tweaks Tricks, HTML, Facebook, Animated JPG, Counter-Strike, USB Windows Format, Screensaver, USB Security.
download file now
Tuesday, September 5, 2017
Turn on Font Autohinting
Turn on Font Autohinting
Execute following command and restart your gui session to enable autohinting.
sudo ln -sf /etc/fonts/conf.avail/10-autohint.conf /etc/fonts/conf.d/
download file now
Turn on autologon for any windows user in windows XP
Turn on autologon for any windows user in windows XP
By default auto login feature got disabled in windows when ever you create any other account in windows XP other than default administrator acoount.
What is AutoLogon?
When a user got logged in windows XP without entering username and password. Don�t you think this could be more convenient when logging to windows?
Note: When you turn on autologon in Windows XP becomes more convenient, but turning this setting on can pose a security risk, but still if you want to do it.
Let�s see how you turn this setting on.
Turn AutoLogon On
1. Open Start >> Run and type regedit (this will open registry editor )
2. Navigate to the following path:
HKEY_LOCAL_MACHINESOFTWAREMicrosoftWindowsNTCurrentVersionWinlogon
3. Double-click the DefaultUserName entry, and type your user name and click OK?
4. Now double-click the DefaultPassword key, type your password and click OK.
Note: If you don�t find DefaultPassword value, you will need to create the entry:
4.1. In File menu Click Edit select New, and then click String Value.
4.2 Type DefaultPassword as the value name and click Ok .
4.3 Double-click created key, and type your password.
5. Now double-click the AutoAdminLogon entry, type 1 in the Value Data box, and then click OK.
Note: If you don�t find AutoAdminLogon entry, you will need to create the entry.
5.1 In File menu Click Edit, click New, and then click String Value.
5.2 Type AutoAdminLogon as the value name and click Ok.
5.3 Double-click created key, and type 1 in the Value Data box.
6. Exit Registry and restart windows.
After restart you will be able to auto logon to windows.
download file now
Saturday, September 2, 2017
TURN ON UR PC IN JUST 10 SECONDS
TURN ON UR PC IN JUST 10 SECONDS
TURN ON UR PC IN JUST 10 SECONDS---For Advanced Users Only
Right so u wanna know how to turn the pc on in 10 seconds (may vary)Aight heres what u have to do to turn ur pc on in 10 seconds
Right Click on the start button then press R it will take u to Run well go to run
n type Regedit
press enter
this will open Registery Editor
now look for the key
HKEY_LOACAL_MECHINESYSTEMCurrentControlSetControlContentIndex
now there find the Key Called
"Startup Delay"
Double Click On It
Now where its Base
Click Decimal
Now its Default Value Is 4800000 (75300:hexadecimal)
Change The Value To 40000
here u go u have done it
now close the Registery Editor
Restart Your Computer
download file now
Friday, September 1, 2017
Turn The Google Menu Bar Into An Ubuntu themed Panel
Turn The Google Menu Bar Into An Ubuntu themed Panel
Google began rolling out a darker menu bar across its sites and services yesterday.
This minor similarity has led one developer to create a userstyle that replaces Google�s choice of menu bar with an Ubuntu Ambiance-themed �Panel� style � even through to the highlight colour used in menus

Download
The userstyle is available to download from gnome-look.org.Once fully download head to your Downloads folder and extract the .zip archive.
Next open your �Home� folder and press �CTRL+H� to reveal hidden files and folders.
Google Chrome/ium users need to move the css file to:
- ~/.config/chromium/Default/User StyleSheets/
- ~/.mozilla/firefox/yourProfile/chrome/
Going Further in Chrome
For an even greater Ambiance-themed Chrome you can also install: -- Ubuntu-style scrollbars
- Ubuntu coloured hover/highlight text
download file now
Tuesday, August 29, 2017
Turn your laptop into WI FI hotspot in 10 simple steps
Turn your laptop into WI FI hotspot in 10 simple steps
1. Open network and sharing center
2. Select 'Setup new connection or network'
3. Scroll down, select 'Setup a wirless adhoc(computer to computer) network'
4. Click Next then Next
5. Give a name to network eg: MY WIFI.
6. Select WEP Authentication
download file now
Turn your PS4 into a laptop for 1100
Turn your PS4 into a laptop for 1100
Turn your PS4 into a laptop for $1100

Share This article
Ed Zarick, the man behind some of the most well-known laptopified consoles, has done it again. This PS4-based laptop is modeled in 3D on a PC, and made with a combination of 3D-printing, laser cutting, and CNC milling. Each one is made to order, so you can choose exactly how it looks. The core unit color can be either black or white, and 3D-printed trim can be just about any color imaginable. Based on what Zarick has shown off, the PlayBook 4 looks just as polished as his previous efforts, so the aesthetically-minded among us will be very pleased.
Along with the guts of a PS4 and the custom housing, this console laptop also uses a 22-inch 1080p display from Vizio. It�s not exactly the same experience as playing a game on your 65-inch TV at home, but with a pixel density of roughly 100 PPI, those games are going to look incredibly crisp.

While Zarick�s site doesn�t specifically mention weight, it�s pretty easy to do some rough estimates like we did with the Xbox One laptop. The PS4 weighs in at roughly 6.1 pounds, and a 22-inch 1080p Vizio TV is roughly 6.5 pounds. Put them both together, and we have an estimated weight of 12.6 pounds. You definitely don�t want to carry this �laptop� around town under your arm, but it�s light enough to travel decently in your luggage. It doesn�t run on battery power, but he did manage to get the console and screen working off of a single power cord.
Okay, a heavy and bulky PS4 laptop is already a tough sell, but the worst part is definitely the cost. If you supply the console, the conversion will cost $1,095 plus shipping. If you buy the finished product directly from Zarick himself, it�ll cost you $1,395 plus shipping. In addition, you�ll need to tack on $50 if you want an HDMI out on your PlayBook 4 for compatibility with other displays. It�s certainly one of the coolest console hacks I�ve ever seen, but unless you�re independently wealthy, you�re probably better off just buying a Vita and using Remote Play.
download file now
Sunday, August 27, 2017
Turn your Social media in to Paychecks with right Social Media Optimization Strategy
Turn your Social media in to Paychecks with right Social Media Optimization Strategy

download file now
Sunday, August 20, 2017
Turn off Menubar transparency
Turn off Menubar transparency
Found here
download file now
Saturday, August 12, 2017
Turn off animations ripple effects on Android Lollipop
Turn off animations ripple effects on Android Lollipop
Go to Settings > Developer options

Find Animator duration scale. Decrease its number.
download file now
Turn off Location Services on your iPhone to Conserve Power
Turn off Location Services on your iPhone to Conserve Power
My iPhone has been driving me crazy these last few weeks. The power has been draining so fast that I need to recharge by lunch time if I still want a phone (and not a brick) by the afternoon.
Id been blaming my iPhone for being old but as it turns out, the problem was much simpler than that - It was location settings.
When you think about it, it makes perfect sense. After all, you have to assume that if your phone is going to communicate with the satellites (and other receivers), its probably going to need a bit of power to get up there. Then of course you factor in the number of apps which are using location services (its exploded since I last looked in there).... and of course, many of the apps use location services "always".
Yep, thats right... even when youre not using the phone.
So, how do you turn these things off?
The easiest way is via these three icons;
- Settings
- Privacy
- Location Services
Once you get there either slide it to the OFF position (which I did for a couple of days)
or
Go through all of the settings and set them to NEVER.
In my case, I left Camera, Google Maps and Map my Walk but only "While Using".
If theres anything that says "Always" shut it down for sure.
The proof is undeniable. Ive not made any other changes to my phone and its been going 15 hours and I still have 54% battery left.
download file now
Friday, August 11, 2017
Turn Off Your Computer with an E mail or Cell Phone
Turn Off Your Computer with an E mail or Cell Phone

Using this method, the user can turn off, restart, hibernate, etc. his computer, simply by sending an e-mail from your phone.
To do this, all you need is Microsoft Outlook which should come with Microsoft Office, which many people have. This must be the computer that you want to want to stop.
So, this is how you do this:
1. First, you need the batch file to perform the Shutdown, Hibernate etc. You can make it very easily.
2. Open the notebook and write like this ...
c:windowssystem32shutdown -s -f -t 00
and save it as shutdown.bat
3. Open Microsoft Outlook. Make sure you have set for your email. Now must make sure that Outlook checks your mailbox for every minute (1 minute for testing time can be increased if desired switch-off delayed). You can do this by going to Tools >> Options.
4. Then click the Mail Setup tab, and then click the Send/Receive button.
5. Make sure that the Schedule an automatic send/receive every........ box is checked and set the number of minutes to 1. Now you can close all of these dialog boxes.
6. Now go to Tools >> Rules and Alerts. Then click the Options button in the upper right and press the import rules button.
7. Now select the file shutdown.bat (which you have created before).
8. Now, when you send a message from the phone to email with the subject of shutdown or %smsshutdown%, your computer will turn off.

download file now