Showing posts with label part. Show all posts
Showing posts with label part. Show all posts
Friday, September 29, 2017
Trying Out Ubuntu 10 04 On A Desktop PC Part Two
Trying Out Ubuntu 10 04 On A Desktop PC Part Two
This blog describes the multimedia playback capabilities (both audio and video) of the standard Ubuntu 10.04 - that is, what this 64-bit OS can play out-of-the-box. Let us start with the audio capabilities first.
Multimedia - Audio Playback
It was obvious from the start that Ubuntu can handle sound - but what format? A quick peek into the /usr/share/sounds directory gave me some answers. The sound file formats that Ubuntu can handle out-of-the-box are .wav and .ogg type files. The wav format is an uncompressed PCM one while the ogg format is a lossy compressed one. Both are free formats and that is the reason they were included on a standard Ubuntu (which has a strict policy regarding non-free or propriety formats - they simply are not included).
A test was carried out by plugging in a USB drive containing several audio and video files of various formats, into the Ubuntu 10.04 PC. The USB drive was recognized by the OS and mounted automatically - an icon for that drive appeared on the desktop. The OS also obligingly open the Nautilus file browser showing the contents of the USB drive. Hovering the cursor over the various audio files on the USB drive, I discovered that Ubuntu can indeed play back wav and ogg type audio files plus it also can play back flac type audio files. This format is a lossless compressed PCM type and it is a free format (flac = free lossless audio codec) - hence it was included in the standard Ubuntu. However, out of the box Ubuntu CANNOT play back mp3, mp4, aac, m4a and ape formatted audio files. Obviously, extra non-free or propriety codecs need to be installed to handle these formats.
A quick check with the official Ubuntu 10.04 document did not help much but checking the community document on restricted formats gave instructions on which package to install in order to get support for the other audio (and video) formats. The package is appropriately named ubuntu-restricted-extras and besides the codecs necessary for play back of the other formats, also includes Microsoft TTF fonts, Java runtime environment, Flash plugin, LAME (to create compressed audio files), and DVD playback. Opening the Synaptic Package Manager, I installed this package - which took a while - mainly due to the downloading of the various TTF fonts from a busy server.
After the ubuntu-restricted-extras package was installed, another test was performed on the other audio files on the USB drive. Hovering the cursor over the files I can now play back mp3, mp4, aac, m4a and ape formatted audio files. This package indeed took care of the most popular audio formats found. By the way, I also found out that the popular Microsoft TrueType fonts (like Times New Roman, Arial, Courier New, etc) were also installed on my system - a big plus and another reason to install this package.
Another audio capability test was then performed - the audio CD playback capability. Inserting an audio CD into the drive resulted in it being recognized and mounted (a icon will appear on the desktop). A message box will also pop-up telling me that I have inserted an audio CD and asked which application to use the CD with - the default is Rhythmbox. Note that I can make this the default action also - however, for this test I accepted the default application by clicking on OK. Rhythmbox, the music management and playback software for GNOME, was launched and I was able to play the CD by clicking on the Play button. The details about the CD (album name, artist, and track/song title) was also displayed. This test confirmed that Ubuntu was indeed capable of handling audio CDs.
Thats it as far as my needs for audio playback on Ubuntu 10.04 goes. In my next blog, I will be describing the video playback capabilities of the OS, so stay tuned.
download file now
Tuesday, September 26, 2017
Tuning Rebecca Linux Mint 17 1 Cinnamon Part 2
Tuning Rebecca Linux Mint 17 1 Cinnamon Part 2
This is Part 2 of the series - for those who have not read Part 1, click here. In this part, we will continue with connecting more hardware to Rebecca (aka Linux Mint 17.1).
d) Connecting Android Smart Phones and Tablets Using USB
This section describes how to connect Android smart phones and tablets to a Linux Mint 17.1 PC via a USB port. Most modern Android-based smart phones have the built-in capability of being USB connected to a PC. Some also even have software written specifically for communicating with a PC, but the ability to read and write to the storage media is a basic ability of these devices. Connection between PC and most modern Android smart phones uses the Media Transfer Protocol (MTP) - for more information on MTP, click here. Note that MTP is only for file transfers and do NOT have the ability to play a media file (audio or video) located on the device - trying to use a media player on Rebecca to play media files on the phone or tablet will cause errors - some of which can only be cured by a restart of the PC.
The author has two Android smart phones and one Android tablet in his possession. The tablet is an old (by tablet standard) Acer Iconia A500 using Android 4.0.3 (Ice Cream Sandwich) - old but still useful. One of the two smart phones is a China made knockoff of the Samsung Galaxy Note 2 and is using Android 4.1.1 (Jellybean). This phone is still serviceable but because of the limited RAM (512MB!), it drove the author to purchase a real Samsung Galaxy Note 2 - which is now running Android 4.4.2 (KitKat). So having these 3 devices gave me an opportunity to test whether the various Android (4.0.3 to 4.4.2) versions support MTP when connected to Rebecca.
TIP: For the following tests, a KNOWN good USB port on Rebecca was used. The author had some problems with a intermittently working USB port on Rebecca - symptoms were the PC froze solid whenever a device was connected using this USB port. Swapping USB cables did not help. When the problem was determined to lie with the USB port on Rebecca, that port was blocked off and another USB port was used but occasional problems was detected - this time due to el-chepo USB cables. So make sure that you only use known working USB ports and known good USB cables when performing connections from devices to Rebecca.
Starting with the oldest device first, it was connected to a known good USB port on Rebecca using the cable supplied with the tablet. The message Connect as a media device appeared on the tablet and a window popped up on Rebecca (see figure below), plus an icon appeared on the desktop.
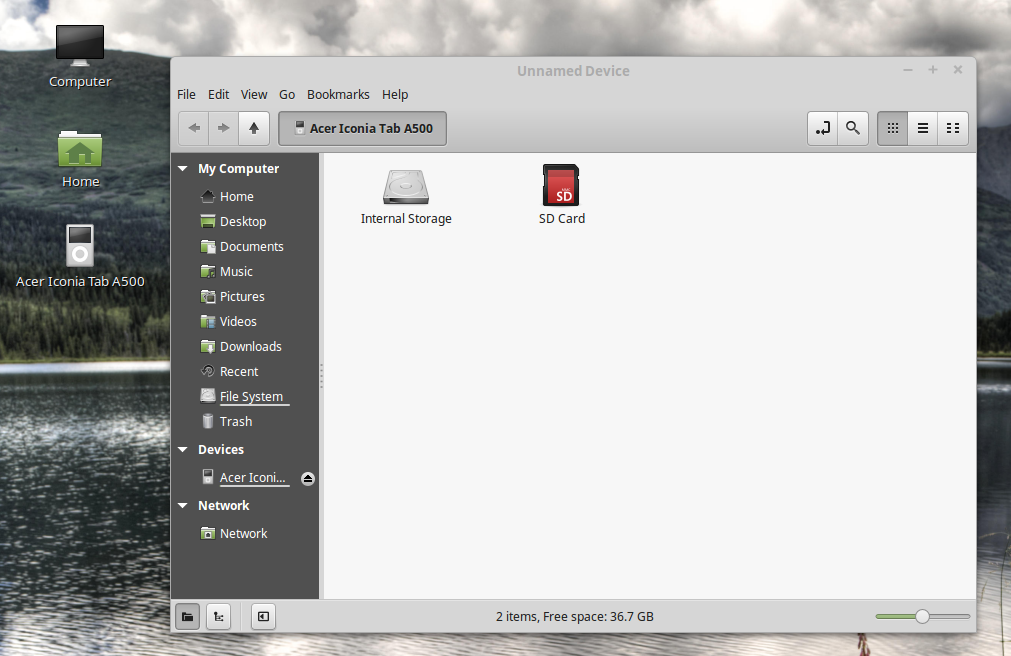
Note that the PC correctly identified the device as the Acer Iconia Tab A500 and using the file manager, it was possible to browse through both the storage units - internal and SD card - on the tablet. It was also possible to transfer files back and forth between the PC and the tablet using the file manger drag and drop feature. The only hiccup was that the Nemo file manager has a title of Unidentified Device whenever the Acer tablet was connected. To disconnect the tablet, the eject button on the file manager device was clicked upon with the mouse. All in all, it was a successful test.
Next the China made smart phone was connected to Rebecca using the good USB port and the USB cable supplied with the phone. To my surprise, the following screen appeared on the phone.
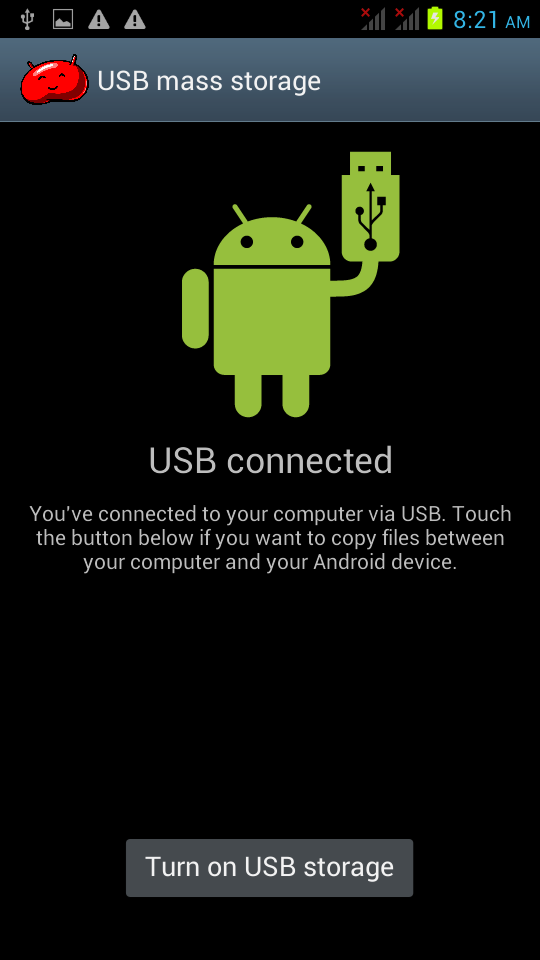
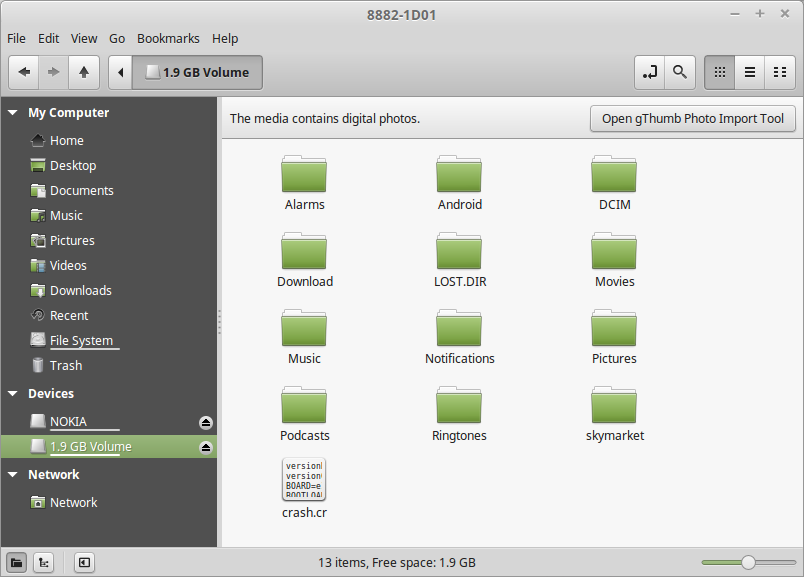
So I guess that the fake Note 2 phone does not support MTP after all - it still relies on the old-fashioned UMS despite it using Android 4.1.1 (Jellybean). I guess the manufacturer of this phone did not implement MTP for this device. However, and as shown below, it was still possible to browse all the files on the phones main storage and SD card (an old NOKIA microSD card salvaged from an old Nokia phone) and transfer files back and forth - albeit at a very much slower pace.
Next the genuine Samsung Galaxy Note 2 was connected to Rebecca using the good USB port and the USB cable supplied with the phone. The first thing that happened was a beep from the phone and a notification message that read Connected as a media device briefly appeared on the phone. It does not seem to matter whether phone was asleep or otherwise when connected. On the PC, the file manager popped up and an icon labelled GT N7100 appeared on the desktop (see below).
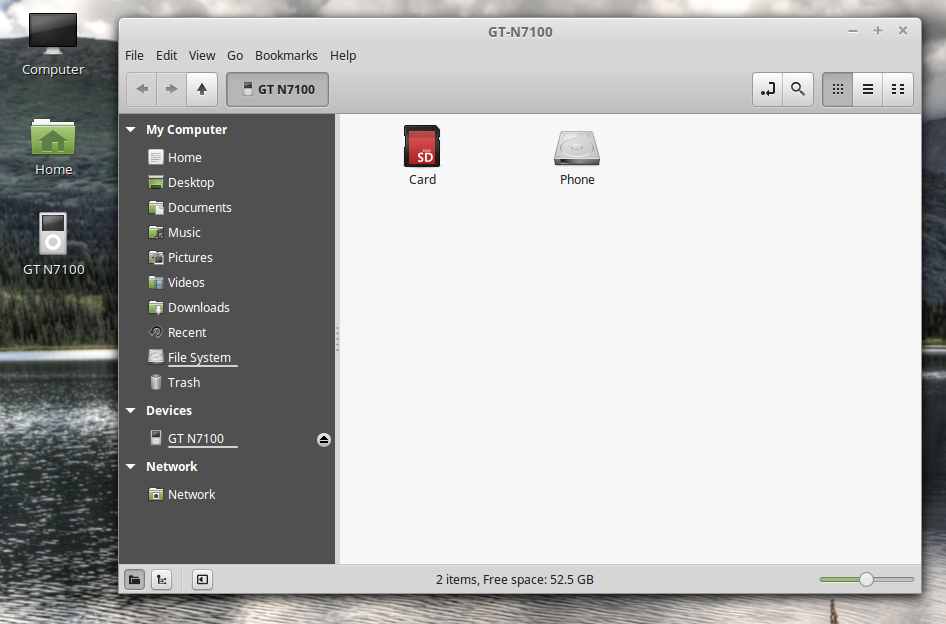
Note that the phone was correctly identified (the correct model number for the Samsung Galaxy Note 2 is GT-N7100) on both the desktop icon and the Nemo file manager. Even the title in the file manager was correct (unlike the Acer A500). It was gratifying to find out that the files on both the storage media on the phone can be browsed by the file manager. It was also possible to transfer files back and forth between the PC and the phone using the file manger drag and drop feature. The MTP file transfer portion worked with the phone with no problem at all. Disconnecting the phone was easy - just right-click on the desktop icon for the phone and select Eject. Alternatively, click on the eject button for the device in the file manager window.
To summarize, Linux Mint 17.1 will handle any Android tablet or smartphone connected to it over USB without any problem or without having to install any other software. Just note that if you stick to file transfer operations only, then you should not encounter any problems.
e) Connecting Apple Devices Using USB
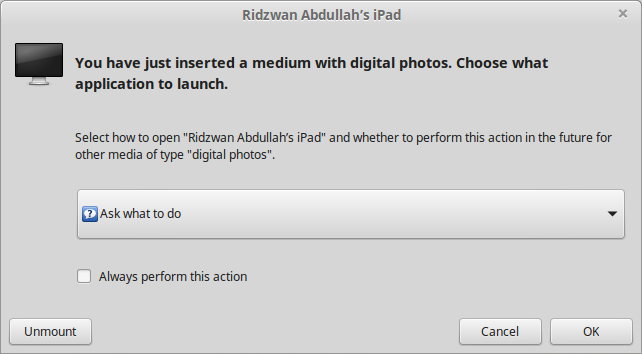
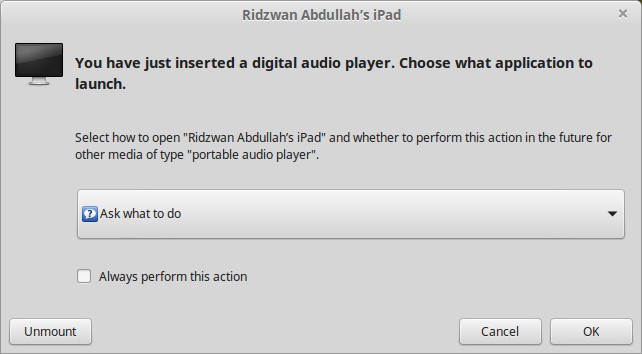
Apple�s devices poses a problem for Linux Mint 17.1 � it doesn�t include MTP support at all. Apple�s iPod, iPhone, and iPad use their own proprietary syncing protocol along with iTunes, so it is understandable that they do not support MTP - a competing protocol. However, the author has the original iPad in his possession and was curious to find out what would happen if he connected this device to Rebecca over USB.
Well, the first thing that happened was 2 windows popped up, one on top of the other (see below). The first asked me what to do with the digital photos media, while the second asked me what to do with digital media player.
The second thing that happened was the the Nemo file manager opened up with the iPad listed under Devices as two items as shown below.
Since the file manager was already open, I dismissed the other two windows using the Cancel button. Clicking on the device that identified as my iPad resulted in display shown below.
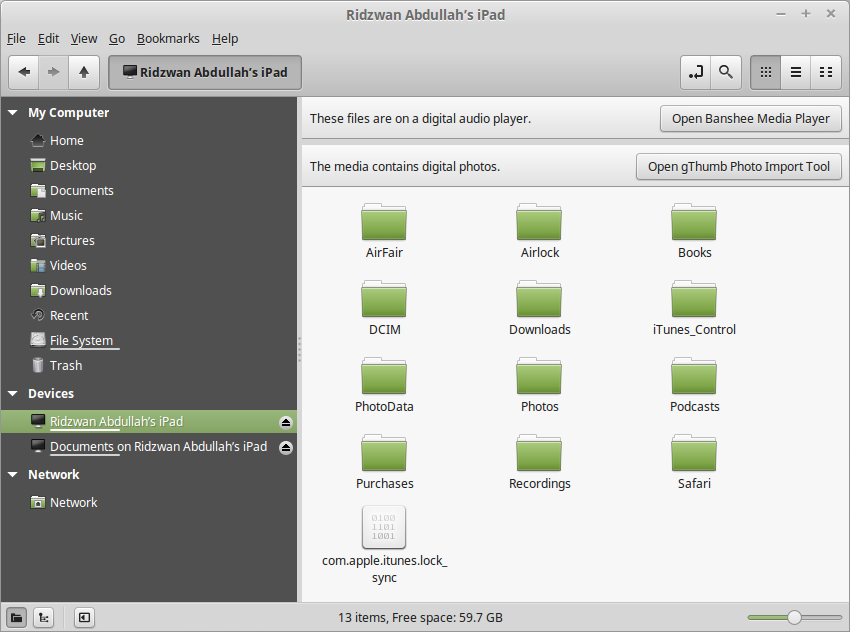
It was interesting to note that the file manager did detect that there were music and photo files on the iPad and even offer to sync and import these files - using Banshee or gPhoto. Unfortunately these do not work and the end result was not a single file was transferred either way.
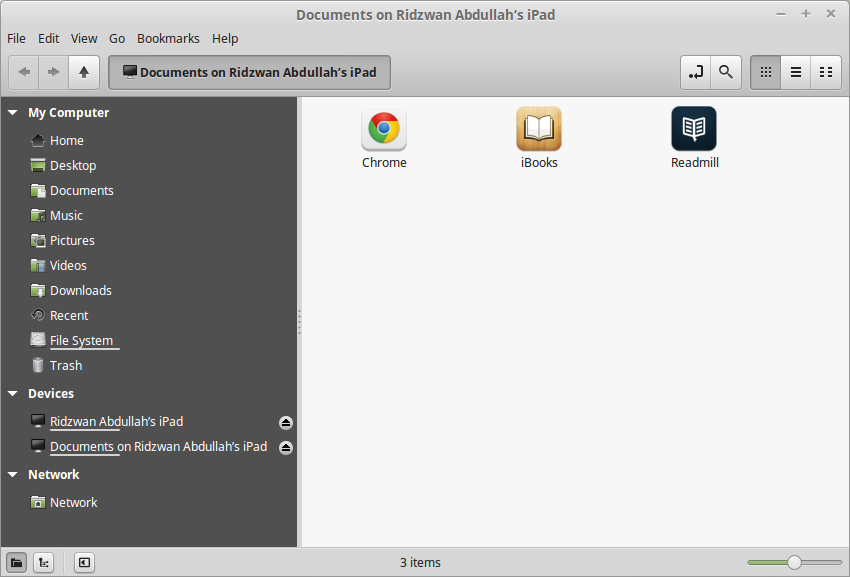
Clicking on the Documents on my iPad resulted in the display shown above. Double-clicking on the Readmill icon resulted in a Documents folder being displayed. Note that this folder on the iPad was created by the free Readmill book reader software, which was installed because it was not dependant on Apples Appstore. I could move ebook files back and forth between the PC and this folder without any problems. Files moved into this folder appeared in the book list and was treated just like another book.
The other two apps shown, Chrome and iBooks each had a Document folder, however, although I could move files from the PC to the iPad, they will not appear in any list. This was probably because the file moved was verboten - it was not purchased through the app store - so it was ignored.
There was another very strange thing that was observed while the iPad connected to the PC - it refuses to recognize any other USB device - for example a USB thumb drive, that was plugged into the PC. The only way to overcome this was to disconnect the iPad and perform a system reboot before connecting any other USB device - only then will the device work properly.
All in all, it was very disappointing that Apples iPad refuses to work with a Linux Mint 17.1 PC. The moral of this story is "Do not use any Apple device with a Linux Mint 17.1 PC" - I guess this is solely a job for my Apple Mac PC.
f) Connecting Android Smart Phones and Tablets Using Bluetooth
Any Bluetooth devices can be paired with an Linux Mint PC which have Bluetooth devices and services enabled. However, be aware that not all Bluetooth PC dongle will work with Linux Mint. The author had several dongle in his possession, ranging from old ones (which looks like a USB thumb drive) to the latest and very tiny dongle. After testing all the dongles, the author found out that only a few worked - and those were the newer models. So, if your dongle does not work with Linux Mint, try another one.
Before attempting to pair a Bluetooth device with a Linux Mint PC, plug in the dongle. Then check the notification area on the bottom right corner of the screen - you should see the Bluetooth icon there if your dongle works with Linux Mint (see figure below).

If the Bluetooth icon is clicked, you should see that Bluetooth services is enabled by default (see figure below).
You can now proceed to pair a Bluetooth device with Linux Mint. As an example, the Acer Iconia A500 tablet will be paired first. Of course, the tablet will need to have its Bluetooth sevices enabled first, then we need to pair the tablet with the PC. Perform the following steps:
- Touch "Settings" on the tablet home screen.
- Then enable Bluetooth by touching the switch to On.
- Then touch the Bluetooth item and in the right pane of the screen, make sure that the A500 device is visible by by touching the item. While the tablet is visible (a timeout timer will start on the tablet), the following steps need to be performed on the Linux Mint PC.
- Click on the Bluetooth icon in the panel of the Linux Mint PC.
- Click on the "Set up a New Device...".
- The Bluetooth New Device Setup screen (shown below) will appear with the words Searching for devices... on it. After a while (and if the visibilty of the tablet has not timed out), the item "A500" will be listed as shown. Select the device by clicking on it and then the "Continue" button.

- The next screen that will appear on the PC (shown below), will prompt you to enter the indicated PIN number on the tablet. At this time you will also be prompted on the tablet to enter the PIN number indicated on the PC screen.

- Enter the PIN number on the tablet, touch "OK" and the screen on Linux Mint will change to the one shown below - indicating success with the pairing. The PC name will also appear on the tablet as one of the paired devices.

Note that you can also rename the Linux Mint PC in the Bluetooth pane of the A500 tablet. To do do, just touch the settings icon (found to the right of the current PC name) and a Rename item will be displayed (see below). Touch the Rename item, then enter the new name.

In my case, I have renamed the PC from mint-0 to a more descriptive scully64-mint-17,1 (scully64 is the actual name of the PC). The final Bluetooth settings will look something like the figure below.

After the tablet has been paired with the PC, you can now easily exchange files between these two devices. To receive a file from the tablet, follow these steps:
- First we need to enable the ability to receive files over Bluetooth on the Linux Mint PC. This setting can be found in the Menu -> Preference -> Personal File Sharing (see below). In the Receive Files over Bluetooth section, enable Receive files in Downloads folder over Bluetooth and Notify about received files. Note that this setting only has to be done once. Click on the Close button when done.

- Next, use a file manager (for example, the ES File Manager) on the tablet to select the file to send to the PC. Then select the file, use the Share option, specify Bluetooth and the A500 as the recipient for the file.
- The file transfer will start. While the transfer is in progress, a blue icon will appear on the PCs notification area (see figure below). To monitor the progress on the tablet, touch the upload icon and the resulting display will tell you the percentage of the transfer that has been completed. Once the transfer has been completed, a notification will briefly appear on the screen of the PC.

To send a file over Bluetooth from the Linux Mint PC to the tablet, just follow these steps:
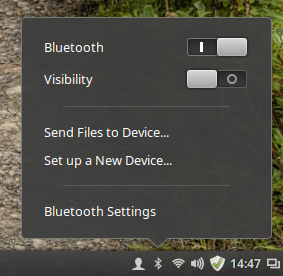
- First click on the Bluetooth icon the the PCs panel. The resulting display is as shown below.

- Then click on the Send Files to Device... item. The display will change as shown below.

- Browse to the file to send and click on the Select button. The display will change as shown below.

- Select the tablet A500 as the recipient of the file and click on the Send button. The display will change as shown below.

- You will be asked by the A500 tablet whether to accept the file from the PC - say Yes in this case.
- The display on the PC will change as shown below.

There may be occasions that you may want to unpair a device from the PC - for example, you have sold off the Android device. To remove (or unpair) a Bluetooth device (the tablet in this case) follow the steps below:
- On the tablet, touch "Settings" and enable Bluetooth (if it is off), then touch the "Bluetooth" item.
- On the screen that appears next, touch the option icon to the right of the PC name, then touch "Unpair". Then exit from here.
- On the PC, click on the Bluetooth icon in panel and select "Bluetooth Settings..."
- On the screen that appears next, select the device by clicking on it (see figure below) followed by a click on the "-" (minus) button below. You will be prompted to confirm the removal (see figure below) - click "Remove" to remove the device.


- The tablet will be removed (unpaired) - then close the settings window.
The process of pairing a smartphone with a Linux Mint PC is very similar to that of a tablet. The only difference is the screen display on the smartphone and where the menu items are located on the smartphone. The process can be summarized as follows:
- On the smartphone, enable Bluetooth services and make it visible.
- On the PC invoke set up a new device, let the PC discover the smartphone, enter the PIN on the smartphone, and it will be paired.
At this point, all the hardware that the author wish to connect to Rebecca has been taken care of. Of course, there are other hardware than can be connected to Rebecca but this article only describes the hardware in the authors possession that are connected to Rebecca.
This is the end of Part 2. In the third part, we will continue with tuning Rebecca. Stay tuned.
download file now
Tuesday, September 19, 2017
Ubuntu 10 04 Netbook Remix On An HP Mini 2140 Netbook Part 3
Ubuntu 10 04 Netbook Remix On An HP Mini 2140 Netbook Part 3
Now that I have Ubuntu Netbook Remix installed on my HP Mini 2140 netbook, I became aware of another thing about the HP that is different from my Lenovo S10-2 netbook, and that was the display size and clarity. At first I thought it was simply my imagination but after comparing the powered-up netbooks side by side, it became apparent that the display on the HP was very much sharper and was easier to read. It was also noticeable that the HPs screen was slightly smaller than the Lenovos - which was confirmed by the specification in the HP Mini 2140 Data Sheet. The HP has a 1024 x 576 pixels screen while the Lenovo has the normal (for a netbook, that is) 1024 x 600 pixels screen. Why this was so is not clear but the type of LCD panel used by HP resulted in the sharper and clearer display than the Lenovo - so I am not complaining :)
Another feature of the HP that differs from the Lenovo is the standard battery that came with the netbook. HP only supplies a 3-cell battery as standard while Lenovo supplies a 6-cell one. Obviously this has an impact on battery life under normal netbook usage. According to reports and reviews found on the web, the 3-cell battery on the HP was only good for about 2 hours under normal usage - compare this with an actual 4.5 hours which was actually obtained by me for the Lenovo. So, if I wanted to extend the battery life on the HP, I have to purchase the optional 6-cell battery. After making several inquiries, I discovered to my horror that such a battery cost around 25% of the actual cost of the netbook! Way to go HP! Is this your way of screwing your users? In retrospect, I should have expected this - after all, after working with HP for more than 20 years, I should know by now that HP stands for High Price.
Expect for the 6-cell battery price farce, I found several things to like about the HP Mini 2140 - which was a saving grace (else I would have just got rid of it). One, as I mentioned previously, was the sharp screen display. The other likable item was the keyboard - the keys were large and nice to use - unlike the somewhat soggy feel of the Lenovos keyboard. I also felt that the inclusion of the ExpressCard/54 slot as a nice feature to have - provided, of course, I can get actual ExpressCard/54 cards locally. As mentioned previously, I am looking for a 4-port USB ExpressCard/54 card in order to expand the number of available USB ports. More on this ExpressCard later.
Anyway, enough about the HP Mini - allow me to elaborate on my first impression of the new Ubuntu 10.04 Netbook Remix (UNR) OS. The first and most noticable impression is the new color scheme (or theme). The standard brown scheme found in the previous version (9.10) has been replaced with a purple, gray, and orange theme called Ambiance. Personally, I prefer the old scheme but I could live with the new one. Fortunately the background could be easily be changed to almost anything I wish and I do have some nice images to serve as the background. This was the first thing I did on the netbook - copy my favorite images to my home folder (Pictures subfolder) and changed the background to my liking.
The next (and somewhat irritating) thing I noticed about the new UNR is that, for some reason or another, the Canonical team decided to place the windows control (maximize, minimize and close) buttons on top left side of the windows - instead of the usual (and familiar) top right side. According to reviews found on the web, the decision was to copy the Mac OS layout. It was also evident from the various posts on various user forums that this was not a popular decision. Fortunately, there is a way to restore the placement of the button back to the normal position. The procedure can be found at this link (http://www.howtogeek.com/howto/13535/move-window-buttons-back-to-the-right-in-ubuntu-10.04/).
As the HP netbook is to be a mobile device, battery life must be preserved at all time - which means that the power management utility in the new UNR must work correctly. This was tested next - the result was not very encouraging - in fact, it was downright disappointing. On my other netbook (the Lenovo S10-2), power management worked flawlessly with the UNR 9.10. When I close the lid of the Lenovo netbook, the system went to sleep. At the predetermined time it went into hibernation. With this power management I was able to make the battery last for the duration I am on the road. On the HP, closing the lid did not do anything - the only way I could put the HP netbook to sleep was to do it manually by pressing the Fn+F1 key combination. Opening the lid after manually putting the HP netbook to sleep did not wake it up - again I had to manually wake it up using the on/off button. To my alarm, I noted that it did not prompt me for a password upon waking up (as it is supposed to) - it just restored the last screen. Plainly, the 10.04 UNRs power management utility did not work as it was supposed to do.
After doing a bit of research on the web, I discovered that there was indeed a unresolved bug concerning the HP 2140 and its lid closing detection on UNR 10.04. It seems to be unique to the HP - other netbook did not seem to be affected. At the moment, it cannot be determined as to when this issue will be resolved. This fact alone put a bit of a damper for my plans for the HP Mini 2140 and I need to re-think them for my sleep-deprived netbook.
More to come ... stay tuned.
download file now
Monday, September 18, 2017
Trying Out Ubuntu 10 04 On A Desktop PC Part One
Trying Out Ubuntu 10 04 On A Desktop PC Part One
As mentioned in several of my previous blogs, I use Ubuntu Netbook Remix exclusively on my netbooks (a Lenovo S10-2 and an HP Mini 2140). After playing around with the relatively new UNR 10.04 on the HP, I grew to like the OS - so much so that I decided to install it on a spare PC that I had around (which was mainly used for testing) and play around with it some more. The PC is built around an Asus M2N-E motherboard and the CPU I had installed is an AMD Athlon 64 X2 5200+. The amount of RAM on the motherboard is 8 GB of DDR2-800. Clearly the 64-bit flavor of Ubuntu 10.04 was the choice of OS here. To top up the hardware, I also installed a ATI HD 4670 video card, a 550W power supply and a 320GB SATA hard disk. The display was an Acer 23 inch wide screen LCD. With all the hardware pieces in place, I ventured into the world of 64-bit Linux computing. This blog and more will describe my journey in that world.
After downloading the ISO image of the DVD, I burned it to a disc and used it for the installation. The actual installation was painless - the only unusual item of note is that I partitioned the hard disk manually and used ext3 filesystem instead of the default ext4. I also used my normal (normal for me, that is) partitioning scheme - i.e., a small boot partition, the root partition, a swap partition and a home partition. The reason for using the ext3 filesystem was mentioned also in my previous blog - it enables me to backup or clone my hard disk using the Arconis Home 2010 software, which at the moment can only handle ext3 type filesystem.
The first boot-up went without any problem and after logging in, was presented with the purple-colored desktop. The first thing I did was to change the screen desktop background to a more pleasing one - right-clicking on the desktop and selecting Change Desktop Background, I was presented with several choices. I selected Maraetai before sunrise as my background - at least it does not hurt my eyes as much as the default! :)
The second thing I did was un-mute my sound system, which, for some reason or other, the Ubuntu team decided to initially start off muted. I also adjusted the volume level sliders to a reasonable value. Note that the Sound Preference dialog box that appears upon clicking it, do not have the option to test the sound levels - a shortcoming which I urge the Ubuntu team to fix.
The next (and somewhat irritating) thing I fixed is the placement of the windows control (maximize, minimize and close) buttons from the top left side of the windows to the usual (and familiar) top right side.
As with my previous installation of UNR 10.04 on my HP netbook, I was prompted to update my system and it also indicated that propriety drivers were available for my system. Putting aside the drivers for the time being, I updated the system via the Update Manager - which took a while since there was a fair amount of updates that needed to be applied. Once completed a re-boot was required - this was done and the system restarted - this time it was accompanied with the Ubuntu startup sound.
The Firefox Browser
The first software I tried out on the Ubuntu 10.04 was the default web browser that come with it - the Firefox. I started it and changed my home page to news.google.com.my and then checked the installed plugins by executing about:plugins via the address bar. All the necessary multimedia and java plugins were installed except Shockwave flash-player and pdf-reader plugins.
The Shockwave flash-player plugin package (named flashplugin-nonfree) can be installed using the Synaptic Package Manager but note that this is a 32-bit plugin - the 64-bit one is still in beta and was not included in the standard installation of Ubuntu 10.04. As it is a 32-bit package, there was a lot of dependencies for it - the major ones being nspluginwrapper and ia32-libs. These are required to make the 32-bit plugin work on 64-bit Ubuntu. A lot of work to get one plugin to work - I just wish Adobe would get the 64-bit one working as soon as possible. However, the plugin worked - I verified it by playing a YouTube movie (my favorite HQ movie of Sarah Brighman singing Harem). The command about:plugins also verified that the shockwave flash is indeed installed.
The pdf-reader plugin, on the other hand, is not such a simple package to install. First the lucid partner repository need to enabled - this is done by editing the /etc/apt/sources.list file (as root) and un-commenting the two lines for the lucid partner repository. Then the Synaptic Package Manager need to be restarted and the package database refreshed by clicking on the Reload button. Alternatively, the command sudo aptitude update can be run from a console. Then a search for acroread need to be done and once found that package need to be installed. Note that this will also install the free Adobe Acrobat Reader and if you choose so, make it the default pdf type file reader. Once the plugin (and reader) has been installed, the Firefox browser has to re-started. The command about:plugins has also to be executed to verify that the pdf plugin is indeed installed - which in my case, was. In order to test the plugin I used a web page containing a pdf test document and it verified that the installed plugin worked. However, for some strange reason, the Acrobat Reader was not listed in the Applications menu list. Loggin out and then back in solved this - Acrobat Reader 9 was now listed in Applications -> Office.
Next I installed some extra essential (to me!) plugins - Adblock Plus, Download Statusbar, Webmail Notifier and Yoono (a social neworking app to mintor my twitter and facebook account). Once these were installed I now have the Firefox browser that I can use productively. In fact, I use the same setup for my netbooks and my Windows 7 workstations. Later I get my bookmarks synchronized across all my computers. I wonder if there is an application that will allow me to do so.
Next, I will check out the multimedia capabilities of Ubuntu 10.04 ... stay tuned.
download file now
Thursday, September 14, 2017
Ubuntu Package Management Part 4 PPA Third Party Repository
Ubuntu Package Management Part 4 PPA Third Party Repository

Subscribe to UbuntuBuzz Telegram Channel https://telegram.me/ubuntubuzz to get article updates directly.
1) What Is Repository?
Read the previous part about Sources.list.
2) What Is Third-Party Repository?
Third-party repository is a term to mention �unofficial repository�. It means the software packages stored inside this repo are not available in the official repo; or the repo is created by any party outside the official Ubuntu Developer Team.
3) What Is PPA?
Personal Package Archive (PPA) is a kind of third-party repository to store software packages for Ubuntu users. PPA service is a part of Launchpad, thus a service of Canonical, the company behind Ubuntu. The main purpose of a PPA is to deliver software directly to the users without entering the official repository before. Every PPA has an addressand this address can be added to sources.list in your Ubuntu system. APT will read the address and install the software packages from PPA for you (so again, a PPA is just a repository). This term PPA for Ubuntu is more or less synonymous with AURfor Arch Linux or COPR for Fedora or SBO for Slackware. Read more about PPA in Launchpad Help https://help.launchpad.net/Packaging/PPA.
4) Do You Need PPA?
Yes, you will need PPA for many popular software applications that are not available in Ubuntu official repository. There are two possible reasons you need PPA: either it is software version, or software availability. First condition: sometimes certain software available in both PPA and official repo (with the PPA one�s are newer, so it�s software version); second condition: a lot of certain software available only in PPA and not in official repo (it�s software availability).
For example, there are PPA providing very latest version of Scribus, GIMP, Inkscape, Blender, Krita, MyPaint, FreeCAD, and so on. Many users install those software from PPA instead because the official repo versions are considerably old.
5) Maintain PPA Addresses
To maintain PPA addresses in an Ubuntu system, every Ubuntu user has two choices: using GUI and using console. You can use the GUI program named �Software & Updates� in your menu, or run the command $ software-properties-gtk . The rest of this article does not explain the GUI method, instead, it explains the console method.
Using GUI:

Using console:

4) Find A PPA
Look at Launchpad (https://launchpad.net) or search through search engines. The majority of PPA for Ubuntu are available in Launchpad. If you don�t have time searching, I have collected many PPA addresses for popular software applications for Ubuntu:
- http://www.ubuntubuzz.com/2016/11/list-of-ppa-repositories-for-ubuntu-16.04-xenial-xerus.html
- http://www.ubuntubuzz.com/2016/11/list-of-ppa-repositories-for-ubuntu-16.10-yakkety-yak.html
5) Add A PPA Address as Sources.list
Generally, to add a PPA address in Ubuntu system, you edit the sources.list. Then you should run apt-get update command. This apt-get update is needed in order to download the �repository map� of that PPA repository so APT can download packages from it. This article uses 2 PPAs as example, GIMP PPA and Inkscape PPA, to show how to add a PPA address. Both PPA provides software packages for Ubuntu 14.04, 16.04, until 16.10.
- GIMP PPA by Otto https://launchpad.net/~otto-kesselgulasch/+archive/ubuntu/gimp-edge
- Inkscape PPA by Inkscape Developers Team https://launchpad.net/~inkscape.dev/+archive/ubuntu/stable
6) Add PPA Manually
Edit /etc/apt/sources.list file manually by placing the PPA address correctly. I use Gedit text editor again to demonstrate it. See following steps:
For GIMP PPA:
- Visit the PPA web page address https://launchpad.net/~otto-kesselgulasch/+archive/ubuntu/gimp
- Look for �Technical details about this PPA� link, click that link, you must see a box appears showing two lines of sources.list.
- Click �Choose your Ubuntu version button� and select your Ubuntu version from there. This will change the two lines automatically to suit your selected Ubuntu version.
- Copy the two lines of source code there.
- $ sudo gedit /etc/apt/sources.list
- Paste the two lines you copied into a new blank line at the most bottom.
- Save the sources.list file.
- $ sudo apt-get update
For Inkscape PPA:
- Visit the PPA web page address https://launchpad.net/~inkscape.dev/+archive/ubuntu/stable.
- Do point 2 until 8 like the GIMP PPA above.
Screenshot:

7) Add PPA via Special Command
The most common and easiest way to add PPA address is using add-apt-repositorycommand line. This command will automatically add a special .list file to /etc/apt/sources.list.d/ directory for each PPA. In other words, this command doesn�t touch the main sources.list to add PPA. To demonstrate it, I show here the 2 examples again.
For GIMP PPA:
- Visit the PPA web page address https://launchpad.net/~otto-kesselgulasch/+archive/ubuntu/gimp-edge.
- Look for one address code �ppa:packager_name/ppa_name� and for this case it is ppa:otto-kesselgulasch/gimp-edge.
- Copy that PPA address code.
- $ sudo add-apt-repository ppa:otto-kesselgulasch/gimp-edge
- Terminal will ask for your permission. Press Enter to go next, or press Ctrl+C to cancel.
- $ sudo apt-get update
For Inkscape PPA:
- Visit the PPA web page address https://launchpad.net/~inkscape.dev/+archive/ubuntu/stable.
- Look for one address code �ppa:packager_name/ppa_name� and for this case it is ppa:inkscape.dev/stable.
- Do point 3 until 6 like GIMP PPA above.
Screenshot:

8) Install Software from PPA
This is the purpose of using a PPA repository. To install software package from PPA, simply run apt-get install command with the <package_name> of the software available in that PPA. Regarding the 2 examples mentioned, so the command lines are:
Synopsis:
$ sudo apt-get install <package_name>
GIMP from PPA:
$ sudo apt-get install gimp
Inkscape from PPA:
$ sudo apt-get install inkscape
9) Comparing Package Versions
Once you add a PPA address and obtain its �repository map�, you can see the both version of same software packages both in PPA and official repo. Use apt-cache command to do it like this.
Synopsis:
$ apt-cache policy <package_name>
GIMP versions:
$ apt-cache policy gimp
Inkscape version:
$ apt-cache policy inkscape
Output for GIMP:

Output for Inkscape:

Explanation:
- For GIMP: you see that there are two versions, version 2.9.5 from PPA and version 2.8.18 from official repo.
- For Inkscape: you see that there are two versions, version 0.92 from PPA and version 0.91 from official repo.
10) Remove PPA Address Automatically
This method is easier for beginner. To remove a PPA address (only the address, not the software) from your sources.list system, use add-apt-repositorycommand again. Remember that you need to run apt-get update once you change any sources.list setting. I show you for the 2 examples above.
For GIMP:
$ sudo add-apt-repository --remove ppa:otto-kesselgulasch/gimp
$ sudo apt-get update
For Inkscape:
$ sudo add-apt-repository --remove ppa:inkscape.dev/stable
$ sudo apt-get update
Explanation:
The command above will delete the PPA address. However, that command does not delete its *.list file. You may check /etc/apt/sources.list.d/ directory for the file.
11) Remove PPA Address Manually
This method is needed when you experience some trouble. To remove PPA address manually, if you added it manually too, then you just need to delete its lines in sources.list. But to remove PPA address manually if you added it automatically (via add-apt-repository), then you should know the files and delete them manually.
Method 1:
- $ sudo gedit /etc/apt/sources.list
- Look for your PPA address line there, such as gimp-edge or inkscape-stable.
- Delete that lines.
- Save sources.list file.
- $ sudo apt-get update
Method 2:
- Look at /etc/apt/sources.list.d/ directory.
- Look for any .list file named with your PPA address name, such as gimp-edge or inkscape-stable.
- Assume the PPA address file name is �gimp-edge.list� then the delete command is:
- $ sudo rm /etc/apt/sources.list.d/gimp-edge.list*
- Then perform a reload:
- $ sudo apt-get update
11) Remove Software Packages from PPA
To remove software package installed from PPA, use apt-get remove normally. There are 2 examples:
For GIMP:
$ sudo apt-get remove gimp
For Inkscape:
$ sudo apt-get remove inskcape
Note:
Remember that deleting the package is not the same as deleting the PPA address. After removing the package, if you install the same package again next time, your system will choose the PPA version not the official repository version. For that reason, you may delete the PPA address either so next time APT will install package from official repository.
Additional Information
Once you use Ubuntu you use free software and live in free software community. One of the meaning of being free is everyone in whole community has the right to distribute software. So it means there are still many third-party repositories available for Ubuntu outside Launchpad. One of the biggest of them is openSUSE OpenBuildService https://build.opensuse.org.
References
- http://askubuntu.com/questions/4983/what-are-ppas-and-how-do-i-use-them
- http://askubuntu.com/questions/307/how-can-ppas-be-removed
- http://unix.stackexchange.com/questions/6766/is-there-is-a-ppa-service-equivalent-in-the-fedora-world
download file now
Ubuntu 10 04 Netbook Remix On An HP Mini 2140 Netbook Part One
Ubuntu 10 04 Netbook Remix On An HP Mini 2140 Netbook Part One
It was 5 months ago when Canonical announced the release of the Ubuntu 10.04 (codenamed Lucid Lynx) Linux OS - which also carried the LTS (Long Term Support) moniker. The Netbook Remix version was also released at the same time. At that time I was using the 9.10 Netbook Remix version (Karmic Kaola) on my Lenovo S10-2 Ideapad netbook and was very satisfied with it. Needless to say, I was tempted to upgrade to the 10.04 version - however, from experience, I decided to hold off for a few months until all the bugs have been ironed out from the OS.
Recently, I obtained a Hewlett-Packard Mini 2140 - a netbook similar to the Lenovo S10-2. My sister had purchased it because it was relatively cheap but was very disappointed with its small sized screen. After using it for a short while, she gave up and offered it to me. I now own 2 netbooks - one already running the Ubuntu 9.10 (the Lenovo) and the other running Windows XP (the HP). This situation presented me the opportunity to try out the Ubuntu 10.04 Netbook Remix OS on the HP Mini.
The HP Mini 2140 is an Intel Atom based netbook and it uses a 1.6 Ghz N270 CPU. It also use the Intel 945GSE chipset with the GMA950 mobile graphics. For wireless connectivity, it utilize the Broadcom chipset. As you can see, these specifications are the same as for the Lenovo S10-2 with one major exception. The exception is the number of USB ports - only 2 is present on the HP while the Lenovo has 3. The space that would be required for the extra USB port on the HP is occupied by an ExpressCard/54 slot (with an SD cardslot immediately below it). Note that the Lenovo does not have an ExpressCard slot. It looks as if a USB hub is a must for the HP - or if a 54mm wide ExpressCard card with 4 USB ports is available, it would meet the need for extra USB ports.
In order to try out Ubuntu 10.04 Netbook Remix on the HP Mini 2140, I purchased a brand new WD Scorpio Blue 500GB hard disk to replace the existing disk (which I carefully stored it just in case I need to use Windows XP again) in the HP netbook. I also replaced the 1GB memory stick in the HP with a 2GB stick. I also discovered that I simply could not locate a 54mm wide ExpressCard card with 4 USB ports anywhere here in Malaysia - only a 34mm wide version is available. Anyway I had a spare 4-port USB hub for use during the trial if needed. Thus armed with all the items mentioned, I then proceeded to download the ISO image of the Netbook Remix from the Ubuntu web site and a CDROM was created using Brasero (a CDROM burning software) on the Lenovo with an external CD burner attached. Instructions was also available on the download web site on how to create a USB drive for installing UNR from it. Just in case something happens to the external CDROM drive for the netbook, I also created the install USB drive.
I then proceeded to install the Ubuntu 10.04 Netbook Remix on the HP Mini 2140 netbook. Happily, it was a success. The installation will be described in the next part of this blog ... stay tuned.
download file now
Tuesday, September 12, 2017
Ubuntu 10 04 Netbook Remix On An HP Mini 2140 Netbook Part 4
Ubuntu 10 04 Netbook Remix On An HP Mini 2140 Netbook Part 4
As mentioned in my previous blog, I mentioned that I was disappointed with the inability of the HP Mini 2140 to enter sleep mode when the lid was closed and also mentioned that there was indeed a unresolved bug (#376793) concerning the HP 2140 and its lid closing detection on UNR 10.04. Intrigued, I decided to test whether this inability affected the previous UNR (version 9.10 codenamed Karmic Kaola). So out went the hard disk from the netbook and in its place I installed a spare blank hard disk that I had kept for such a test.
After installing the UNR 9.10, I updated the OS with the latest updates (after going through the process in getting the Broadcom wireless working as outlined in my older blogs) and then started testing the power management features. I found out that they worked perfectly! The netbook went to sleep when I closed the lid - unlike UNR 10.04. Clearly there was a problem in UNR 10.04 and NOT with the HP netbook.
The question now remains - shall I wipe out UNR 10.04 from the removed hard disk and use UNR 9.10, or continue using the already installed UNR 10.04 but always have to remember to put the netbook to sleep manually? There was one big advantage of using UNR 10.04 - it has Long Term Support (3 years support for the desktop). Battery conservation is a big issue here - if I forget to put the netbook to sleep manually, then there will be problems relating to inability to use the netbook in a remote site. Decisions, decisions, .....
More to come ... stay tuned.
download file now
Saturday, September 9, 2017
Thursday, August 31, 2017
TrueOS Lumina Desktop Environment user experience overview Part 1
TrueOS Lumina Desktop Environment user experience overview Part 1
Your enjoyment of TrueOS and the default Lumina desktop environment is largely dependent on your experience with FreeBSD, and your tolerance for different work environments. Windows and macOS users will find the experience jarring especially when it comes to performing tasks they are accustomed to doing in a certain way. Even Linux users might find TrueOS uncomfortable, though veteran Linux users who had used early Mandriva, Knoppix, and Debian releases will be more open-minded.

If you stick to the command line interface, you will notice differences between TrueOS with Lumina and FreeBSD 11. If you work primarily on the desktop, then Lumina has a few traits similar to Enlightenment (E17) or a standalone IceWM install.

Aesthetics and customization
Users who like making minute changes to their desktop environment will definitely start work on changing Luminas appearance. Even serious users who dont generally change icon and window defaults will probably end up making changes. As always, its a matter of taste and preference.

For the most part, the desktop settings can easily be changed directly, but you can go one step further by editing the text configuration files using the Theme Editor.
Performance and graphics
The default Lumina desktop environment has a low overhead, but on my Zotac ZBOX Nano with an Intel Celeron, Intel HD chip, and 8 GB of RAM, there were brief pixel artifacts and shadowing when I dragged windows and applications. Moreover, observant users will probably notice a brief lag when performing tasks - its hard to tell whether its due more to FreeBSD or TrueOS Lumina.
Note: I run FreeBSD 11 with either Xfce or MATE on modest hardware and work mostly on the terminal for tasks, so performance is hard to assess and making comparisons would be inaccurate. Linux distributions on the same hardware, however, shrug off all tasks I perform daily with no impact on desktop user experience.

According to the System Monitor Lumina Plugin, basic tasks such as running Firefox, Chromium, and file managers never really pushes TrueOS. Basic photo editing, taking screen captures, and transferring files to my NAS only trigger a slight bump, though playback of media using VLC registered a considerable amount of resources.

Continued in TrueOS + Lumina Desktop Environment User Experience Part 2
download file now
Wednesday, August 30, 2017
Sunday, August 27, 2017
Ubuntu Logitech diNovo Edge Bluetooth Wireless Keyboard Part 2
Ubuntu Logitech diNovo Edge Bluetooth Wireless Keyboard Part 2
I reported on problems with Ubuntu Logitech diNovo Edge Bluetooth Wireless Keyboard, and now in Ubuntu 11.10 Oneiric and Ubuntu 12.04 Precise the problem resurfaces each time you do a fresh install or Distribution Upgrade. But the solution is slightly different than before.
Update: The problem appears in Ubuntu/Kubuntu 12.04 Precise also, but the solution is the same.
This solution is using for the Logitech diNovo Edge in Ubuntu/Kubuntu. Symptoms are the bluetooth-device-manager kept prompting me to connect to the device but nothing I did ever worked.
Here is the solution / fix for getting the keyword to work. The source for this information is here.
The problem is in the udev rules. In 11.04 there was a special line in /lib/udev/rules.d/70-hid2hci.rules for Logitech devices that started with KERNEL=="hidraw*".
These seem to be missing in default configurations. This fix adds this line into another file instead which makes things work.
Edit the file: /lib/udev/rules.d/##-bluez-hid2hci.rules (where the ## is the number on your system. Just search for the keywords bluez-hid2hci.rules in the /lib/udev/rules.d/ directory. For example, on my system in Ubuntu 11.10 it was number 62 and on Ubuntu 12.04 is was 97.)
download file now
Tuesday, August 22, 2017
Sunday, August 20, 2017
Trying Out Ubuntu 10 04 On A Desktop PC Part One Addendum
Trying Out Ubuntu 10 04 On A Desktop PC Part One Addendum
In my previous blog, I mentioned installing some extra add-ons. What I forgot to mention was that I had problem initially while trying to install ANY add-ons - an error #228 occurs eveytime. After researching the web, I found that this was a common problem with 64-bit Ubuntu and it had to do something with IPv6 support in Firefox. This has to be disabled before add-ons can be successfully installed.
Following the instruction, I executed about:config in Firefox and then clicked "Ill be careful" button on the warning that appeared. I then typed ipv6 in the filter box to get to the one and only line thats needed - that line will say network.dns.disableipv6. The default value is "false". I then double-clicked it to set the value to "true" (to disable IPv6). Once this was done and Firefox restarted, I could install the add-ons without any problems. Note that if you do require IPv6 support in Firefox you need to reverse the process.
download file now
Friday, August 18, 2017
Ubuntu 10 04 Netbook Remix On An HP Mini 2140 Netbook Part Two
Ubuntu 10 04 Netbook Remix On An HP Mini 2140 Netbook Part Two
For the actual install, I used an external CDROM drive attached to the HP netbook. For internet connection, I use a Ethernet LAN cable to the netbook.
1) Placing the install CDROM in the external CDROM drive attached to the HP Mini, I powered it up and pressed the F9 key to access the boot menu. The USB CDROM drive was selected as the boot drive by pressing the Enter key after which the netbook proceeded to boot the OS. After a while an Install dialog box appeared giving choices of languages and 2 other options. The first is to try out Ubuntu 10.04 without making any changes to the HP and the other is to install Ubuntu 10.04 to the HP without trying it first. Note that:
(a) it is possible to install the OS later to the HP even if you select the first option (i.e., try out the OS) by selecting Install Ubuntu-Netbook 10.04 on the Favorites screen that appears first after starting.
(b) it is also possible to create a USB stick containing the same Netbook Remix image as the CD by using the Startup Disk Creator present in the Ubuntu 10.04 System screen. Note that the 7-steps install process itself is similar in both cases.
2) After making sure that the correct language was used, I then selected the correct location, keyboard layout, and then came the important disk space preparation. Note that the easiest way is to accept the default - i.e., Erase and use the entire disk. However, this would create partitions using the ext4 filesystem - the default filesystem used by Ubuntu 10.04. The problem with using this relatively new filesystem is that most popular disk cloning and backup system do not support ext4 yet. I found this out the hard way when I tried to clone and backup a Kubuntu 10.04 based system using my favorite cloning software - Arconis Home 2010. This software will simply fail to process an ext4 based hard disk. In order to avoid this I decided to partition my hard disk manually by selecting Specify partitions manually (advanced) and use the ext3 filesystem for the partitions. (If you do not plan to clone your hard disk or do not want to tinker with the manual method, then I suggest using the default method.) I will skip the details of actually making the partitions - it is only sufficient to say that I created 4 primary partitions for boot, root, swap and home. When the partitions have been specified, I then entered my user information, password and netbook name in the next step. Note that the Log in automatically option is selected by default - for security reason I changed this to Require password to log in instead. The actual install process began after clicking on the Install button on the next screen that appeared and the whole process took a while to complete.
3) When the install process was completed, a notice appeared on the screen saying so, and also notified that a restart was required. Upon pressing the Restart Now button, the netbook re-booted into the newly-installed Ubuntu 10.04 Netbook Remix OS - after logging in, of course. One noticeable difference from the previous release 9.10, is that there was no startup sound - it has to be enabled by clicking on the speaker icon on the top right panel and selecting Sound Preference. On the dialog box that appeared, I selected Ubuntu in the Sound theme drop list box after which the startup sound was heard.
4) After a while at the desktop (2 or 3 minutes), two things happened. The first is that a flashing folder icon appeared next to the Ubuntu icon at the top left-hand side of the screen. This was the Update Manager telling me that there are updates available for the OS. The second thing was that a message appeared saying that restricted drivers is available and a new icon (which looks like a plug-in PCI card for a PC) appeared next to the mail envelope icon. This was the Hardware Drivers telling me that there are restricted drivers available for me to use - in fact, this is the driver for the Broadcom wireless chipset. For the moment I ignored the Hardware Drivers notification - instead the OS was updated using the Update Manager (via the Ethernet (LAN) internet access). As of September 2010, there were 272 updates to be installed - so this process took some time to complete. The kernel was also updated, so a reboot was required as soon as all updates were installed - which I did.
5) In the previous version of Ubuntu (9.10), the installation of the restricted driver for the Broadcom wireless chipset caused problems for my Lenovo netbook. This has been fixed in this version. The restricted drivers was installed by selecting System -> Hardware Drivers from the menu. The netbook started to search for available hardware driver and when found displayed the results - which turns out to be 2 type of drivers for the Broadcom wireless chipset. I selected the Broadcom STA wireless driver and then clicked on the Activate button. After entering my password, the drivers was downloaded and installed, after which a message appeared saying I need to reboot in order to activate the drivers. The Hardware Drivers window was closed and the netbook restarted. Once restarted and upon clicking on the network icon on the top panel, I saw a list of accessible wireless access points within range - I clicked on the one I wish to connect to, entered a password and I was connected to the internet wirelessly! No fuss - no freeze as in version 9.10! At this point I also disconnected the LAN connection.
All in all, installation was painless - kudos to the Ubuntu team for making it right this time - especially the restricted Broadcom wireless drivers. Of course, it would have been nicer if the wireless had been detected and the drivers installed automatically but this would be asking too much from Canonical.
More to follow ... stay tuned.
download file now
Wednesday, August 16, 2017
TrueOS Lumina Desktop Environment user experience overview Part 2
TrueOS Lumina Desktop Environment user experience overview Part 2
Continued from TrueOS + Lumina Desktop Environment User Experience Part 1
Insight File Manager and available file managers
Insight File Manager is clearly designed for FreeBSD. Unlike a stock install of FreeBSD 10/11, TrueOS is set up to detect mounted locations automatically, and users can go ahead and launch Insight for file management tasks.Users coming from Linux accustomed to file managers that come with KDE, Gnome, and Cinnamon can install ports of PCMANFM, Thunar, Dolphin, Caja, and Nautilus. However, note that functionality is slightly different. PCMANFM, for example, doesnt have the same reliability and features in TrueOS Lumina as it does on a Linux system. For Windows shares, the TrueOS handbook only lists Dolphin, Nautilus, and Thunar. Surprisingly, Insight File Manager cant access network shares, so if youre on a mixed network environment youll have to install one of the recommended file managers or stick to the command line.

There were a few hiccups when accessing my WD My Cloud on TrueOS. I was a bit surprised that I could write to the folders on my My Cloud even without authentication. After mounting the SMB shares, moving, copying, and deleting files worked fine, but the preinstalled VLC stuttered and struggled a bit when playing back media. Scrubbing through an episode of MacGyver (1985) or Spider-Man (1967) was as not as smooth as I would like. Again, I wasnt sure if this was due to the VLC port, the hardware, or FreeBSD itself.
Productivity, multimedia, and general user experience
As with E17, you can right-click anywhere and access the main applications menu at any time. The Desktop Plugins included with Lumina are few but useful, and thankfully not as numerous or as processor-intensive as KDEs widgets. For users who prefer background music while working, the Audio Player desktop plugin is clean and simple. The Note Pad and System Dashboard desktop plugins also deserve mention.
If youre new to FreeBSD or coming from Linux distributions, then remember that you dont have to use the preinstalled applications and install a more familiar port. Shutter, Shotwell, Chromium, and all the usual suspects are available from TrueOS AppCafe.
The standalone Lumina Screenshot is more than enough if you only occasionally take screen captures. Captures can be edited immediately using Photonic.
TrueOS includes VLC, which arguably pretty much addresses most multimedia issues.

Issues
After a few weeks of use, TrueOS with Lumina started showing signs of usability problems. Initially, I was looking forward to ironing out and writing about desktop issues here at Unsolicited But Offered. However, after several instances regarding software updates and software management using AppCafe, TrueOS became unusable, and frustrating considering that my stock FreeBSD 11 install had no problems.
I was hesitant about recording the issues, considering that they were unique to Lumina, and may not occur with other users. Im fully aware of FreeBSDs reputation for stability, but my TrueOS install was clearly more unstable than even a poorly built Linux distribution. Eventually, I gave up on it, focusing instead on FreeBSD 11 with stock Xfce.

For users who plan to try out TrueOS, be prepared for sound, mixer, graphics, and update and software management issues. Booting and file sharing should have no problems. I briefly experienced issues with Wi-Fi and Ethernet with Wi-Fi oddly working and Ethernet failing, but the issues were easily addressed, (albeit not as intuitively) using the Lumina Network Manager.

In addition, additional steps are required for mounting smartphones and tablets using the GUI Mount Tray. Users coming from FreeBSD 11 should take note that TrueOS behaves differently, particularly when it comes to software management and configuration.
download file now
Wednesday, August 2, 2017
Ubuntu Package Management Part 2 Basic Apt Get Commands
Ubuntu Package Management Part 2 Basic Apt Get Commands

This beginners guide for Part 2 explains Apt-get commands with examples for Ubuntu package management. This including some required explanations (about package, how apt works, and apt "database") and screenshots for 10 examples. This guide also includes add-apt-repository command, despite its not part of APT, its mentioned here to ensure beginner users happy with PPA and third-party repositories. This guide is a continuation of the Part 1 Dpkg Commands. I hope everyone can take advantage from this article. Enjoy.
Subscribe to UbuntuBuzz Telegram Channel https://telegram.me/ubuntubuzz to get article updates directly.
Package
In Ubuntu operating system platform, software is �distributed� by Ubuntu developer to all the users. Ubuntu already distributes approximately 80.000 software in the 16.10 version at 2016. Each software is distributed as certain file called �package�. The user installs software in their Ubuntu system also in form of �package�. So in other words working with Ubuntu is working with software packages.
Ubuntu distribution gives two types of package to the users, source code package and binary package. Source package is a file with .tar.gz format while binary package is a file with .deb format. Ubuntu developer puts large efforts to transform all source packages into binary packages so every users can just install the .deb instantly and run the software in their computer. All software packages of Ubuntu distribution stored at some public server named "repository". Every Ubuntu user installs software from this so-called repository.
How APT Works
APT is a complex system composed of apt-get and many other programs. But from end-user point of view, the main concept is simple, this APT system is simply a client of Ubuntu repository server. In other words, APT is a local program in your Ubuntu system to communicate with the Ubuntu repository server. In particular, apt-get is the download manager of APT system to download package from repository.
In technical sense, APT�s main purpose is to resolve dependency, and that�s why people calls APT dependency resolver. APT works by reading Ubuntu internal databases to determine what packages installed and what packages not installed, then doing a calculation resulting complete list of packages need to be installed, and then the apt-get downloads those packages from repository through the network. The final job is actually done by Dpkg to install packages one by one. APT does not install package, APT is just dependency resolver. By downloading, APT stores all packages downloaded at /var/cache/apt/archives/ directory.
In order to work with repository, of course, APT needs the address of the repository itself. This requirement is fulfilled by sources.list settings. The sources.list is actually a text file containing URL addresses of repository and some �codes� to determine what �room� of repository enabled/disabled. The settings is located in /etc/apt/sources.list file. APT system gives more options by providing /etc/apt/sources.list.d/ directory if the user wants to use third-party repository.
Important Database
APT works with its own �database� in your Ubuntu system located at /var/lib/apt/lists/. APT database is basically a bunch of text files storing complete information information such as name, URL, size, dependencies, description, etc. of every single of thousand packages from the repository. To make APT works, first the user must invokes APT to download the �map� from repository (I call it here: reload). Once this "map" completeley obtained, then the user can perform search for any package they want and ask APT to install any package. Without this "map" APT will not work.
1. Reload
Command synopsis:
$ sudo apt-get update
Example:
$ sudo apt-get update
Output:

Explanation:
The update command downloads "repository map". Repository map is database files containing complete information about the repository and all packages inside it. All database files downloaded stored at /var/lib/apt/lists/ as .list files and you can read them using any text editor. Whenever you change your sources.list settings, you should run this update command once. Without this �map�, APT can not download any package. This requires internet connection.
Note: I use the term "Reload" here to avoid confusion between "update" and "upgrade" terms, to make it clear that apt-get update does not install any package. Also, the term "Reload" is used in popular Synaptic Package Manager to express the same thing.
2. Install
Command synopsis:
$ sudo apt-get install <package_name>
Example:
$ sudo apt-get install flowblade
Output:

Explanation:
The install command installs a software from repository. You will be asked firstly for password, type it anyway and press Enter; then you will be asked secondly for permission, type �y� letter anyway and press Enter. The APT will download all packages needed and the software will be installed in your system. Do not close the terminal while the installation progress is still going. Therefore, this requires internet connection.
3. Remove
Command synopsis:
$ sudo apt-get remove <package_name>
Example:
$ sudo apt-get remove firefox
Output:

Explanation:
The remove command uninstalls software from your system. The remove command uninstalls only a single package, it does not uninstalls the package dependencies came with it. After performing this command, you can no longer run the software you removed. This does not require internet connection.
4. Upgrade
Command synopsis:
$ sudo apt-get upgrade
Example:
$ sudo apt-get upgrade
Output:

Explanation:
The upgrade command downloads and installs all new version of all packages installed in your system. This command depends on your sources.list settings, so APT can find new version of packages only if the repository you used does provide them. Remember that upgrade is completely different to update: upgrade installs packages while update does not install any.
5. Dist-Upgrade
Command synopsis:
$ sudo apt-get dist-upgrade
Example:
$ sudo apt-get dist-upgrade
Output:

Explanation:
The dist-upgrade command is a companion of upgrade command, it helps the upgrade command with a �smart conflict resolution�. To give you the difference between both commands: upgrade does not delete any package, while dist-upgrade may delete packages in order to resolve conflicts. This dist-upgrade is usually performed by the user once upgrade command finished. The dist-upgrade command does only packages upgrade, not system version upgrade, so using it will never upgrade Ubuntu 16.04 into 16.10 for example.
6. Download Only
Command synopsis:
$ sudo apt-get download <package_name>
Example:
$ sudo apt-get download gparted
Output:

Explanation:
The download command downloads package. This shows that apt-get is basically a download manager. This command will not install the package. The package will be downloaded to the same directory as your command line running. For example, when you perform this command without changing directory, then by default the package stored at your $HOME.
7. Simulate
Command synopsis:
$ sudo apt-get --simulate install <package_name>
$ sudo apt-get --simulate upgrade
$ sudo apt-get �simulate dist-upgrade
Example:
$ sudo apt-get --simulate install gparted
Output:

Explanation:
This option --simulate is available for apt-get commands to simulate (dry run) the package management being processed. This option is usable in the install, remove, upgrade, and dist-upgrade commands. The �simulate is extremely useful to prevent any error before installing/upgrading, because it shows the installing/upgrading process without doing the real installing/upgrading. So you will know if installing certain package there will be an error or not by this --simulate. It can be used when offline.
8. Add Repository
Command synopsis:
$ sudo add-apt-repository
Example
$ sudo add-apt-repository deb http://kambing.ui.ac.id/ubuntu yakkety main universe
$ sudo add-apt-repository �ppa:gimp/gimp-stable�
Output:

Explanation:
This add-apt-repository command is not a part of APT, rather, it is a part of software-properties-common package in Ubuntu. This command is a helper to add new repository address to sources.list easily. This command is very common among majority of Ubuntu desktop users, to add new PPA repository (third party repository) to the system so they can install the software available in that repository. To use it, run it as example, and then read the message retrieved, and then press Enter to continue adding the repository address, and after adding you should do Reload to get "the map" of the new repository. This command should be used online.
Note: the reason I put add-apt-repository is because this command is very famous among PPA users and almost all Ubuntu desktop users use PPA. So for your convenience, I put it here.
9. Print Uris
Command synopsis:
$ sudo apt-get --print-uris install <package_name>
Example:
$ sudo apt-get --print-uris install gparted
Output:

Explanation:
This option --print-uris shows all download links of a software package installation. So for example if a gparted installation needs two packages to be downloaded, it shows the two download links of two packages. If you download the two packages manually somewhere and install them by Dpkg, you may install gparted software correctly in an offline Ubuntu system. Yes, this option --print-uris is extremely useful for offline users. This option �print-uris can be used when offline, because APT generates all download links from its �repository map� (local database /var/lib/apt/lists/ and its sources.list). Again, apt-get is basically a download manager so it certainly knows all package download links. This does not require any internet connection.
10. Always Yes
Command synopsis:
$ sudo apt-get install --yes <package_name>
Example:
$ sudo apt-get install --yes gparted
$ sudo apt-get remove --yes gparted
$ sudo apt-get upgrade --yes
$ sudo apt-get dist-upgrade --yes
Output:

Explanation:
This option --yes makes the user may leave safely the Terminal while APT is processing. The meaning of --yes here is to answer �y� automatically to APT for all questions possible while doing install/remove/upgrade/dist-upgrade. So, by using this you do not need to answer any further question one by one while doing package management.
download file now
Subscribe to:
Posts (Atom)
Change this line:
to
I have made the changed sections BOLD. Save the changes to the file. I also turned bluetooth off from the icon in the system tray.
After making this change, I turned on my wireless keyboard, unplugged its bluetooth dongle, plugged it back in, paired the keyword with the dongle, and a few seconds later it worked. I did not even have to reboot.
IF YOU NEED HELP EDITING CONFIGURATION FILES UNDER LINUX, please see this link: http://awesomelinux.blogspot.com/2010/09/how-to-edit-configuration-file.html