Showing posts with label management. Show all posts
Showing posts with label management. Show all posts
Thursday, September 14, 2017
Ubuntu Package Management Part 4 PPA Third Party Repository
Ubuntu Package Management Part 4 PPA Third Party Repository

Subscribe to UbuntuBuzz Telegram Channel https://telegram.me/ubuntubuzz to get article updates directly.
1) What Is Repository?
Read the previous part about Sources.list.
2) What Is Third-Party Repository?
Third-party repository is a term to mention �unofficial repository�. It means the software packages stored inside this repo are not available in the official repo; or the repo is created by any party outside the official Ubuntu Developer Team.
3) What Is PPA?
Personal Package Archive (PPA) is a kind of third-party repository to store software packages for Ubuntu users. PPA service is a part of Launchpad, thus a service of Canonical, the company behind Ubuntu. The main purpose of a PPA is to deliver software directly to the users without entering the official repository before. Every PPA has an addressand this address can be added to sources.list in your Ubuntu system. APT will read the address and install the software packages from PPA for you (so again, a PPA is just a repository). This term PPA for Ubuntu is more or less synonymous with AURfor Arch Linux or COPR for Fedora or SBO for Slackware. Read more about PPA in Launchpad Help https://help.launchpad.net/Packaging/PPA.
4) Do You Need PPA?
Yes, you will need PPA for many popular software applications that are not available in Ubuntu official repository. There are two possible reasons you need PPA: either it is software version, or software availability. First condition: sometimes certain software available in both PPA and official repo (with the PPA one�s are newer, so it�s software version); second condition: a lot of certain software available only in PPA and not in official repo (it�s software availability).
For example, there are PPA providing very latest version of Scribus, GIMP, Inkscape, Blender, Krita, MyPaint, FreeCAD, and so on. Many users install those software from PPA instead because the official repo versions are considerably old.
5) Maintain PPA Addresses
To maintain PPA addresses in an Ubuntu system, every Ubuntu user has two choices: using GUI and using console. You can use the GUI program named �Software & Updates� in your menu, or run the command $ software-properties-gtk . The rest of this article does not explain the GUI method, instead, it explains the console method.
Using GUI:

Using console:

4) Find A PPA
Look at Launchpad (https://launchpad.net) or search through search engines. The majority of PPA for Ubuntu are available in Launchpad. If you don�t have time searching, I have collected many PPA addresses for popular software applications for Ubuntu:
- http://www.ubuntubuzz.com/2016/11/list-of-ppa-repositories-for-ubuntu-16.04-xenial-xerus.html
- http://www.ubuntubuzz.com/2016/11/list-of-ppa-repositories-for-ubuntu-16.10-yakkety-yak.html
5) Add A PPA Address as Sources.list
Generally, to add a PPA address in Ubuntu system, you edit the sources.list. Then you should run apt-get update command. This apt-get update is needed in order to download the �repository map� of that PPA repository so APT can download packages from it. This article uses 2 PPAs as example, GIMP PPA and Inkscape PPA, to show how to add a PPA address. Both PPA provides software packages for Ubuntu 14.04, 16.04, until 16.10.
- GIMP PPA by Otto https://launchpad.net/~otto-kesselgulasch/+archive/ubuntu/gimp-edge
- Inkscape PPA by Inkscape Developers Team https://launchpad.net/~inkscape.dev/+archive/ubuntu/stable
6) Add PPA Manually
Edit /etc/apt/sources.list file manually by placing the PPA address correctly. I use Gedit text editor again to demonstrate it. See following steps:
For GIMP PPA:
- Visit the PPA web page address https://launchpad.net/~otto-kesselgulasch/+archive/ubuntu/gimp
- Look for �Technical details about this PPA� link, click that link, you must see a box appears showing two lines of sources.list.
- Click �Choose your Ubuntu version button� and select your Ubuntu version from there. This will change the two lines automatically to suit your selected Ubuntu version.
- Copy the two lines of source code there.
- $ sudo gedit /etc/apt/sources.list
- Paste the two lines you copied into a new blank line at the most bottom.
- Save the sources.list file.
- $ sudo apt-get update
For Inkscape PPA:
- Visit the PPA web page address https://launchpad.net/~inkscape.dev/+archive/ubuntu/stable.
- Do point 2 until 8 like the GIMP PPA above.
Screenshot:

7) Add PPA via Special Command
The most common and easiest way to add PPA address is using add-apt-repositorycommand line. This command will automatically add a special .list file to /etc/apt/sources.list.d/ directory for each PPA. In other words, this command doesn�t touch the main sources.list to add PPA. To demonstrate it, I show here the 2 examples again.
For GIMP PPA:
- Visit the PPA web page address https://launchpad.net/~otto-kesselgulasch/+archive/ubuntu/gimp-edge.
- Look for one address code �ppa:packager_name/ppa_name� and for this case it is ppa:otto-kesselgulasch/gimp-edge.
- Copy that PPA address code.
- $ sudo add-apt-repository ppa:otto-kesselgulasch/gimp-edge
- Terminal will ask for your permission. Press Enter to go next, or press Ctrl+C to cancel.
- $ sudo apt-get update
For Inkscape PPA:
- Visit the PPA web page address https://launchpad.net/~inkscape.dev/+archive/ubuntu/stable.
- Look for one address code �ppa:packager_name/ppa_name� and for this case it is ppa:inkscape.dev/stable.
- Do point 3 until 6 like GIMP PPA above.
Screenshot:

8) Install Software from PPA
This is the purpose of using a PPA repository. To install software package from PPA, simply run apt-get install command with the <package_name> of the software available in that PPA. Regarding the 2 examples mentioned, so the command lines are:
Synopsis:
$ sudo apt-get install <package_name>
GIMP from PPA:
$ sudo apt-get install gimp
Inkscape from PPA:
$ sudo apt-get install inkscape
9) Comparing Package Versions
Once you add a PPA address and obtain its �repository map�, you can see the both version of same software packages both in PPA and official repo. Use apt-cache command to do it like this.
Synopsis:
$ apt-cache policy <package_name>
GIMP versions:
$ apt-cache policy gimp
Inkscape version:
$ apt-cache policy inkscape
Output for GIMP:

Output for Inkscape:

Explanation:
- For GIMP: you see that there are two versions, version 2.9.5 from PPA and version 2.8.18 from official repo.
- For Inkscape: you see that there are two versions, version 0.92 from PPA and version 0.91 from official repo.
10) Remove PPA Address Automatically
This method is easier for beginner. To remove a PPA address (only the address, not the software) from your sources.list system, use add-apt-repositorycommand again. Remember that you need to run apt-get update once you change any sources.list setting. I show you for the 2 examples above.
For GIMP:
$ sudo add-apt-repository --remove ppa:otto-kesselgulasch/gimp
$ sudo apt-get update
For Inkscape:
$ sudo add-apt-repository --remove ppa:inkscape.dev/stable
$ sudo apt-get update
Explanation:
The command above will delete the PPA address. However, that command does not delete its *.list file. You may check /etc/apt/sources.list.d/ directory for the file.
11) Remove PPA Address Manually
This method is needed when you experience some trouble. To remove PPA address manually, if you added it manually too, then you just need to delete its lines in sources.list. But to remove PPA address manually if you added it automatically (via add-apt-repository), then you should know the files and delete them manually.
Method 1:
- $ sudo gedit /etc/apt/sources.list
- Look for your PPA address line there, such as gimp-edge or inkscape-stable.
- Delete that lines.
- Save sources.list file.
- $ sudo apt-get update
Method 2:
- Look at /etc/apt/sources.list.d/ directory.
- Look for any .list file named with your PPA address name, such as gimp-edge or inkscape-stable.
- Assume the PPA address file name is �gimp-edge.list� then the delete command is:
- $ sudo rm /etc/apt/sources.list.d/gimp-edge.list*
- Then perform a reload:
- $ sudo apt-get update
11) Remove Software Packages from PPA
To remove software package installed from PPA, use apt-get remove normally. There are 2 examples:
For GIMP:
$ sudo apt-get remove gimp
For Inkscape:
$ sudo apt-get remove inskcape
Note:
Remember that deleting the package is not the same as deleting the PPA address. After removing the package, if you install the same package again next time, your system will choose the PPA version not the official repository version. For that reason, you may delete the PPA address either so next time APT will install package from official repository.
Additional Information
Once you use Ubuntu you use free software and live in free software community. One of the meaning of being free is everyone in whole community has the right to distribute software. So it means there are still many third-party repositories available for Ubuntu outside Launchpad. One of the biggest of them is openSUSE OpenBuildService https://build.opensuse.org.
References
- http://askubuntu.com/questions/4983/what-are-ppas-and-how-do-i-use-them
- http://askubuntu.com/questions/307/how-can-ppas-be-removed
- http://unix.stackexchange.com/questions/6766/is-there-is-a-ppa-service-equivalent-in-the-fedora-world
download file now
Wednesday, August 2, 2017
Ubuntu Package Management Part 2 Basic Apt Get Commands
Ubuntu Package Management Part 2 Basic Apt Get Commands

This beginners guide for Part 2 explains Apt-get commands with examples for Ubuntu package management. This including some required explanations (about package, how apt works, and apt "database") and screenshots for 10 examples. This guide also includes add-apt-repository command, despite its not part of APT, its mentioned here to ensure beginner users happy with PPA and third-party repositories. This guide is a continuation of the Part 1 Dpkg Commands. I hope everyone can take advantage from this article. Enjoy.
Subscribe to UbuntuBuzz Telegram Channel https://telegram.me/ubuntubuzz to get article updates directly.
Package
In Ubuntu operating system platform, software is �distributed� by Ubuntu developer to all the users. Ubuntu already distributes approximately 80.000 software in the 16.10 version at 2016. Each software is distributed as certain file called �package�. The user installs software in their Ubuntu system also in form of �package�. So in other words working with Ubuntu is working with software packages.
Ubuntu distribution gives two types of package to the users, source code package and binary package. Source package is a file with .tar.gz format while binary package is a file with .deb format. Ubuntu developer puts large efforts to transform all source packages into binary packages so every users can just install the .deb instantly and run the software in their computer. All software packages of Ubuntu distribution stored at some public server named "repository". Every Ubuntu user installs software from this so-called repository.
How APT Works
APT is a complex system composed of apt-get and many other programs. But from end-user point of view, the main concept is simple, this APT system is simply a client of Ubuntu repository server. In other words, APT is a local program in your Ubuntu system to communicate with the Ubuntu repository server. In particular, apt-get is the download manager of APT system to download package from repository.
In technical sense, APT�s main purpose is to resolve dependency, and that�s why people calls APT dependency resolver. APT works by reading Ubuntu internal databases to determine what packages installed and what packages not installed, then doing a calculation resulting complete list of packages need to be installed, and then the apt-get downloads those packages from repository through the network. The final job is actually done by Dpkg to install packages one by one. APT does not install package, APT is just dependency resolver. By downloading, APT stores all packages downloaded at /var/cache/apt/archives/ directory.
In order to work with repository, of course, APT needs the address of the repository itself. This requirement is fulfilled by sources.list settings. The sources.list is actually a text file containing URL addresses of repository and some �codes� to determine what �room� of repository enabled/disabled. The settings is located in /etc/apt/sources.list file. APT system gives more options by providing /etc/apt/sources.list.d/ directory if the user wants to use third-party repository.
Important Database
APT works with its own �database� in your Ubuntu system located at /var/lib/apt/lists/. APT database is basically a bunch of text files storing complete information information such as name, URL, size, dependencies, description, etc. of every single of thousand packages from the repository. To make APT works, first the user must invokes APT to download the �map� from repository (I call it here: reload). Once this "map" completeley obtained, then the user can perform search for any package they want and ask APT to install any package. Without this "map" APT will not work.
1. Reload
Command synopsis:
$ sudo apt-get update
Example:
$ sudo apt-get update
Output:

Explanation:
The update command downloads "repository map". Repository map is database files containing complete information about the repository and all packages inside it. All database files downloaded stored at /var/lib/apt/lists/ as .list files and you can read them using any text editor. Whenever you change your sources.list settings, you should run this update command once. Without this �map�, APT can not download any package. This requires internet connection.
Note: I use the term "Reload" here to avoid confusion between "update" and "upgrade" terms, to make it clear that apt-get update does not install any package. Also, the term "Reload" is used in popular Synaptic Package Manager to express the same thing.
2. Install
Command synopsis:
$ sudo apt-get install <package_name>
Example:
$ sudo apt-get install flowblade
Output:

Explanation:
The install command installs a software from repository. You will be asked firstly for password, type it anyway and press Enter; then you will be asked secondly for permission, type �y� letter anyway and press Enter. The APT will download all packages needed and the software will be installed in your system. Do not close the terminal while the installation progress is still going. Therefore, this requires internet connection.
3. Remove
Command synopsis:
$ sudo apt-get remove <package_name>
Example:
$ sudo apt-get remove firefox
Output:

Explanation:
The remove command uninstalls software from your system. The remove command uninstalls only a single package, it does not uninstalls the package dependencies came with it. After performing this command, you can no longer run the software you removed. This does not require internet connection.
4. Upgrade
Command synopsis:
$ sudo apt-get upgrade
Example:
$ sudo apt-get upgrade
Output:

Explanation:
The upgrade command downloads and installs all new version of all packages installed in your system. This command depends on your sources.list settings, so APT can find new version of packages only if the repository you used does provide them. Remember that upgrade is completely different to update: upgrade installs packages while update does not install any.
5. Dist-Upgrade
Command synopsis:
$ sudo apt-get dist-upgrade
Example:
$ sudo apt-get dist-upgrade
Output:

Explanation:
The dist-upgrade command is a companion of upgrade command, it helps the upgrade command with a �smart conflict resolution�. To give you the difference between both commands: upgrade does not delete any package, while dist-upgrade may delete packages in order to resolve conflicts. This dist-upgrade is usually performed by the user once upgrade command finished. The dist-upgrade command does only packages upgrade, not system version upgrade, so using it will never upgrade Ubuntu 16.04 into 16.10 for example.
6. Download Only
Command synopsis:
$ sudo apt-get download <package_name>
Example:
$ sudo apt-get download gparted
Output:

Explanation:
The download command downloads package. This shows that apt-get is basically a download manager. This command will not install the package. The package will be downloaded to the same directory as your command line running. For example, when you perform this command without changing directory, then by default the package stored at your $HOME.
7. Simulate
Command synopsis:
$ sudo apt-get --simulate install <package_name>
$ sudo apt-get --simulate upgrade
$ sudo apt-get �simulate dist-upgrade
Example:
$ sudo apt-get --simulate install gparted
Output:

Explanation:
This option --simulate is available for apt-get commands to simulate (dry run) the package management being processed. This option is usable in the install, remove, upgrade, and dist-upgrade commands. The �simulate is extremely useful to prevent any error before installing/upgrading, because it shows the installing/upgrading process without doing the real installing/upgrading. So you will know if installing certain package there will be an error or not by this --simulate. It can be used when offline.
8. Add Repository
Command synopsis:
$ sudo add-apt-repository
Example
$ sudo add-apt-repository deb http://kambing.ui.ac.id/ubuntu yakkety main universe
$ sudo add-apt-repository �ppa:gimp/gimp-stable�
Output:

Explanation:
This add-apt-repository command is not a part of APT, rather, it is a part of software-properties-common package in Ubuntu. This command is a helper to add new repository address to sources.list easily. This command is very common among majority of Ubuntu desktop users, to add new PPA repository (third party repository) to the system so they can install the software available in that repository. To use it, run it as example, and then read the message retrieved, and then press Enter to continue adding the repository address, and after adding you should do Reload to get "the map" of the new repository. This command should be used online.
Note: the reason I put add-apt-repository is because this command is very famous among PPA users and almost all Ubuntu desktop users use PPA. So for your convenience, I put it here.
9. Print Uris
Command synopsis:
$ sudo apt-get --print-uris install <package_name>
Example:
$ sudo apt-get --print-uris install gparted
Output:

Explanation:
This option --print-uris shows all download links of a software package installation. So for example if a gparted installation needs two packages to be downloaded, it shows the two download links of two packages. If you download the two packages manually somewhere and install them by Dpkg, you may install gparted software correctly in an offline Ubuntu system. Yes, this option --print-uris is extremely useful for offline users. This option �print-uris can be used when offline, because APT generates all download links from its �repository map� (local database /var/lib/apt/lists/ and its sources.list). Again, apt-get is basically a download manager so it certainly knows all package download links. This does not require any internet connection.
10. Always Yes
Command synopsis:
$ sudo apt-get install --yes <package_name>
Example:
$ sudo apt-get install --yes gparted
$ sudo apt-get remove --yes gparted
$ sudo apt-get upgrade --yes
$ sudo apt-get dist-upgrade --yes
Output:

Explanation:
This option --yes makes the user may leave safely the Terminal while APT is processing. The meaning of --yes here is to answer �y� automatically to APT for all questions possible while doing install/remove/upgrade/dist-upgrade. So, by using this you do not need to answer any further question one by one while doing package management.
download file now
Monday, July 31, 2017
Ubuntu Package Management Part 5 Basic Synaptic
Ubuntu Package Management Part 5 Basic Synaptic
This beginners guide Part 5 explains how to use Synaptic Package Manager, an easy to use GUI program to manage software packages. Synaptic is a replacement to Apt-Get command line for casual end-users, it provides complete options in simple and user-friendly manner. By using Synaptic, you can do easy sources.list editing, proxy + auth setting, install/remove/upgrade package, and so on. And this guide is a continuation of Part 4 PPA & Third-Party Repository. I hope this will be easy and useful for everyone.
Subscribe to UbuntuBuzz Telegram Channel https://telegram.me/ubuntubuzz to get article updates directly.
Usage Basic
In using Synaptic, there is a basic usage in 4 points from novice users point of view:
- user chooses an action or some actions,
- Synaptic does wait for users decision,
- user decides to Apply the chosen action/actions
- Synaptic does perform the action/actions
In other words, Synaptic will never do install/remove/upgrade package unless the user explicitly decides the action(s) to do. Synaptic is safe to use even for complete beginners.
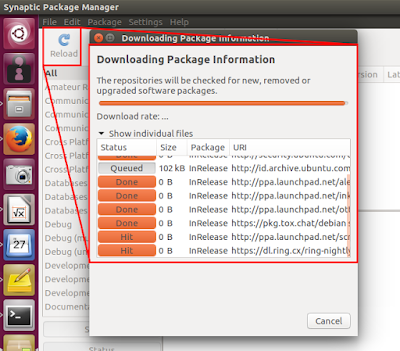
Reload
The term "Reload" means downloading the "repository maps" mentioned in your system sources.list. Reload is just the same as $ sudo apt-get update command. To do it, press Reload button.
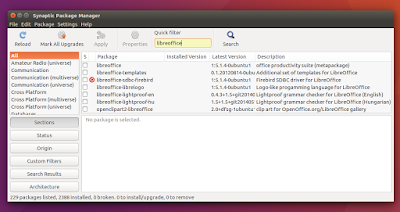
Search Package
To search a package, type your keyword on the "quick filter" search bar. If you dont see this search bar, click "Search" button.
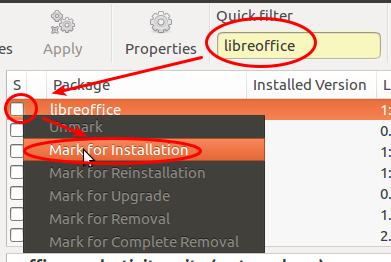
Install Package
To install package, search for a package > click on white box on the left of the package name > select Mark for Installation > press Apply button. You may mark more than one package and apply them to be installed simultaneously.
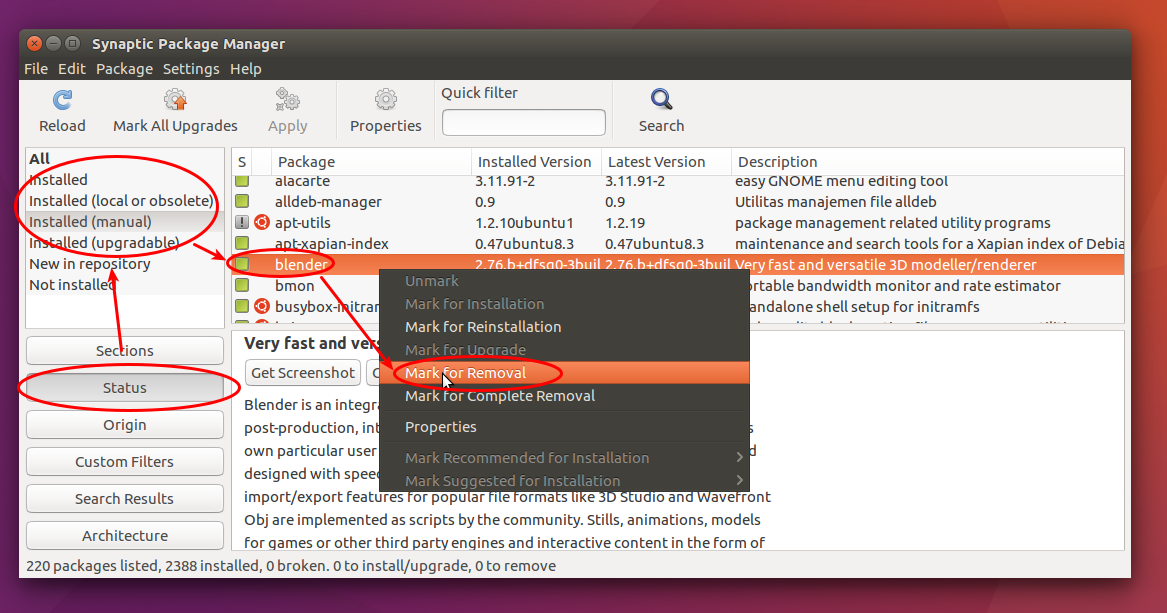
Remove Package
To uninstall a package, enable left-panel filter "Status" > search a package > choose any of "Installed" statuses on left-panel > click on the green box on the left of package name > select Mark for Removal > press Apply button. You can mark more than one package to remove them all simultaneously.
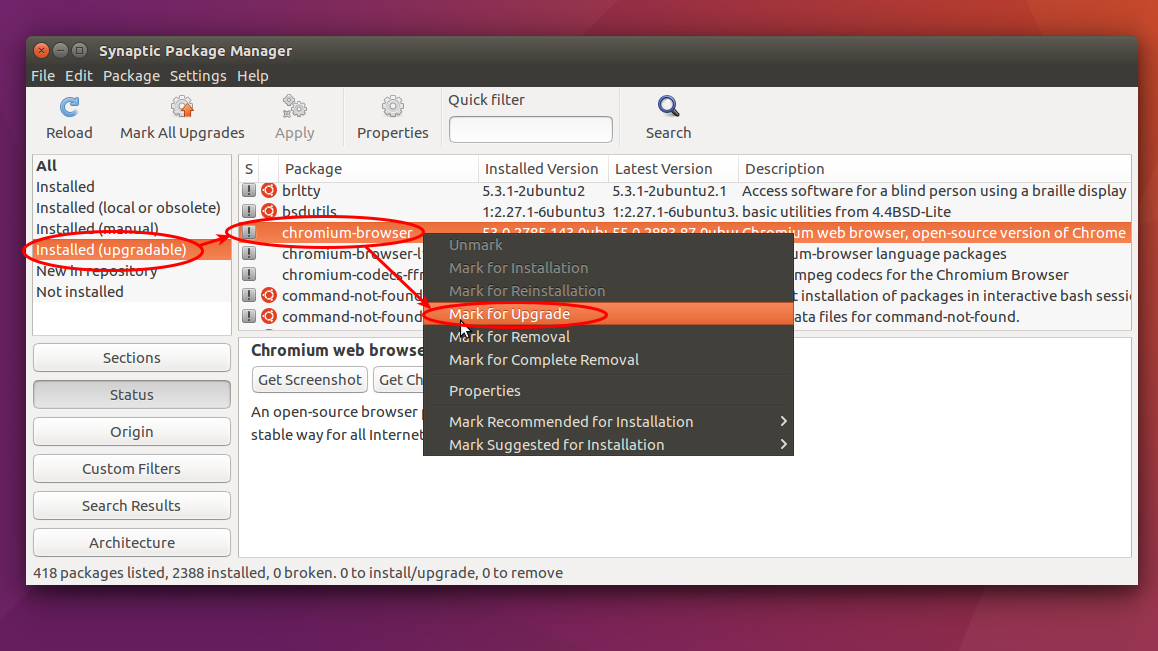
Upgrade Package
To upgrade package, enable left-panel filter "Status" > choose "Installed (upgradable)" status > search a package > click on grey box on the left of package name > select Mark for Upgrade > press Apply button.
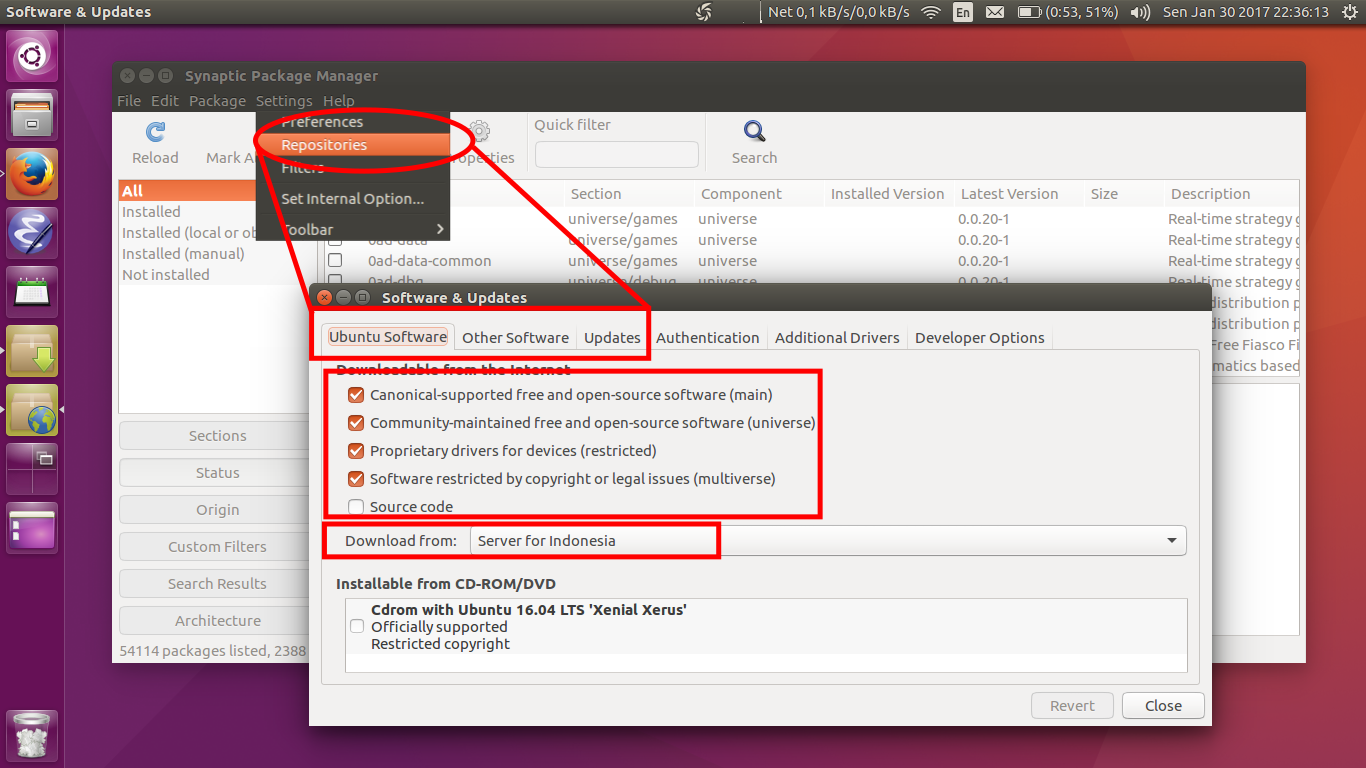
Repository Setting
Synaptic provides repository setting from menu Settings > Repositories. There you can control your sources.list in an easy GUI way.
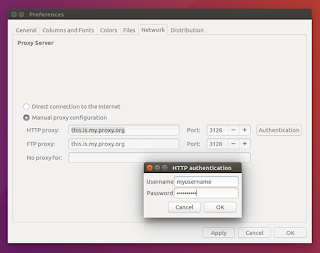
Proxy Setting
To change proxy setting, you can visit menu Settings > Preferences > Network. There you can determine your proxy address and your authentication credentials (username & password).
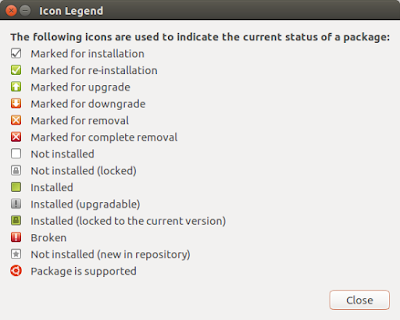
Icon Legend
You can show the explanation of all Synaptic icons from menu Help > Icon Legend.
download file now
Subscribe to:
Posts (Atom)