Showing posts with label basic. Show all posts
Showing posts with label basic. Show all posts
Sunday, September 10, 2017
Tutorial Setting Mikrotik RB dari Awal Sampai Terkoneksi Dengan Internet Basic Setup Mikrotik
Tutorial Setting Mikrotik RB dari Awal Sampai Terkoneksi Dengan Internet Basic Setup Mikrotik
Saya asumsikan anda sudah mengenal hardware mikrotik dimana nanti kita akan me-reset awal setting default konfigurasi agar mikrotik menjadi nol konfigurasi, langkah yang harus kita lakukan agar mikrotik Rb kita bisa tekoneksi dengan internet adalah sebagai berikut :
Planing Topologi :
Ether1 : Internet // 192.168.10.2/24 => Modem Ip : 192.168.10.1
Ether2 : LAN // 192.168.2.1/24 => Client DHCP : 192.168.2.2-254
- Masuk ke mikrotik RB dengan menu winbox , bisa dengan media Mac Address atau bisa dengan media IP Address Lan Mikrotik RB ( Jika via IP maka tancapkan Lan kita ke mikrotik RB ether-2 , IP defaultnya adalah 192.168.88.1 dan saya asumsikan anda sudah faham mengenai setting Lan di IP di Laptop/PC, karna jika masuk winbox via IP anda wajib setting LAN di laptop/pc anda dan wajib satu subnet dengan Rb Mikrotiknya.lihat gambar dibawah dan jangan lupa di klik Connect :

- Setelah terkoneksi dengan Rb Mikrotik, lanjut dengan remove konfigurasinya agar kita bisa setting manual sesuai keinginan. lihat gambar dibawah !

- Langkah pertama yang harus kita lakukan adalah memberi identitas, password dan ip address

- Berikan password login, ikuti langkahya dibawah ini :

- Untuk langkah selanjutnya, kita berikan comment terlebih dahulu disetiap Ethernet / Port agar memudahkan kita mengingat ID ether interface, ikuti langkah sbb :

Berikut beberapa ethernet yang sudah diberikan label/comment :

- Kemudian kita akan menghubungkan router ke Internet, sebelumnya pastikan dulu untuk ethernet yang terhubung ke Internet ( Modem ) disini adalah ether1, ikuti langkah berikut :

- Selanjutnya kita akan memasukkan default gatway IP Internet ke menu route, Jika berhasil maka akan terdapa keterangan reachable, ikuti langkah berikut :

- Kemudian buatlah IP Address local, disini topologi di ether2 dengan IP 192.168.2.1/24

- Selanjutnya kita masuk NAT masquerade terlebih dahulu agar IP Private 192.168.2.0/24 di izinkan mengakses Internet menggunakan IP Publik, karena tidak akan mungkin sebuah IP Private di jaringan LAN bisa mengakses Internet tanpa mekanisme NAT, Ikuti langkah sbb :

- Terakhir, kita membuat DHCP Server, yang berfungsi untuk memberikan IP otomatis kepada setiap client sehingga administrator tidak perlu memberikan IP secara manual, ikuti langkahnya dibawah ini :

Selesai Untuk setting awal mikrotik agar terkoneksi dengan internet, dan share local ip dengan dhcp client
Mode CLI
/system identity
set name="Mikroserver"
/interface ethernet
set [ find default-name=ether1 ] name=ether1-Internet
set [ find default-name=ether2 ] name=ether2-LAN
/ip address
add address=192.168.10.2/24 comment="Internet" interface=ether1-Internet
network=192.168.10.0
add address=192.168.2.1/24 comment=Local interface=ether2-LAN network=
192.168.2.0
/ip dhcp-server
add address-pool=dhcp-lan disabled=no interface=ether2-LAN lease-time=1h name=
dhcp
/ip dhcp-server network
add address=192.168.2.0/24 comment="hotspot network" gateway=192.168.2.1
/ip pool
add name=pool-lan ranges=192.168.2.2-192.168.5.254
/ip dns
set allow-remote-requests=yes servers=8.8.8.8,8.8.4.4
/ip firewall nat
add action=masquerade chain=srcnat
/ip route
add comment="Default Route" distance=1 gateway=192.168.10.1Copy - Paste di New TerminalSource/Reference :
- http://mikrotik.co.id
download file now
Thursday, August 3, 2017
Ubuntu Tip Using Quickly To Build Applications Basic Commands
Ubuntu Tip Using Quickly To Build Applications Basic Commands
What is Quickly?
Basically its a command line based tool for building applications. So go ahead and open a terminal. Now it will be useful if youre familiar with the Python programming language. If youre not then there are tones of on-line resources to help you learn.
How to create a new application:
Type: quickly create ubuntu-application mybrowser
Quickly will create a directory with the same name as your application containing all its files.
How to edit your application:
In the applications directory type: quickly edit
How to edit the GUI:
In the applications directory type: quickly design
How to run your application:
In the applications directory type: quickly run
How to package your application:
In the applications directory type: quickly package
You might also want to watch this video. It will take you through the development of a very basic web browser application.
download file now
Wednesday, August 2, 2017
Ubuntu Package Management Part 2 Basic Apt Get Commands
Ubuntu Package Management Part 2 Basic Apt Get Commands

This beginners guide for Part 2 explains Apt-get commands with examples for Ubuntu package management. This including some required explanations (about package, how apt works, and apt "database") and screenshots for 10 examples. This guide also includes add-apt-repository command, despite its not part of APT, its mentioned here to ensure beginner users happy with PPA and third-party repositories. This guide is a continuation of the Part 1 Dpkg Commands. I hope everyone can take advantage from this article. Enjoy.
Subscribe to UbuntuBuzz Telegram Channel https://telegram.me/ubuntubuzz to get article updates directly.
Package
In Ubuntu operating system platform, software is �distributed� by Ubuntu developer to all the users. Ubuntu already distributes approximately 80.000 software in the 16.10 version at 2016. Each software is distributed as certain file called �package�. The user installs software in their Ubuntu system also in form of �package�. So in other words working with Ubuntu is working with software packages.
Ubuntu distribution gives two types of package to the users, source code package and binary package. Source package is a file with .tar.gz format while binary package is a file with .deb format. Ubuntu developer puts large efforts to transform all source packages into binary packages so every users can just install the .deb instantly and run the software in their computer. All software packages of Ubuntu distribution stored at some public server named "repository". Every Ubuntu user installs software from this so-called repository.
How APT Works
APT is a complex system composed of apt-get and many other programs. But from end-user point of view, the main concept is simple, this APT system is simply a client of Ubuntu repository server. In other words, APT is a local program in your Ubuntu system to communicate with the Ubuntu repository server. In particular, apt-get is the download manager of APT system to download package from repository.
In technical sense, APT�s main purpose is to resolve dependency, and that�s why people calls APT dependency resolver. APT works by reading Ubuntu internal databases to determine what packages installed and what packages not installed, then doing a calculation resulting complete list of packages need to be installed, and then the apt-get downloads those packages from repository through the network. The final job is actually done by Dpkg to install packages one by one. APT does not install package, APT is just dependency resolver. By downloading, APT stores all packages downloaded at /var/cache/apt/archives/ directory.
In order to work with repository, of course, APT needs the address of the repository itself. This requirement is fulfilled by sources.list settings. The sources.list is actually a text file containing URL addresses of repository and some �codes� to determine what �room� of repository enabled/disabled. The settings is located in /etc/apt/sources.list file. APT system gives more options by providing /etc/apt/sources.list.d/ directory if the user wants to use third-party repository.
Important Database
APT works with its own �database� in your Ubuntu system located at /var/lib/apt/lists/. APT database is basically a bunch of text files storing complete information information such as name, URL, size, dependencies, description, etc. of every single of thousand packages from the repository. To make APT works, first the user must invokes APT to download the �map� from repository (I call it here: reload). Once this "map" completeley obtained, then the user can perform search for any package they want and ask APT to install any package. Without this "map" APT will not work.
1. Reload
Command synopsis:
$ sudo apt-get update
Example:
$ sudo apt-get update
Output:

Explanation:
The update command downloads "repository map". Repository map is database files containing complete information about the repository and all packages inside it. All database files downloaded stored at /var/lib/apt/lists/ as .list files and you can read them using any text editor. Whenever you change your sources.list settings, you should run this update command once. Without this �map�, APT can not download any package. This requires internet connection.
Note: I use the term "Reload" here to avoid confusion between "update" and "upgrade" terms, to make it clear that apt-get update does not install any package. Also, the term "Reload" is used in popular Synaptic Package Manager to express the same thing.
2. Install
Command synopsis:
$ sudo apt-get install <package_name>
Example:
$ sudo apt-get install flowblade
Output:

Explanation:
The install command installs a software from repository. You will be asked firstly for password, type it anyway and press Enter; then you will be asked secondly for permission, type �y� letter anyway and press Enter. The APT will download all packages needed and the software will be installed in your system. Do not close the terminal while the installation progress is still going. Therefore, this requires internet connection.
3. Remove
Command synopsis:
$ sudo apt-get remove <package_name>
Example:
$ sudo apt-get remove firefox
Output:

Explanation:
The remove command uninstalls software from your system. The remove command uninstalls only a single package, it does not uninstalls the package dependencies came with it. After performing this command, you can no longer run the software you removed. This does not require internet connection.
4. Upgrade
Command synopsis:
$ sudo apt-get upgrade
Example:
$ sudo apt-get upgrade
Output:

Explanation:
The upgrade command downloads and installs all new version of all packages installed in your system. This command depends on your sources.list settings, so APT can find new version of packages only if the repository you used does provide them. Remember that upgrade is completely different to update: upgrade installs packages while update does not install any.
5. Dist-Upgrade
Command synopsis:
$ sudo apt-get dist-upgrade
Example:
$ sudo apt-get dist-upgrade
Output:

Explanation:
The dist-upgrade command is a companion of upgrade command, it helps the upgrade command with a �smart conflict resolution�. To give you the difference between both commands: upgrade does not delete any package, while dist-upgrade may delete packages in order to resolve conflicts. This dist-upgrade is usually performed by the user once upgrade command finished. The dist-upgrade command does only packages upgrade, not system version upgrade, so using it will never upgrade Ubuntu 16.04 into 16.10 for example.
6. Download Only
Command synopsis:
$ sudo apt-get download <package_name>
Example:
$ sudo apt-get download gparted
Output:

Explanation:
The download command downloads package. This shows that apt-get is basically a download manager. This command will not install the package. The package will be downloaded to the same directory as your command line running. For example, when you perform this command without changing directory, then by default the package stored at your $HOME.
7. Simulate
Command synopsis:
$ sudo apt-get --simulate install <package_name>
$ sudo apt-get --simulate upgrade
$ sudo apt-get �simulate dist-upgrade
Example:
$ sudo apt-get --simulate install gparted
Output:

Explanation:
This option --simulate is available for apt-get commands to simulate (dry run) the package management being processed. This option is usable in the install, remove, upgrade, and dist-upgrade commands. The �simulate is extremely useful to prevent any error before installing/upgrading, because it shows the installing/upgrading process without doing the real installing/upgrading. So you will know if installing certain package there will be an error or not by this --simulate. It can be used when offline.
8. Add Repository
Command synopsis:
$ sudo add-apt-repository
Example
$ sudo add-apt-repository deb http://kambing.ui.ac.id/ubuntu yakkety main universe
$ sudo add-apt-repository �ppa:gimp/gimp-stable�
Output:

Explanation:
This add-apt-repository command is not a part of APT, rather, it is a part of software-properties-common package in Ubuntu. This command is a helper to add new repository address to sources.list easily. This command is very common among majority of Ubuntu desktop users, to add new PPA repository (third party repository) to the system so they can install the software available in that repository. To use it, run it as example, and then read the message retrieved, and then press Enter to continue adding the repository address, and after adding you should do Reload to get "the map" of the new repository. This command should be used online.
Note: the reason I put add-apt-repository is because this command is very famous among PPA users and almost all Ubuntu desktop users use PPA. So for your convenience, I put it here.
9. Print Uris
Command synopsis:
$ sudo apt-get --print-uris install <package_name>
Example:
$ sudo apt-get --print-uris install gparted
Output:

Explanation:
This option --print-uris shows all download links of a software package installation. So for example if a gparted installation needs two packages to be downloaded, it shows the two download links of two packages. If you download the two packages manually somewhere and install them by Dpkg, you may install gparted software correctly in an offline Ubuntu system. Yes, this option --print-uris is extremely useful for offline users. This option �print-uris can be used when offline, because APT generates all download links from its �repository map� (local database /var/lib/apt/lists/ and its sources.list). Again, apt-get is basically a download manager so it certainly knows all package download links. This does not require any internet connection.
10. Always Yes
Command synopsis:
$ sudo apt-get install --yes <package_name>
Example:
$ sudo apt-get install --yes gparted
$ sudo apt-get remove --yes gparted
$ sudo apt-get upgrade --yes
$ sudo apt-get dist-upgrade --yes
Output:

Explanation:
This option --yes makes the user may leave safely the Terminal while APT is processing. The meaning of --yes here is to answer �y� automatically to APT for all questions possible while doing install/remove/upgrade/dist-upgrade. So, by using this you do not need to answer any further question one by one while doing package management.
download file now
Monday, July 31, 2017
Ubuntu Package Management Part 5 Basic Synaptic
Ubuntu Package Management Part 5 Basic Synaptic
This beginners guide Part 5 explains how to use Synaptic Package Manager, an easy to use GUI program to manage software packages. Synaptic is a replacement to Apt-Get command line for casual end-users, it provides complete options in simple and user-friendly manner. By using Synaptic, you can do easy sources.list editing, proxy + auth setting, install/remove/upgrade package, and so on. And this guide is a continuation of Part 4 PPA & Third-Party Repository. I hope this will be easy and useful for everyone.
Subscribe to UbuntuBuzz Telegram Channel https://telegram.me/ubuntubuzz to get article updates directly.
Usage Basic
In using Synaptic, there is a basic usage in 4 points from novice users point of view:
- user chooses an action or some actions,
- Synaptic does wait for users decision,
- user decides to Apply the chosen action/actions
- Synaptic does perform the action/actions
In other words, Synaptic will never do install/remove/upgrade package unless the user explicitly decides the action(s) to do. Synaptic is safe to use even for complete beginners.
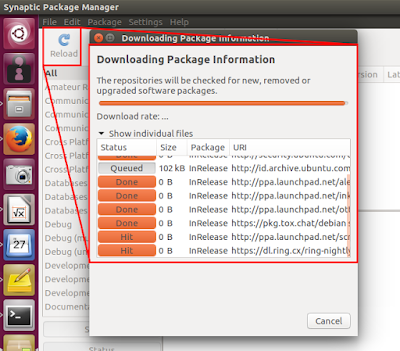
Reload
The term "Reload" means downloading the "repository maps" mentioned in your system sources.list. Reload is just the same as $ sudo apt-get update command. To do it, press Reload button.
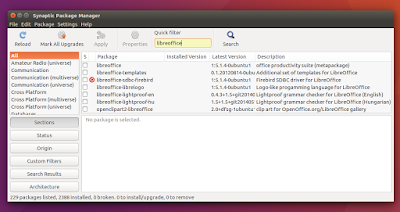
Search Package
To search a package, type your keyword on the "quick filter" search bar. If you dont see this search bar, click "Search" button.
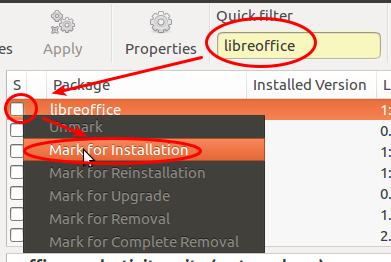
Install Package
To install package, search for a package > click on white box on the left of the package name > select Mark for Installation > press Apply button. You may mark more than one package and apply them to be installed simultaneously.
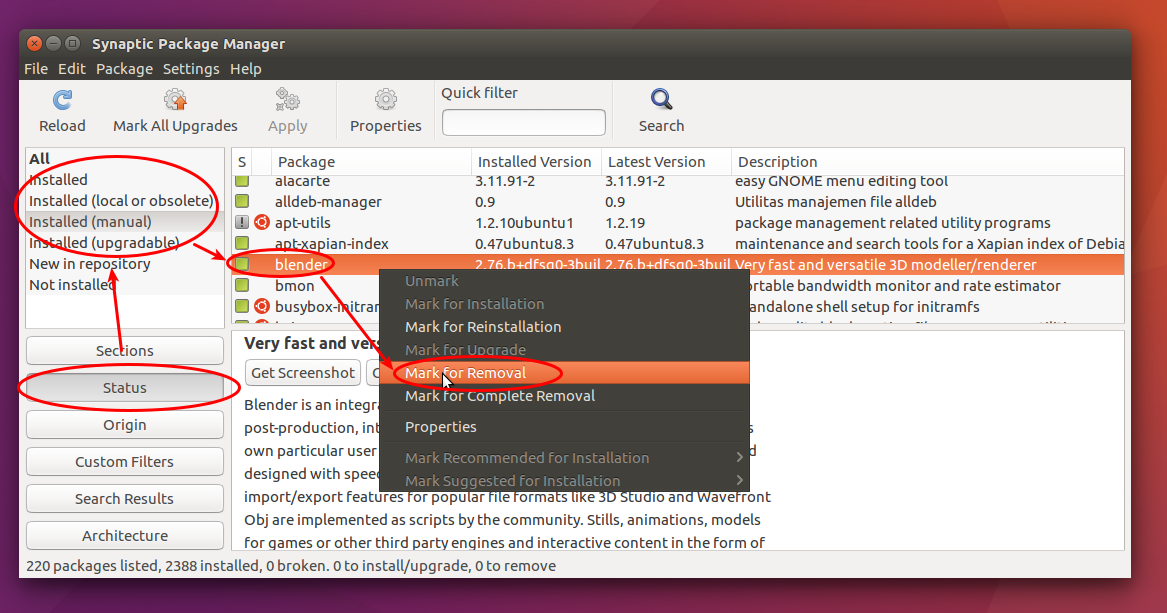
Remove Package
To uninstall a package, enable left-panel filter "Status" > search a package > choose any of "Installed" statuses on left-panel > click on the green box on the left of package name > select Mark for Removal > press Apply button. You can mark more than one package to remove them all simultaneously.
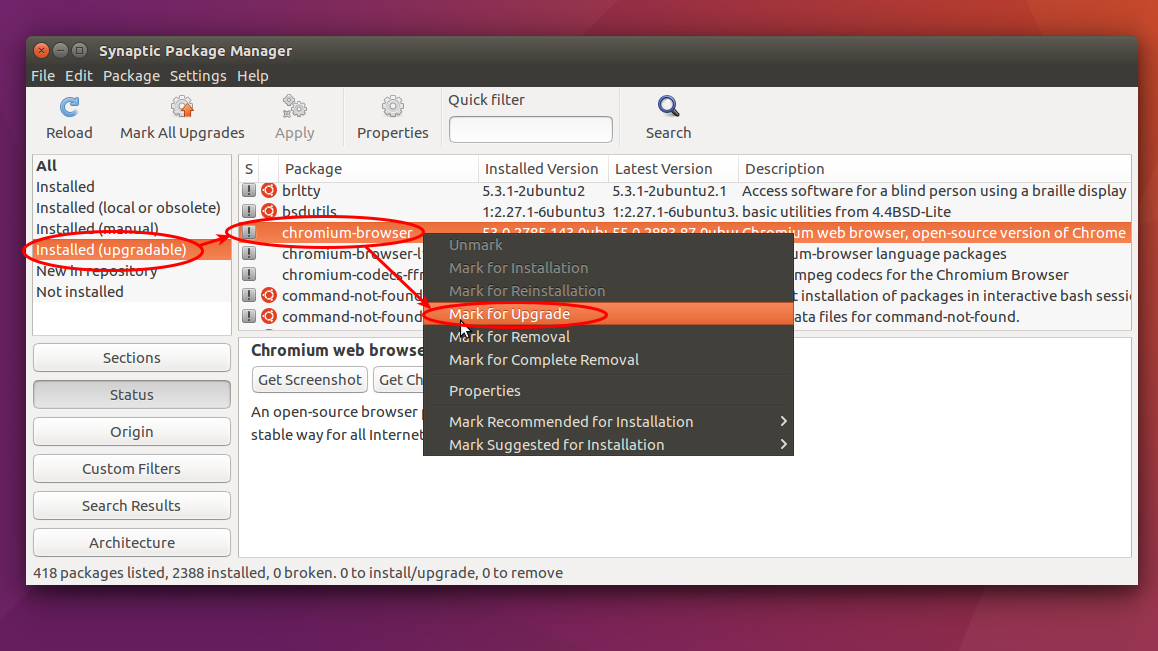
Upgrade Package
To upgrade package, enable left-panel filter "Status" > choose "Installed (upgradable)" status > search a package > click on grey box on the left of package name > select Mark for Upgrade > press Apply button.
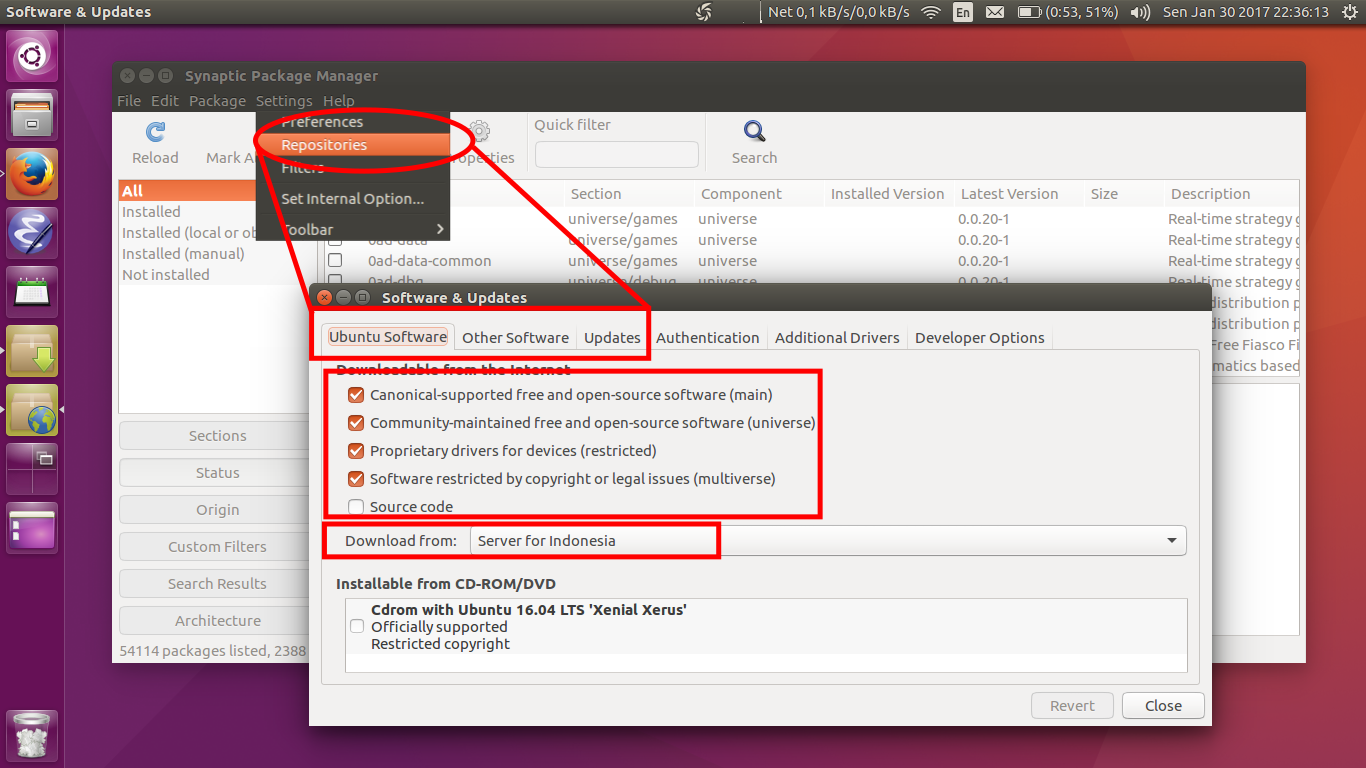
Repository Setting
Synaptic provides repository setting from menu Settings > Repositories. There you can control your sources.list in an easy GUI way.
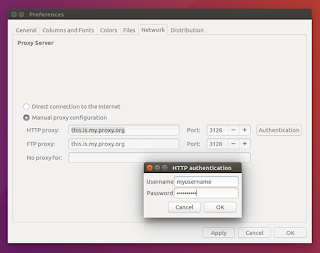
Proxy Setting
To change proxy setting, you can visit menu Settings > Preferences > Network. There you can determine your proxy address and your authentication credentials (username & password).
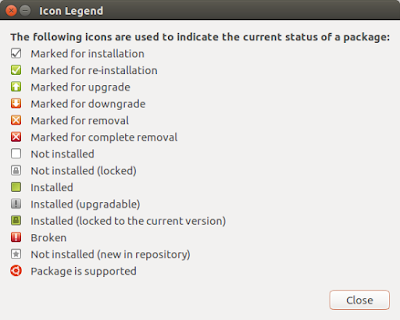
Icon Legend
You can show the explanation of all Synaptic icons from menu Help > Icon Legend.
download file now
Subscribe to:
Posts (Atom)