Showing posts with label 2. Show all posts
Showing posts with label 2. Show all posts
Friday, September 29, 2017
Tutorial 2 ELM Images File Selector and Popups
Tutorial 2 ELM Images File Selector and Popups
This is the second post in my series on developing GUI applications in Elementary using Python. Today we are going to continue building on the Hello Elementary example I started in the first tutorial. In todays post I will only be covering the code that is different from our previous examples, so if you havent looked that one over yet please take a moment to do so now.
You can find the full source code for all of todays examples here.
Example 3:
We are going to start off by displaying a static, pre-defined image in our GUI:
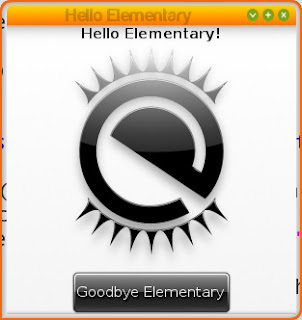
It only takes us 8 lines of actual code to create and display the above image in our program:
 #Creates an Image object that displays an image
 ic = elementary.Image(window)

 #Use the os module to get the current path to our .py file. Our image is relative to our .py We do this because it is best to use the absolute file path to images for the best results.
 location = os.path.dirname(os.path.abspath(__file__))

 #Tell our icon to auto-fill open space
 ic.size_hint_weight_set(evas.EVAS_HINT_EXPAND, evas.EVAS_HINT_EXPAND)
 ic.size_hint_align_set(evas.EVAS_HINT_FILL, evas.EVAS_HINT_FILL)

 #Here we set the image we want our icon to display
 ic.file_set("%s/images/logo.png"%location)

 #Optional, lets add mouse over text to our image
 ic.tooltip_text_set("Look a pretty picture!")

 #Lets show our icon
 ic.show()

 box.pack_end(windytax)
 #Pack our icon between our text and button
 box.pack_end(ic)
 box.pack_end(button)
In this example we utilize the elementary Image object to display our selected .png file.
Example 4:
Very rarely do we want to simply display a single image for as long as our program is running. So lets give the user the ability to change the image we display in our program:

Elementary has a built in FileselectorButton object that when clicked presents our user with a nice file selector GUI:
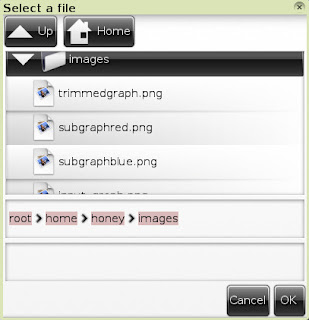
The new code to add this file selector button looks like:
 #Creates a "FileselectorButton" object. This is a button (just like we have created before) except that when it is click it automatically opens a file selector window
 fsb = elementary.FileselectorButton(window)

 #We can set the text of our fsb just like a normal button text
 fsb.text = "Change Image"

 #Tooltip for mouse over
 fsb.tooltip_text_set("Click Me!")

 #This tells our file selector window what to do when our user selects a file. The first argument is the callback function we want run and our second argument is our image object we want to change the display of
 fsb.callback_file_chosen_add(change_image, ic)

 #Show our button
 fsb.show()

 box.pack_end(windytax)
 box.pack_end(ic)
 #Pack our file selector button between our image and button
 box.pack_end(fsb)
 box.pack_end(button)

 window.resize_object_add(box)

 window.resize(300,300)

 window.show()

#Our fileselector callback. The file argument is the fileselectbutton object. The second argument is the full path to the file that was selected. The final argument is the image object we passed to this callback
def change_image(fsb, file_selected, image):
 #Check to make sure a file of some sort was selected. If nothing was selected file_selected will equal None type
 if file_selected:
 #These are the extensions we will allow our program to display
 validExtensions = [".png", ".jpg", ".gif"]

 #Use the os module to easily get the extension of our file
 fileName, fileExtension = os.path.splitext(file_selected)

 #If the extension is in our validExtenions lets check the image we are displaying!
 if fileExtension in validExtensions:
 image.file_set(file_selected)
Example 5:
Lets add one finishing touch to our application. If our user selects a file to display that doesnt have a valid image extension lets send them a popup telling them why the image displayed wasnt changed:
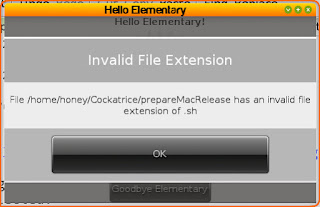
Showing a popup of this nature is fairly easy using elementarys Popup object. So the final edit to our code looks like this:
#This time we also pass the window object to our change image function. The reason for this is that our popup object needs a parent window object
def change_image(fsb, file_selected, image, window):
 if file_selected:
 validExtensions = [".png", ".jpg", ".gif"]

 fileName, fileExtension = os.path.splitext(file_selected)

 if fileExtension in validExtensions:
 image.file_set(file_selected)
 else:
 #if we have an invalid extension lets give the user a popup message telling them why the image didnt change

 #Create a popup message
 popup = elementary.Popup(window)

 #Set the title of our popup
 popup.part_text_set("title,text", "Invalid File Extension")

 #Set the text of our popup
 popup.text = "File %s has an invalid file extension of %s"%(fileName, fileExtension)

 #Create a button object
 bt = elementary.Button(window)

 #Set its text
 bt.text = "OK"

 #Define a callback that is called when the button is clicked, lets pass our popup object to this call back so we can close the popup when the user presses OK
 bt.callback_clicked_add(bnt_close, popup)

 #Sets content for our popup. The first argument is an arbitrary name for the content piece and the second argument is the elementary object you would like displayed for the content
 popup.part_content_set("button1", bt)

 #Show the popup to our user
 popup.show()

#The callback for our popups OK button. The first agurment is the button object itself and the second object is the popup we passed to it
def bnt_close(bt, popup):
 #Lets delete the popup so it goes away
 popup.delete()
Hope everyone learned something today! Have any questions feel free to drop a comment below or start a discussion on our user boards.
Resources for this Lesson:
- Displaying Images
- Image
- FileselectorButton
- Popup
~Jeff Hoogland
download file now
Thursday, September 28, 2017
Tutorial Memperbaiki Redmi 2 Yang Stuck Hang Di Logo Bootloop Bootstuck
Tutorial Memperbaiki Redmi 2 Yang Stuck Hang Di Logo Bootloop Bootstuck
Beberapa bulan yang lalu saya sempat menulis tutorial mengatasi Redmi 2 yang Mati total. Mumpung ada waktu kali ini saya akan memberikan tutorial mengatasi Redmi 2 yang Bootloop, dimana hape kamu tidak bisa booting hanya terhenti di Logo MI. Untuk mengatasi masalah tersebut kamu harus memiliki komputer/laptop, kalo ga punya bisa melalui WARNET atau pinjem punya teman.
Bootloop biasanya disebabkan kerusakan pada file data ataupun system. Baik itu tanpa sengaja ataupun karena salah mengedit file system. Bootloop di tandai dengan reboot berulang kali atau hanya stuck/hang di Logo MI. kalo kamu ingin belajar mencoba memperbaiki nya bisa mengikuti tutorial dibawah ini.
Perhatian
Tutorial ini hanya untuk Redmi 2 versi HM2014811/17/18/19/21. Untuk mengecek versi Redmi 2 kita bisa dilihat di balik batere
Tutorial ini hanya untuk Redmi 2 versi HM2014811/17/18/19/21. Untuk mengecek versi Redmi 2 kita bisa dilihat di balik batere
Siapkan bahan-bahan nya di bawah ini
- Unduh file Tool Flash TWRP Via Adb Fastboot
- Unduh lagi ROM MIUI 7 Global Stable Kitkat
- Kemudian Extract file tersebut di PC/laptop kamu
- Hubungkan ke PC/Laptop dengan kabel data
- Matikan Redmi 2 nya. Kemudian tekan dan tahan bersamaan tombol Volume Bawah dan Power, lepaskan apabila sudah bergetar. Nanti akan masuk ke mode Fastboot

- Buka folder Flash_TWRP_Redmi2 kemudian klik Flash-TWRP.bat
- Nanti ada tulisan �Press any key to continiue� klik ENTER
- Dan proses flashing berjalan kalo berhasil akan langsung masuk ke TWRP

- Selanjutnya pindahkan file ROM MIUI 7 Global Stable ke internal atau Micro SD

- Setelah selesai memindahkan file ROM nya, di menu TWRP pilih WIPE kemudian swipe to factory reset

- Berikutnya pilih Install dan cari dan pilih filemiui_HM2XWCGlobal_V7.1.3.0.KHJMICK_eaca5d5e47_4.4.zip
- Selanjutnya geser Swipe to install

- Tunggu sampai proses selesai dan pilih Reboot System
- Tunggu aja sekitar 5-10 menit nanti akan masuk ke prose setup wizard
Catatan:
Apabila kamu tidak berhasil TWRP nya terinstall kemungkinan masalah drivernya, coba install drivernya dengan menginstall Tool Mi Flash terlebih dahulu.
Apabila kamu tidak berhasil TWRP nya terinstall kemungkinan masalah drivernya, coba install drivernya dengan menginstall Tool Mi Flash terlebih dahulu.
download file now
Truck Racing by Renault Trucks 0 2 7 6
Truck Racing by Renault Trucks 0 2 7 6

Embarque na boleia do seu caminh�o e dispute corridas alucinantes na F�rmula Renault!

download file now
Wednesday, September 27, 2017
TubeMate YouTube Downloader 2 3 8
TubeMate YouTube Downloader 2 3 8
|
download file now
Tuesday, September 26, 2017
Tuning Rebecca Linux Mint 17 1 Cinnamon Part 2
Tuning Rebecca Linux Mint 17 1 Cinnamon Part 2
This is Part 2 of the series - for those who have not read Part 1, click here. In this part, we will continue with connecting more hardware to Rebecca (aka Linux Mint 17.1).
d) Connecting Android Smart Phones and Tablets Using USB
This section describes how to connect Android smart phones and tablets to a Linux Mint 17.1 PC via a USB port. Most modern Android-based smart phones have the built-in capability of being USB connected to a PC. Some also even have software written specifically for communicating with a PC, but the ability to read and write to the storage media is a basic ability of these devices. Connection between PC and most modern Android smart phones uses the Media Transfer Protocol (MTP) - for more information on MTP, click here. Note that MTP is only for file transfers and do NOT have the ability to play a media file (audio or video) located on the device - trying to use a media player on Rebecca to play media files on the phone or tablet will cause errors - some of which can only be cured by a restart of the PC.
The author has two Android smart phones and one Android tablet in his possession. The tablet is an old (by tablet standard) Acer Iconia A500 using Android 4.0.3 (Ice Cream Sandwich) - old but still useful. One of the two smart phones is a China made knockoff of the Samsung Galaxy Note 2 and is using Android 4.1.1 (Jellybean). This phone is still serviceable but because of the limited RAM (512MB!), it drove the author to purchase a real Samsung Galaxy Note 2 - which is now running Android 4.4.2 (KitKat). So having these 3 devices gave me an opportunity to test whether the various Android (4.0.3 to 4.4.2) versions support MTP when connected to Rebecca.
TIP: For the following tests, a KNOWN good USB port on Rebecca was used. The author had some problems with a intermittently working USB port on Rebecca - symptoms were the PC froze solid whenever a device was connected using this USB port. Swapping USB cables did not help. When the problem was determined to lie with the USB port on Rebecca, that port was blocked off and another USB port was used but occasional problems was detected - this time due to el-chepo USB cables. So make sure that you only use known working USB ports and known good USB cables when performing connections from devices to Rebecca.
Starting with the oldest device first, it was connected to a known good USB port on Rebecca using the cable supplied with the tablet. The message Connect as a media device appeared on the tablet and a window popped up on Rebecca (see figure below), plus an icon appeared on the desktop.
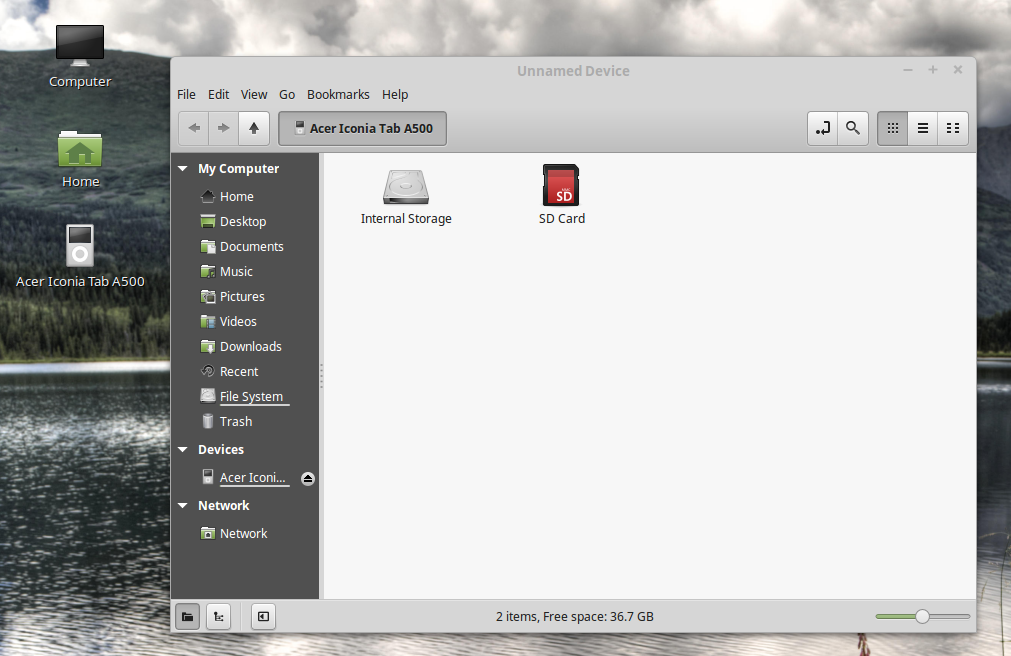
Note that the PC correctly identified the device as the Acer Iconia Tab A500 and using the file manager, it was possible to browse through both the storage units - internal and SD card - on the tablet. It was also possible to transfer files back and forth between the PC and the tablet using the file manger drag and drop feature. The only hiccup was that the Nemo file manager has a title of Unidentified Device whenever the Acer tablet was connected. To disconnect the tablet, the eject button on the file manager device was clicked upon with the mouse. All in all, it was a successful test.
Next the China made smart phone was connected to Rebecca using the good USB port and the USB cable supplied with the phone. To my surprise, the following screen appeared on the phone.
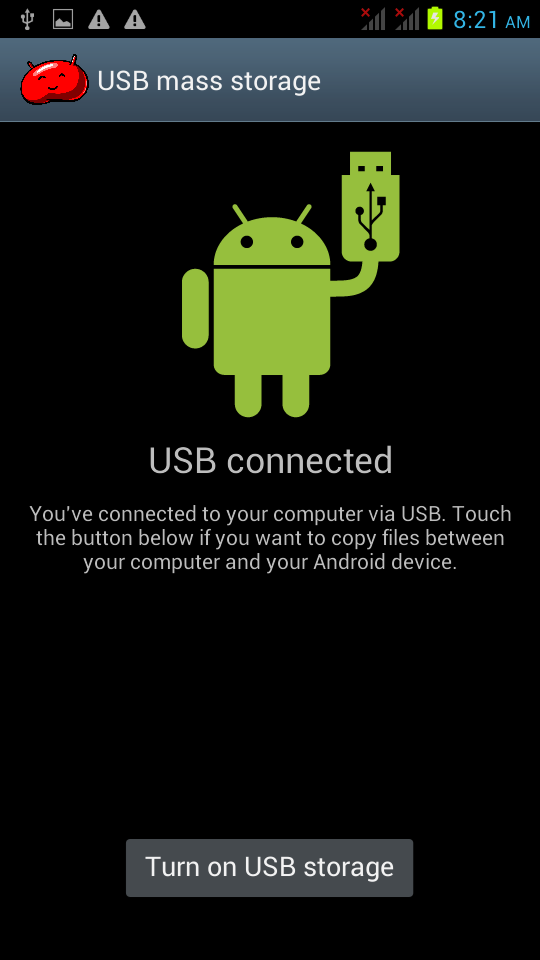
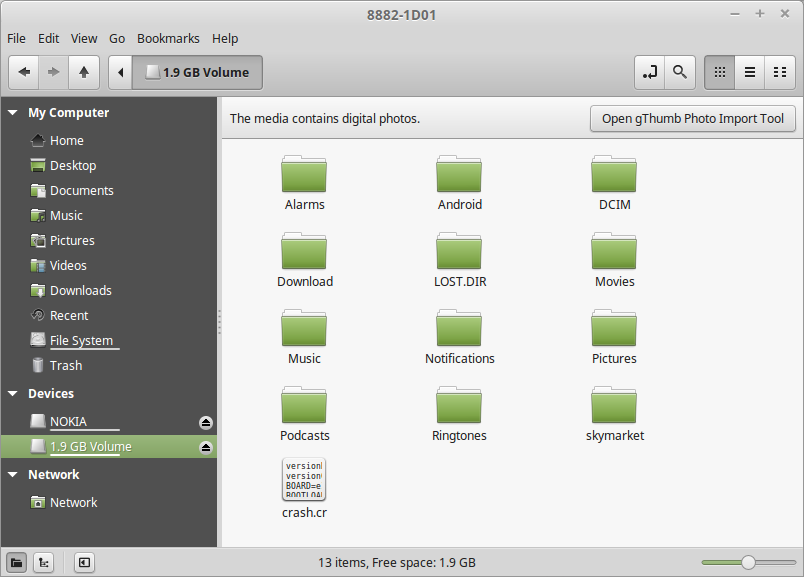
So I guess that the fake Note 2 phone does not support MTP after all - it still relies on the old-fashioned UMS despite it using Android 4.1.1 (Jellybean). I guess the manufacturer of this phone did not implement MTP for this device. However, and as shown below, it was still possible to browse all the files on the phones main storage and SD card (an old NOKIA microSD card salvaged from an old Nokia phone) and transfer files back and forth - albeit at a very much slower pace.
Next the genuine Samsung Galaxy Note 2 was connected to Rebecca using the good USB port and the USB cable supplied with the phone. The first thing that happened was a beep from the phone and a notification message that read Connected as a media device briefly appeared on the phone. It does not seem to matter whether phone was asleep or otherwise when connected. On the PC, the file manager popped up and an icon labelled GT N7100 appeared on the desktop (see below).
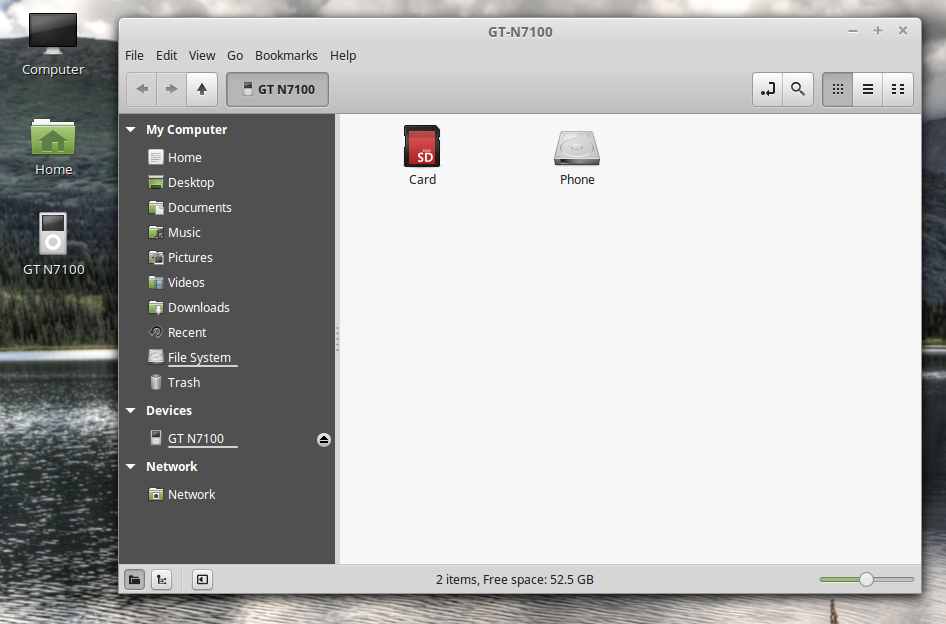
Note that the phone was correctly identified (the correct model number for the Samsung Galaxy Note 2 is GT-N7100) on both the desktop icon and the Nemo file manager. Even the title in the file manager was correct (unlike the Acer A500). It was gratifying to find out that the files on both the storage media on the phone can be browsed by the file manager. It was also possible to transfer files back and forth between the PC and the phone using the file manger drag and drop feature. The MTP file transfer portion worked with the phone with no problem at all. Disconnecting the phone was easy - just right-click on the desktop icon for the phone and select Eject. Alternatively, click on the eject button for the device in the file manager window.
To summarize, Linux Mint 17.1 will handle any Android tablet or smartphone connected to it over USB without any problem or without having to install any other software. Just note that if you stick to file transfer operations only, then you should not encounter any problems.
e) Connecting Apple Devices Using USB
Apple�s devices poses a problem for Linux Mint 17.1 � it doesn�t include MTP support at all. Apple�s iPod, iPhone, and iPad use their own proprietary syncing protocol along with iTunes, so it is understandable that they do not support MTP - a competing protocol. However, the author has the original iPad in his possession and was curious to find out what would happen if he connected this device to Rebecca over USB.
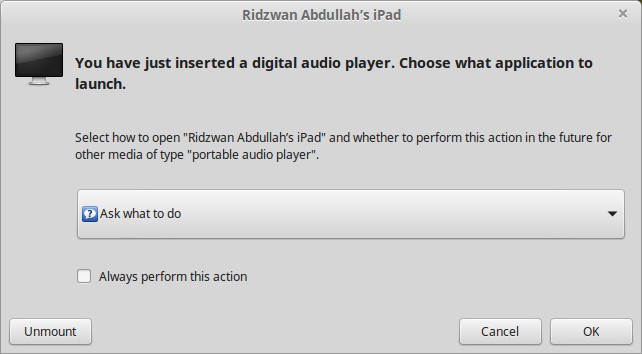
Well, the first thing that happened was 2 windows popped up, one on top of the other (see below). The first asked me what to do with the digital photos media, while the second asked me what to do with digital media player.
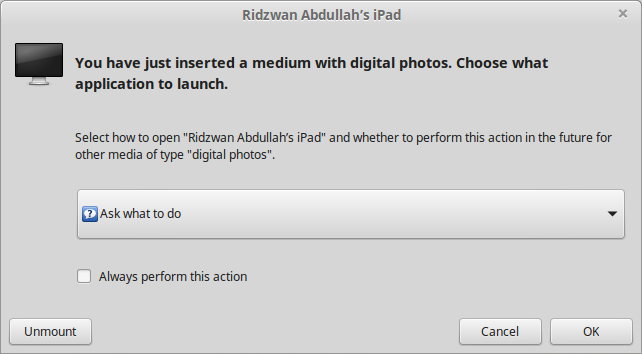
The second thing that happened was the the Nemo file manager opened up with the iPad listed under Devices as two items as shown below.
Since the file manager was already open, I dismissed the other two windows using the Cancel button. Clicking on the device that identified as my iPad resulted in display shown below.
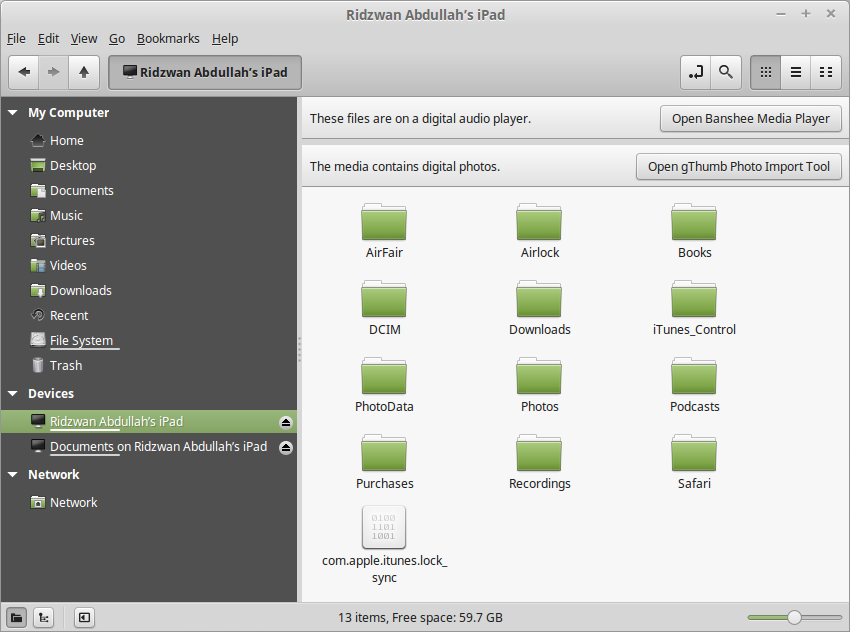
It was interesting to note that the file manager did detect that there were music and photo files on the iPad and even offer to sync and import these files - using Banshee or gPhoto. Unfortunately these do not work and the end result was not a single file was transferred either way.
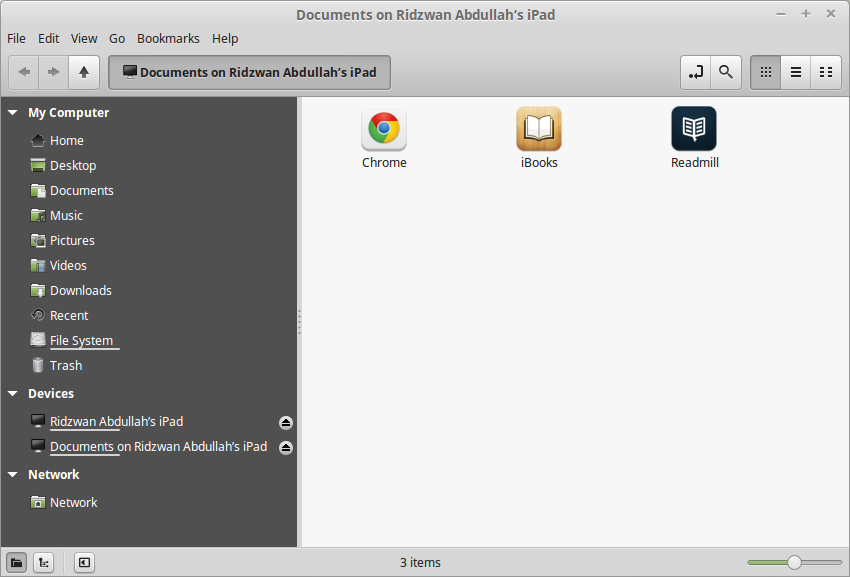
Clicking on the Documents on my iPad resulted in the display shown above. Double-clicking on the Readmill icon resulted in a Documents folder being displayed. Note that this folder on the iPad was created by the free Readmill book reader software, which was installed because it was not dependant on Apples Appstore. I could move ebook files back and forth between the PC and this folder without any problems. Files moved into this folder appeared in the book list and was treated just like another book.
The other two apps shown, Chrome and iBooks each had a Document folder, however, although I could move files from the PC to the iPad, they will not appear in any list. This was probably because the file moved was verboten - it was not purchased through the app store - so it was ignored.
There was another very strange thing that was observed while the iPad connected to the PC - it refuses to recognize any other USB device - for example a USB thumb drive, that was plugged into the PC. The only way to overcome this was to disconnect the iPad and perform a system reboot before connecting any other USB device - only then will the device work properly.
All in all, it was very disappointing that Apples iPad refuses to work with a Linux Mint 17.1 PC. The moral of this story is "Do not use any Apple device with a Linux Mint 17.1 PC" - I guess this is solely a job for my Apple Mac PC.
f) Connecting Android Smart Phones and Tablets Using Bluetooth
Any Bluetooth devices can be paired with an Linux Mint PC which have Bluetooth devices and services enabled. However, be aware that not all Bluetooth PC dongle will work with Linux Mint. The author had several dongle in his possession, ranging from old ones (which looks like a USB thumb drive) to the latest and very tiny dongle. After testing all the dongles, the author found out that only a few worked - and those were the newer models. So, if your dongle does not work with Linux Mint, try another one.
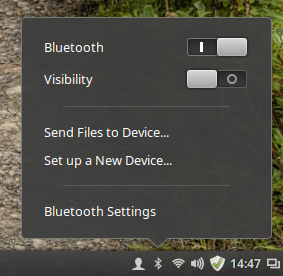
Before attempting to pair a Bluetooth device with a Linux Mint PC, plug in the dongle. Then check the notification area on the bottom right corner of the screen - you should see the Bluetooth icon there if your dongle works with Linux Mint (see figure below).

If the Bluetooth icon is clicked, you should see that Bluetooth services is enabled by default (see figure below).
You can now proceed to pair a Bluetooth device with Linux Mint. As an example, the Acer Iconia A500 tablet will be paired first. Of course, the tablet will need to have its Bluetooth sevices enabled first, then we need to pair the tablet with the PC. Perform the following steps:
- Touch "Settings" on the tablet home screen.
- Then enable Bluetooth by touching the switch to On.
- Then touch the Bluetooth item and in the right pane of the screen, make sure that the A500 device is visible by by touching the item. While the tablet is visible (a timeout timer will start on the tablet), the following steps need to be performed on the Linux Mint PC.
- Click on the Bluetooth icon in the panel of the Linux Mint PC.
- Click on the "Set up a New Device...".
- The Bluetooth New Device Setup screen (shown below) will appear with the words Searching for devices... on it. After a while (and if the visibilty of the tablet has not timed out), the item "A500" will be listed as shown. Select the device by clicking on it and then the "Continue" button.

- The next screen that will appear on the PC (shown below), will prompt you to enter the indicated PIN number on the tablet. At this time you will also be prompted on the tablet to enter the PIN number indicated on the PC screen.

- Enter the PIN number on the tablet, touch "OK" and the screen on Linux Mint will change to the one shown below - indicating success with the pairing. The PC name will also appear on the tablet as one of the paired devices.

Note that you can also rename the Linux Mint PC in the Bluetooth pane of the A500 tablet. To do do, just touch the settings icon (found to the right of the current PC name) and a Rename item will be displayed (see below). Touch the Rename item, then enter the new name.

In my case, I have renamed the PC from mint-0 to a more descriptive scully64-mint-17,1 (scully64 is the actual name of the PC). The final Bluetooth settings will look something like the figure below.

After the tablet has been paired with the PC, you can now easily exchange files between these two devices. To receive a file from the tablet, follow these steps:
- First we need to enable the ability to receive files over Bluetooth on the Linux Mint PC. This setting can be found in the Menu -> Preference -> Personal File Sharing (see below). In the Receive Files over Bluetooth section, enable Receive files in Downloads folder over Bluetooth and Notify about received files. Note that this setting only has to be done once. Click on the Close button when done.

- Next, use a file manager (for example, the ES File Manager) on the tablet to select the file to send to the PC. Then select the file, use the Share option, specify Bluetooth and the A500 as the recipient for the file.
- The file transfer will start. While the transfer is in progress, a blue icon will appear on the PCs notification area (see figure below). To monitor the progress on the tablet, touch the upload icon and the resulting display will tell you the percentage of the transfer that has been completed. Once the transfer has been completed, a notification will briefly appear on the screen of the PC.

To send a file over Bluetooth from the Linux Mint PC to the tablet, just follow these steps:
- First click on the Bluetooth icon the the PCs panel. The resulting display is as shown below.

- Then click on the Send Files to Device... item. The display will change as shown below.

- Browse to the file to send and click on the Select button. The display will change as shown below.

- Select the tablet A500 as the recipient of the file and click on the Send button. The display will change as shown below.

- You will be asked by the A500 tablet whether to accept the file from the PC - say Yes in this case.
- The display on the PC will change as shown below.

There may be occasions that you may want to unpair a device from the PC - for example, you have sold off the Android device. To remove (or unpair) a Bluetooth device (the tablet in this case) follow the steps below:
- On the tablet, touch "Settings" and enable Bluetooth (if it is off), then touch the "Bluetooth" item.
- On the screen that appears next, touch the option icon to the right of the PC name, then touch "Unpair". Then exit from here.
- On the PC, click on the Bluetooth icon in panel and select "Bluetooth Settings..."
- On the screen that appears next, select the device by clicking on it (see figure below) followed by a click on the "-" (minus) button below. You will be prompted to confirm the removal (see figure below) - click "Remove" to remove the device.


- The tablet will be removed (unpaired) - then close the settings window.
The process of pairing a smartphone with a Linux Mint PC is very similar to that of a tablet. The only difference is the screen display on the smartphone and where the menu items are located on the smartphone. The process can be summarized as follows:
- On the smartphone, enable Bluetooth services and make it visible.
- On the PC invoke set up a new device, let the PC discover the smartphone, enter the PIN on the smartphone, and it will be paired.
At this point, all the hardware that the author wish to connect to Rebecca has been taken care of. Of course, there are other hardware than can be connected to Rebecca but this article only describes the hardware in the authors possession that are connected to Rebecca.
This is the end of Part 2. In the third part, we will continue with tuning Rebecca. Stay tuned.
download file now
Monday, September 25, 2017
Tutorial USB Util 2 0 UNTUK OPL
Tutorial USB Util 2 0 UNTUK OPL
Bagi anda yang mengunakan Hd external atau Flashdisk sebagai media penyimpanan game,yang loadingnya mengunakan OPL atau Usb Advance.Instal gamenya bisa mengunakan USBUtil, lebih mudah dalam mengunakanya.untuk instal game sebenarnya banyak software seperti USB insane,USB Extreme dan masih banyak yang lainya.Tapi saya cenderung lebih baik mengunakan USBUtil.
Berikut ini gambaran cara Install Game Dengan USBUtil :
- Terlebih dahulu anda tancapkan HD EXternal atau Flashdisk anda sebagai media penyimpanan, untuk kali ini saya menggunakan harddisk external seagate 250 gb. .
- Buka program USBUtil tampilan awal seperti gambar di bawah

- Selanjutnya anda klik Close,anda pilih pada tab File,jika anda mengunakan file dari hardisk komputer anda dan File gamenya telah di Convert jadi File ISO maka anda pilih Create game from ISO.

- Selanjutnya anda akan di minta dimana anda menyimpan game anda untuk di Instal ke Flashdisk

- Pada option sebelah kiri anda pilih Di Drive mana anda simpan file game anda,saya menyimpanya di Drive D: terlihat pada gambar ada 2 game yang saya simpan dalam berbentuk iso image,selanjutnya pada option sebelah kanan pilih di drive mana anda menancapkan Hardisk Anda,jangan sampai salah memilih.
- sesudah anda pilih Hardisknya,anda pilih game yang anda ingin instal Contoh saya menginstal Burnout 3 TAKEDOWN selanjutnya anda klik pada tab Create.Tungulah hingga proses penginstalan selesai.
- cara di bawah ini adalah mengunakan CDDVD untuk menginstal Game pada HD External atau Flashdisk.

- Masukan CD/DVD game ke DVD rom Jalankan program USBUtil selanjutnya pada File anda pilih Create [GAME/ISO]from CD/DVD

- pada option sebelah kiri terlihat CD/DVD Rom Sudah terdeteksi secara otomatis,pada option sebelah kanan anda pilih dimana anda menancapkan Hardisk anda Selanjutnya anda klik pada tab Create,tungulah hinga proses penginstalan selesai.
download file now
TWILIGHT PHENOMENA 2 STRANGE MENAGERIE Collectors Edition español traducido
TWILIGHT PHENOMENA 2 STRANGE MENAGERIE Collectors Edition español traducido


Sinopsis:
"Estimado colega: He decodificado la antigua inscripci�n olmeca. Quiero probarla en m� mismo. Para convertirse en un semidi�s, un humano debe ser tan astuto como una serpiente, tan �gil como un coyote, y tener la gracia de un jaguar. La �ltima vez falle y termine en el cuerpo de un gib�n. Pero esta vez, voy a hacer todo bien..."
Escapa| de una misteriosa casa llena de criaturas peligrosas en Twilight Phenomena: Strange Menagerie! Cuando tu prima Mary desaparece, te diriges a M�xico para encontrarla. Haci�ndote pasar por un voluntario en un experimento secreto, empiezas a explorar la mansi�n donde Mary esta retenida. Pero cuando comienzas a ver extra�as criaturas arrastrandose en la casa, te das cuenta r�pidamente que el experimento al te inscribiste tiene resultados impactantes. Pero, �qui�n est� detr�s de todo ... y por qu�? �Puedes salvar a Mary y escapar de la casa antes que ambos se convierten en v�ctimas de la ciencia mortal del villano? Descubrelo en este emocionante juego de aventura y objetos ocultos!
La Edici�n de Coleccionista incluye:
* Juego de bonificaci�n revelando efectos secundarios molestos!
* Fondos magn�ficos y arte conceptual
* Pistas de m�sica y salvapantallas descargables
* Gu�a de estrategia integrada
Juego traducido por May!
Fuente: Magnoliajuegos
Gracias por compartir!
Requisitos del sistema:
OS: Windows XP / Windows Vista / Windows 7 y Windows 8
CPU: 1.4 GHz
RAM: 1024 MB
DirectX: 9.0
Descargar: Espa�ol... Links intercambiables!!!
Freakshare:
http://freakshare.com/files/gvr9qpan/twlipheno2stranmem.part1.rar.html
http://freakshare.com/files/tx698o5g/twlipheno2stranmem.part2.rar.html
DepositFiles:
http://dfiles.eu/files/45ddrj3jw
http://dfiles.eu/files/g06sppwrt
Acceso a enlaces VIP
(click en la imagen)

??????????????????????????????????????
download file now
Friday, September 22, 2017
TRIKS PC 2
TRIKS PC 2
Making the "Copy To Folder" and "Move To Folder" in the Context Menu To copy and move files you can do in the context menu. You just select the folder and click copy or cut. But here I will try to give some tips on how warm the option to add the option copy to folder and move to folder. First open notepad through the menu "start | all programs | accessories". After the open notepad copy the script below,
Windows Registry EditorVersion 5.00
[HKEY_CLASSES_ROOTAllFileSystemObjectSshellexContextMenuHandlers]
[HKEY_CLASSES_ROOTAllFileSystemObjectSshellexContextMenuHandlersCopy To]
@="{C2FBB630-2971-11D1-A18C-00C04FD75D13}"
[HKEY_CLASSES_ROOTAllFileSystemObjectSshellexContextMenuHandlersMove To]
@="{C2FBB631-2971-11D1-A18C-00C04FD75D13}"
After that, save with the name "CopyMove.reg". Keep clicking the notepad file you created earlier, click YES when the question arises. Now you try to right click the folder,
If have not seen the option "copy to and move to" try restarting your PC ...!
GOOD TRY
download file now
Thursday, September 21, 2017
Ubuntu Installer Paid 2 0 Cooked and ready to be tasted
Ubuntu Installer Paid 2 0 Cooked and ready to be tasted
Well tasted by my beta testers anyway...but yes 2.0 for the Paid app is ready! so long as there are no more bugs the new update will be loaded to the market tomorrow.
Note that once the new update is on-line the sale will end, so if you have not already grap your paid copy for 20%!!
The change log for the new version is:
*New V5 small image, featuring fixed Java, even more lightweight (now around 1.2GB free) and user can set screen size on boot
*PAID New Build guide which shows you how to build your own Ubuntu images
*Brand new UI To make the whole thing more useable
*PAID new one click boot feature to allow quick booting from either the widget or inside the app
*PAID new widget to activate the one click boot
*PAID app install guide changed in light of one click boot
*Fixed keyboard mapping of random letters in Gnome
The free version should then be updated by the end of next week and will include the new UI and the new V5 small image and Gnome mapping fix.
Backtrack will then be updated shortly after that to include pretty much everything in the change log above (apart from the small image, there is still no small image for backtrack)
download file now
Wednesday, September 20, 2017
Ultimate Ninja Blazing 1 5 2 Mod God Mode High Damage APK
Ultimate Ninja Blazing 1 5 2 Mod God Mode High Damage APK

Ultimate Ninja Blazing
NARUTO SHIPPUDEN: Ultimate Ninja Blazing � Join the battle with your favorite NARUTO characters, fighting in Shinobi Formation Battles across the story of the renowned anime!Fight hordes of enemies and complete missions using the all-new Shinobi Formation Battle system: a strategic RPG fighting system that unleashes exhilarating combination attacks with your allies. Master team field skills, discover new ninjutsu and become the next Hokage in the first-ever Ultimate Ninja mobile game!
NARUTO SHIPPUDEN: Ultimate Ninja Blazing Features:
Battle Enemies with Your Ninja Dream Team!
� Control over 100 NARUTO heroes, each with their own unique attacks and tactics
� Fight enemies using ninjutsu, powerful special techniques and combination attacks
� Unleash ninjutsu abilities for powerful offensive strikes, defensive abilities that can stop enemy movement, and more
Mission Mode Based On the Original Anime Storyline!
� Mission Mode allows you to relive the experience of the NARUTO story
� Battle through stories from the original series
Ninja Skills and Powerful Attacks!
� Fighting skills include close-ranged and combination attacks for massive damage
� Ninja Field Skills can turn the tide of battle in your favor
� Fighting closely with your team allows for great opportunity, but also great risk
Fight Ninjas from Around the World in Online Multiplayer Games!
� Battle against other ninjas in multiplayer mode
� Join together and take on missions with up to 3 other ninjas
New Games in Monthly Phantom Castle Events!
� Compete against other ninjas for the most points and aim for the top in a special mode that can only be accessed during special events
� Battle against a multitude of enemies that await you as you climb the Phantom Castle
WHATS NEW
1.5.2?UI improvements
?Miscellaneous bug fixes
HACK / MOD FEATURES
1. God Mode (HP Decreasing But Never Die)2. High Attack (Show Normal Number But Do High Damage)
*Settings:
BG Music = 0 | Normal Multiplayer
Voice = 0 | Normal PvP
Sound FX = 0 | Turn off High Attack?
HOW TO INSTALL
1. Download the Modded APK file under using your favorite browser or a download manager of your choice.
2. Copy the file over to your Android device via USB, Bluetooth or Wireless. Skip this step if youre using your Android device to download the mod.
3. Browse to the location where the hacked APK is stored using a file manager of your choice.
4. Tap on the .APK file then tap Install and the installation should begin.
5. Once the installation is complete, everything should be ready. Enjoy!
Problems during installation? Follow this step by step Tutorial: How To Install a Mod
DOWNLOAD

Download: Ultimate.Ninja.Blazing 1.5.2 Mod DownloadAndDroid.apk / Mirror (26.4 Mb)
Updated to 1.5.6
Ultimate Ninja Blazing 1.5.6 Mod (God Mode, High Damage) APK
SCREENSHOTS

DISCLAIMER
The different tutorials that are found in this channel have the only educational purpose. I do not take responsibility for the misuse this content done individually.download file now
Subscribe to:
Posts (Atom)