Showing posts with label 17. Show all posts
Showing posts with label 17. Show all posts
Tuesday, September 26, 2017
Tuning Rebecca Linux Mint 17 1 Cinnamon Part 2
Tuning Rebecca Linux Mint 17 1 Cinnamon Part 2
This is Part 2 of the series - for those who have not read Part 1, click here. In this part, we will continue with connecting more hardware to Rebecca (aka Linux Mint 17.1).
d) Connecting Android Smart Phones and Tablets Using USB
This section describes how to connect Android smart phones and tablets to a Linux Mint 17.1 PC via a USB port. Most modern Android-based smart phones have the built-in capability of being USB connected to a PC. Some also even have software written specifically for communicating with a PC, but the ability to read and write to the storage media is a basic ability of these devices. Connection between PC and most modern Android smart phones uses the Media Transfer Protocol (MTP) - for more information on MTP, click here. Note that MTP is only for file transfers and do NOT have the ability to play a media file (audio or video) located on the device - trying to use a media player on Rebecca to play media files on the phone or tablet will cause errors - some of which can only be cured by a restart of the PC.
The author has two Android smart phones and one Android tablet in his possession. The tablet is an old (by tablet standard) Acer Iconia A500 using Android 4.0.3 (Ice Cream Sandwich) - old but still useful. One of the two smart phones is a China made knockoff of the Samsung Galaxy Note 2 and is using Android 4.1.1 (Jellybean). This phone is still serviceable but because of the limited RAM (512MB!), it drove the author to purchase a real Samsung Galaxy Note 2 - which is now running Android 4.4.2 (KitKat). So having these 3 devices gave me an opportunity to test whether the various Android (4.0.3 to 4.4.2) versions support MTP when connected to Rebecca.
TIP: For the following tests, a KNOWN good USB port on Rebecca was used. The author had some problems with a intermittently working USB port on Rebecca - symptoms were the PC froze solid whenever a device was connected using this USB port. Swapping USB cables did not help. When the problem was determined to lie with the USB port on Rebecca, that port was blocked off and another USB port was used but occasional problems was detected - this time due to el-chepo USB cables. So make sure that you only use known working USB ports and known good USB cables when performing connections from devices to Rebecca.
Starting with the oldest device first, it was connected to a known good USB port on Rebecca using the cable supplied with the tablet. The message Connect as a media device appeared on the tablet and a window popped up on Rebecca (see figure below), plus an icon appeared on the desktop.
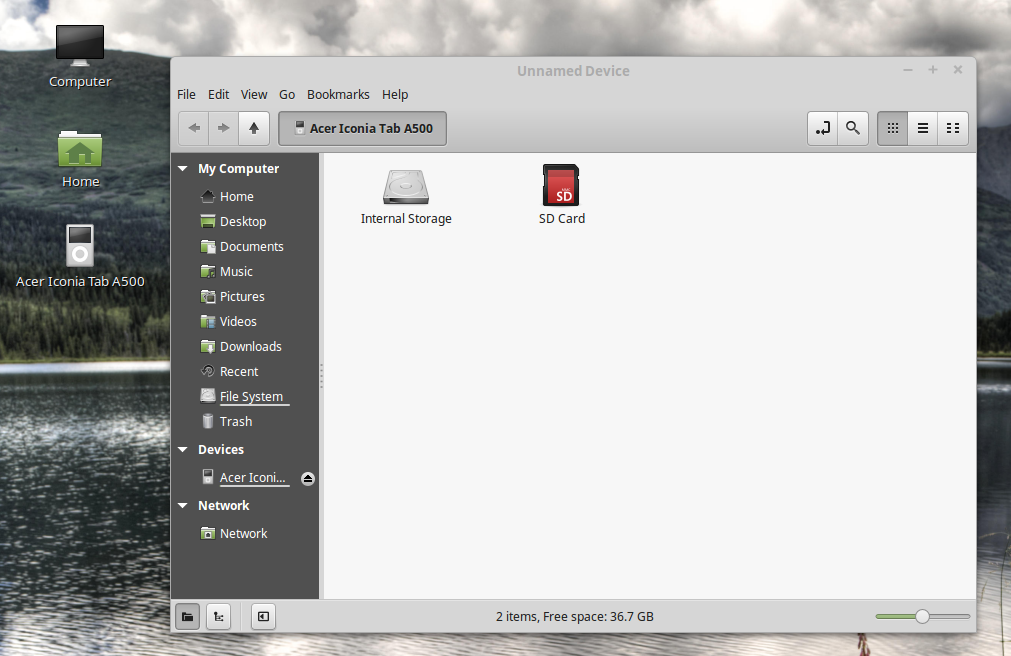
Note that the PC correctly identified the device as the Acer Iconia Tab A500 and using the file manager, it was possible to browse through both the storage units - internal and SD card - on the tablet. It was also possible to transfer files back and forth between the PC and the tablet using the file manger drag and drop feature. The only hiccup was that the Nemo file manager has a title of Unidentified Device whenever the Acer tablet was connected. To disconnect the tablet, the eject button on the file manager device was clicked upon with the mouse. All in all, it was a successful test.
Next the China made smart phone was connected to Rebecca using the good USB port and the USB cable supplied with the phone. To my surprise, the following screen appeared on the phone.
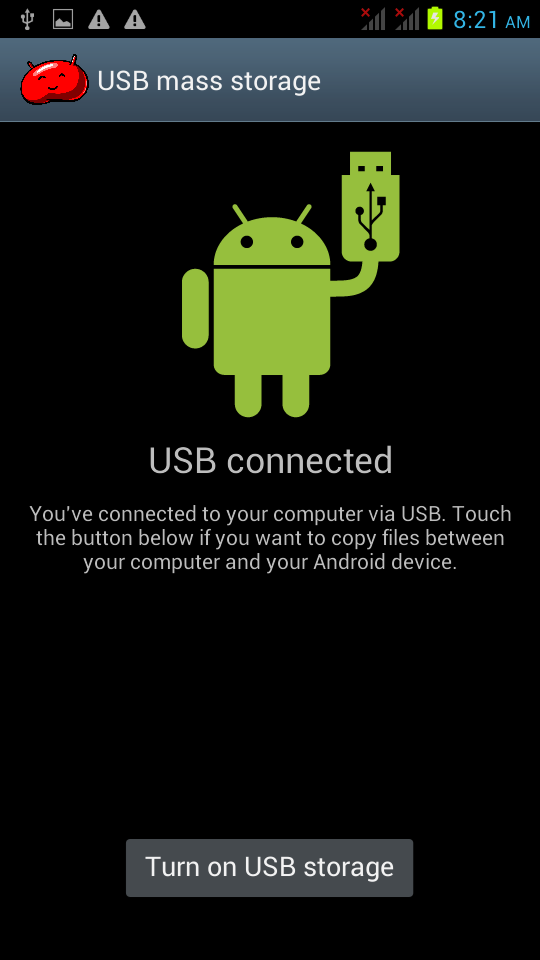
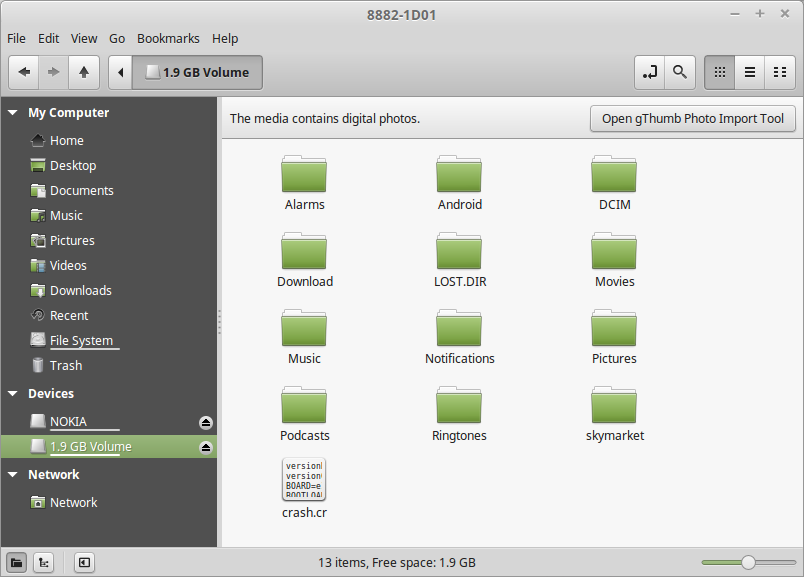
So I guess that the fake Note 2 phone does not support MTP after all - it still relies on the old-fashioned UMS despite it using Android 4.1.1 (Jellybean). I guess the manufacturer of this phone did not implement MTP for this device. However, and as shown below, it was still possible to browse all the files on the phones main storage and SD card (an old NOKIA microSD card salvaged from an old Nokia phone) and transfer files back and forth - albeit at a very much slower pace.
Next the genuine Samsung Galaxy Note 2 was connected to Rebecca using the good USB port and the USB cable supplied with the phone. The first thing that happened was a beep from the phone and a notification message that read Connected as a media device briefly appeared on the phone. It does not seem to matter whether phone was asleep or otherwise when connected. On the PC, the file manager popped up and an icon labelled GT N7100 appeared on the desktop (see below).
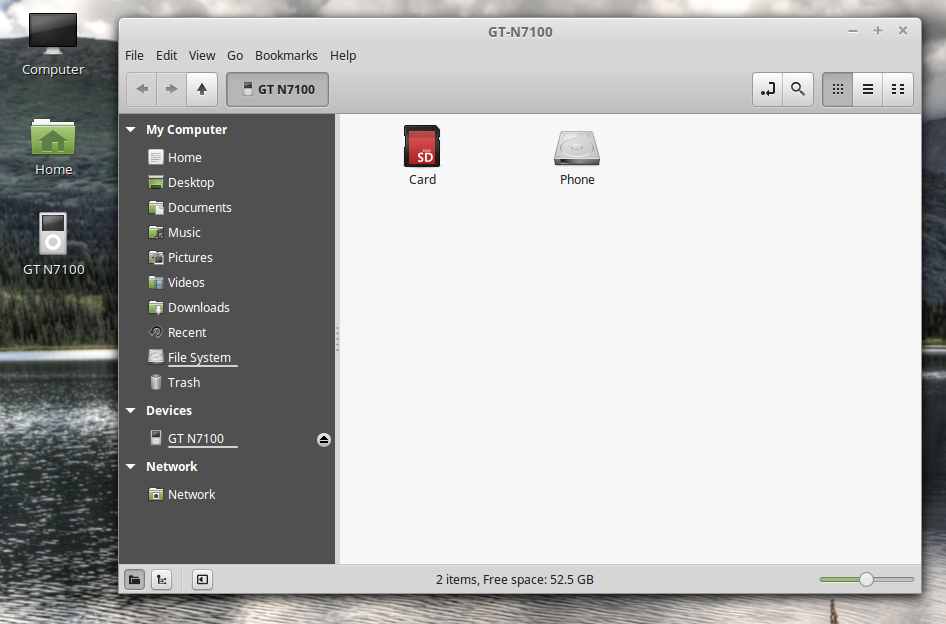
Note that the phone was correctly identified (the correct model number for the Samsung Galaxy Note 2 is GT-N7100) on both the desktop icon and the Nemo file manager. Even the title in the file manager was correct (unlike the Acer A500). It was gratifying to find out that the files on both the storage media on the phone can be browsed by the file manager. It was also possible to transfer files back and forth between the PC and the phone using the file manger drag and drop feature. The MTP file transfer portion worked with the phone with no problem at all. Disconnecting the phone was easy - just right-click on the desktop icon for the phone and select Eject. Alternatively, click on the eject button for the device in the file manager window.
To summarize, Linux Mint 17.1 will handle any Android tablet or smartphone connected to it over USB without any problem or without having to install any other software. Just note that if you stick to file transfer operations only, then you should not encounter any problems.
e) Connecting Apple Devices Using USB
Apple�s devices poses a problem for Linux Mint 17.1 � it doesn�t include MTP support at all. Apple�s iPod, iPhone, and iPad use their own proprietary syncing protocol along with iTunes, so it is understandable that they do not support MTP - a competing protocol. However, the author has the original iPad in his possession and was curious to find out what would happen if he connected this device to Rebecca over USB.
Well, the first thing that happened was 2 windows popped up, one on top of the other (see below). The first asked me what to do with the digital photos media, while the second asked me what to do with digital media player.
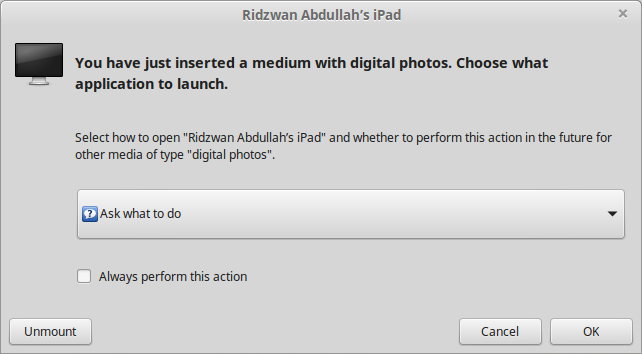
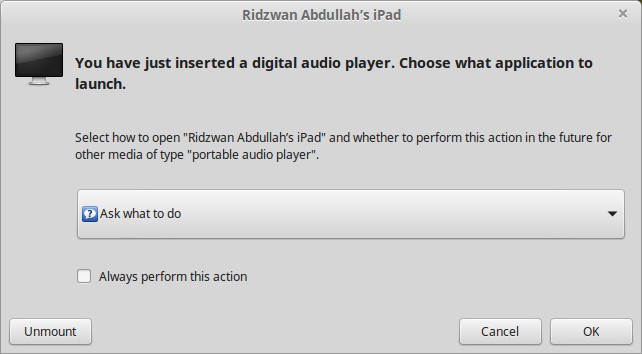
The second thing that happened was the the Nemo file manager opened up with the iPad listed under Devices as two items as shown below.
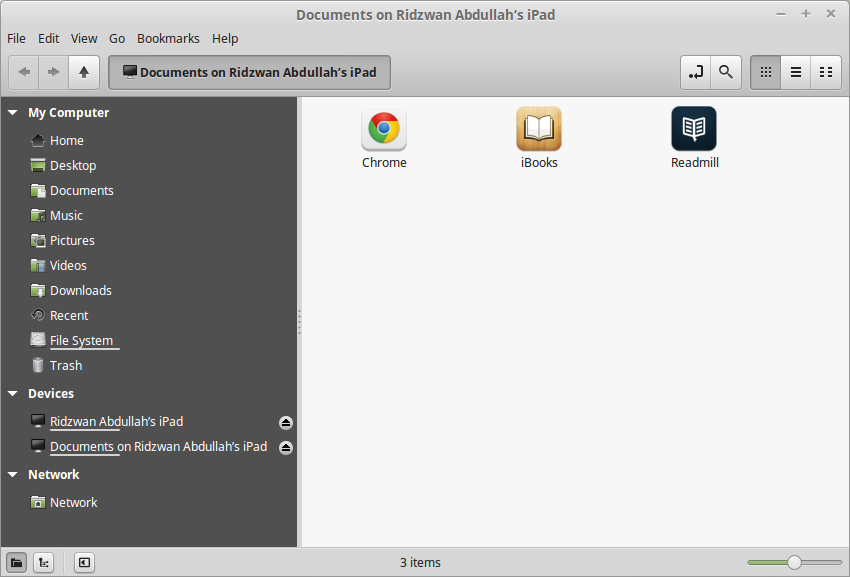
Since the file manager was already open, I dismissed the other two windows using the Cancel button. Clicking on the device that identified as my iPad resulted in display shown below.
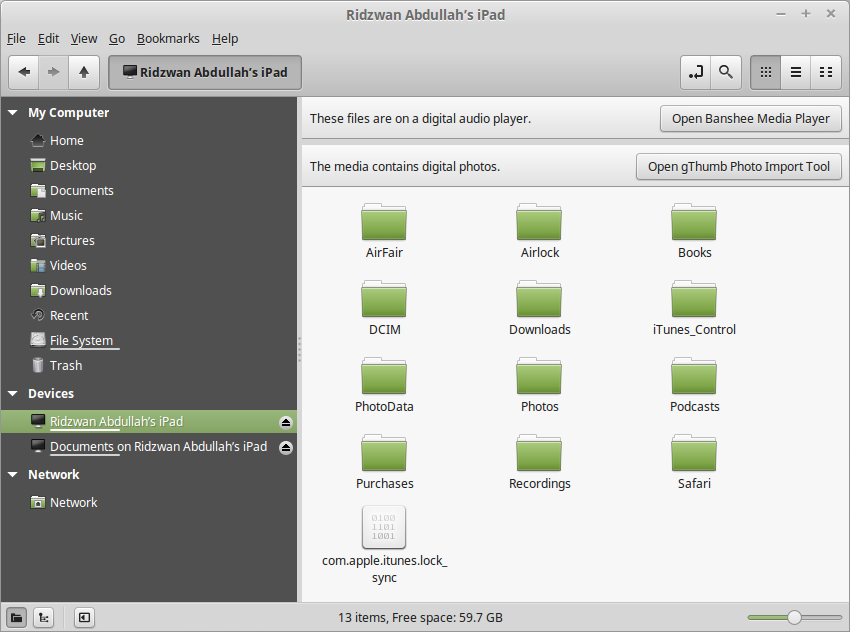
It was interesting to note that the file manager did detect that there were music and photo files on the iPad and even offer to sync and import these files - using Banshee or gPhoto. Unfortunately these do not work and the end result was not a single file was transferred either way.
Clicking on the Documents on my iPad resulted in the display shown above. Double-clicking on the Readmill icon resulted in a Documents folder being displayed. Note that this folder on the iPad was created by the free Readmill book reader software, which was installed because it was not dependant on Apples Appstore. I could move ebook files back and forth between the PC and this folder without any problems. Files moved into this folder appeared in the book list and was treated just like another book.
The other two apps shown, Chrome and iBooks each had a Document folder, however, although I could move files from the PC to the iPad, they will not appear in any list. This was probably because the file moved was verboten - it was not purchased through the app store - so it was ignored.
There was another very strange thing that was observed while the iPad connected to the PC - it refuses to recognize any other USB device - for example a USB thumb drive, that was plugged into the PC. The only way to overcome this was to disconnect the iPad and perform a system reboot before connecting any other USB device - only then will the device work properly.
All in all, it was very disappointing that Apples iPad refuses to work with a Linux Mint 17.1 PC. The moral of this story is "Do not use any Apple device with a Linux Mint 17.1 PC" - I guess this is solely a job for my Apple Mac PC.
f) Connecting Android Smart Phones and Tablets Using Bluetooth
Any Bluetooth devices can be paired with an Linux Mint PC which have Bluetooth devices and services enabled. However, be aware that not all Bluetooth PC dongle will work with Linux Mint. The author had several dongle in his possession, ranging from old ones (which looks like a USB thumb drive) to the latest and very tiny dongle. After testing all the dongles, the author found out that only a few worked - and those were the newer models. So, if your dongle does not work with Linux Mint, try another one.
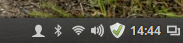
Before attempting to pair a Bluetooth device with a Linux Mint PC, plug in the dongle. Then check the notification area on the bottom right corner of the screen - you should see the Bluetooth icon there if your dongle works with Linux Mint (see figure below).
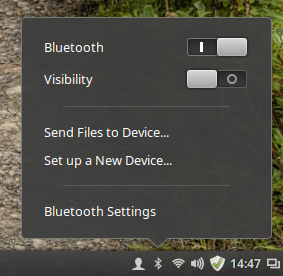
If the Bluetooth icon is clicked, you should see that Bluetooth services is enabled by default (see figure below).
You can now proceed to pair a Bluetooth device with Linux Mint. As an example, the Acer Iconia A500 tablet will be paired first. Of course, the tablet will need to have its Bluetooth sevices enabled first, then we need to pair the tablet with the PC. Perform the following steps:
- Touch "Settings" on the tablet home screen.
- Then enable Bluetooth by touching the switch to On.
- Then touch the Bluetooth item and in the right pane of the screen, make sure that the A500 device is visible by by touching the item. While the tablet is visible (a timeout timer will start on the tablet), the following steps need to be performed on the Linux Mint PC.
- Click on the Bluetooth icon in the panel of the Linux Mint PC.
- Click on the "Set up a New Device...".
- The Bluetooth New Device Setup screen (shown below) will appear with the words Searching for devices... on it. After a while (and if the visibilty of the tablet has not timed out), the item "A500" will be listed as shown. Select the device by clicking on it and then the "Continue" button.

- The next screen that will appear on the PC (shown below), will prompt you to enter the indicated PIN number on the tablet. At this time you will also be prompted on the tablet to enter the PIN number indicated on the PC screen.

- Enter the PIN number on the tablet, touch "OK" and the screen on Linux Mint will change to the one shown below - indicating success with the pairing. The PC name will also appear on the tablet as one of the paired devices.

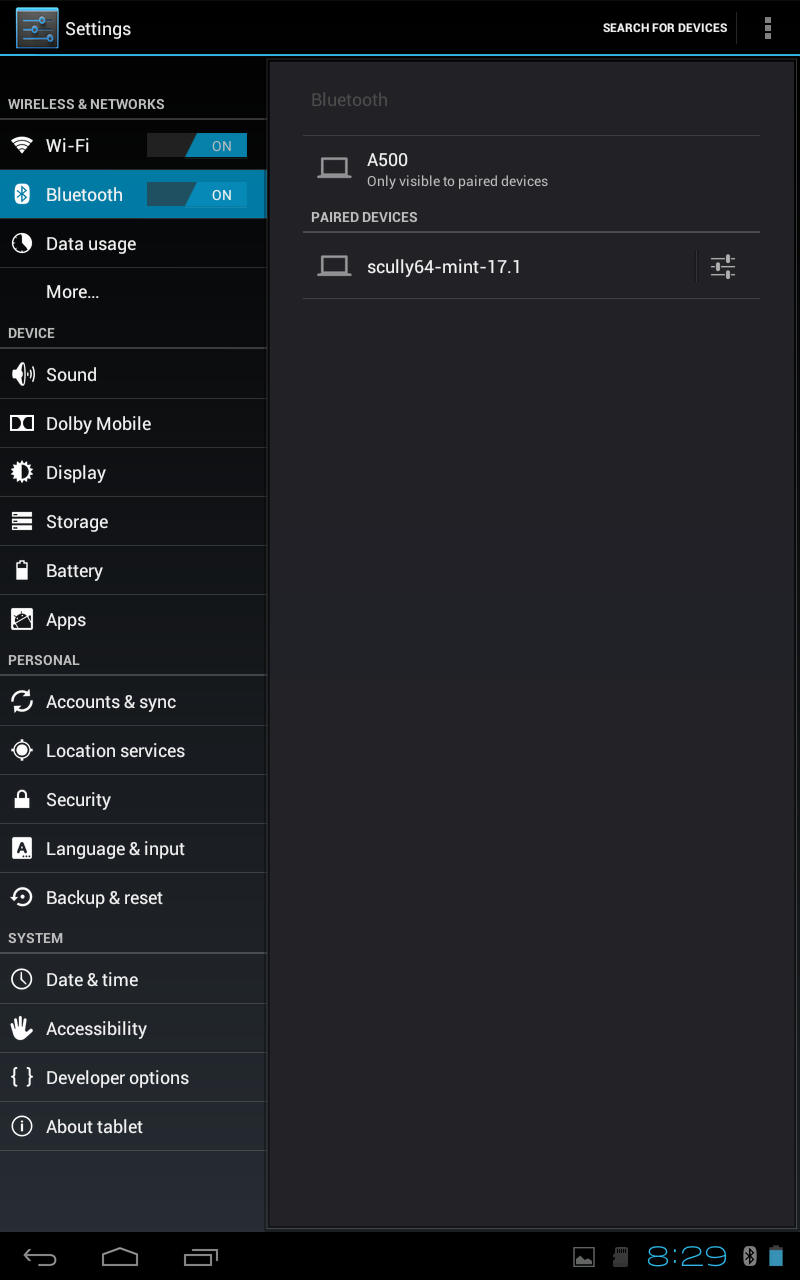
Note that you can also rename the Linux Mint PC in the Bluetooth pane of the A500 tablet. To do do, just touch the settings icon (found to the right of the current PC name) and a Rename item will be displayed (see below). Touch the Rename item, then enter the new name.

In my case, I have renamed the PC from mint-0 to a more descriptive scully64-mint-17,1 (scully64 is the actual name of the PC). The final Bluetooth settings will look something like the figure below.
After the tablet has been paired with the PC, you can now easily exchange files between these two devices. To receive a file from the tablet, follow these steps:
- First we need to enable the ability to receive files over Bluetooth on the Linux Mint PC. This setting can be found in the Menu -> Preference -> Personal File Sharing (see below). In the Receive Files over Bluetooth section, enable Receive files in Downloads folder over Bluetooth and Notify about received files. Note that this setting only has to be done once. Click on the Close button when done.

- Next, use a file manager (for example, the ES File Manager) on the tablet to select the file to send to the PC. Then select the file, use the Share option, specify Bluetooth and the A500 as the recipient for the file.
- The file transfer will start. While the transfer is in progress, a blue icon will appear on the PCs notification area (see figure below). To monitor the progress on the tablet, touch the upload icon and the resulting display will tell you the percentage of the transfer that has been completed. Once the transfer has been completed, a notification will briefly appear on the screen of the PC.

To send a file over Bluetooth from the Linux Mint PC to the tablet, just follow these steps:
- First click on the Bluetooth icon the the PCs panel. The resulting display is as shown below.

- Then click on the Send Files to Device... item. The display will change as shown below.

- Browse to the file to send and click on the Select button. The display will change as shown below.

- Select the tablet A500 as the recipient of the file and click on the Send button. The display will change as shown below.

- You will be asked by the A500 tablet whether to accept the file from the PC - say Yes in this case.
- The display on the PC will change as shown below.

There may be occasions that you may want to unpair a device from the PC - for example, you have sold off the Android device. To remove (or unpair) a Bluetooth device (the tablet in this case) follow the steps below:
- On the tablet, touch "Settings" and enable Bluetooth (if it is off), then touch the "Bluetooth" item.
- On the screen that appears next, touch the option icon to the right of the PC name, then touch "Unpair". Then exit from here.
- On the PC, click on the Bluetooth icon in panel and select "Bluetooth Settings..."
- On the screen that appears next, select the device by clicking on it (see figure below) followed by a click on the "-" (minus) button below. You will be prompted to confirm the removal (see figure below) - click "Remove" to remove the device.


- The tablet will be removed (unpaired) - then close the settings window.
The process of pairing a smartphone with a Linux Mint PC is very similar to that of a tablet. The only difference is the screen display on the smartphone and where the menu items are located on the smartphone. The process can be summarized as follows:
- On the smartphone, enable Bluetooth services and make it visible.
- On the PC invoke set up a new device, let the PC discover the smartphone, enter the PIN on the smartphone, and it will be paired.
At this point, all the hardware that the author wish to connect to Rebecca has been taken care of. Of course, there are other hardware than can be connected to Rebecca but this article only describes the hardware in the authors possession that are connected to Rebecca.
This is the end of Part 2. In the third part, we will continue with tuning Rebecca. Stay tuned.
download file now

Saturday, September 16, 2017
Ubuntu 17 04 Zesty Zapus Beta 2 Installation on VMware Workstation
Ubuntu 17 04 Zesty Zapus Beta 2 Installation on VMware Workstation
 |
| Ubuntu 17.04 (Zesty Zapus) Installation on VMware Workstation |
This video tutorial shows Ubuntu 17.04 (Zesty Zapus) Beta 2 installation on VMware Workstation/Player step by step. This tutorial is also helpful to install Ubuntu 17.04 on physical computer or laptop hardware. We also install VMware Tools (Open VM Tools) on Ubuntu 17.04 Beta 2 for better performance and usability features such as Fit Guest Now, Drag-Drop File and Clipboard Sharing.
Ubuntu 17.04 Beta 2 Installation Steps:
- Download Ubuntu 17.04 Beta 2 ISO
- Create Virtual Machine on VMware Workstation/Player
- Start Ubuntu 17.04 Zesty Zapus Installation
- Install VMware Tools (Open VM Tools)
- Test VMware Tools Features: Fit Guest Now, Drag-Drop File and Clipboard Sharing
Installing Ubuntu 17.04 (Zesty Zapus) Beta 2 on VMware Workstation
Ubuntu 17.04 Zesty Zapus New Features and Improvements
- The default DNS resolver is now systemd-resolved.
- For new installs, a swap file will be used instead of a swap partition.
- Ubuntu 17.04 is based on the Linux Kernel 4.10.
- It support printers which allow printing without printer-specific drivers.
- LibreOffice has been updated to 5.3.
- The Calendar app now has a Week view.
- gconf is no longer installed by default since it has long been superseded by gsettings.
- Apps provided by GNOME have been updated to 3.24. Exceptions are the Nautilus file manager (3.20), Terminal (3.20), Evolution (3.22), and Software (3.22).
Ubuntu 17.04 Desktop Minimum System Requirements
- 700 MHz processor (about Intel Celeron or better)
- 512 MB RAM (system memory)
- 5 GB of hard-drive space (or USB stick, memory card or external drive but see LiveCD for an alternative approach)
- VGA capable of 1024x768 screen resolution
- Either a CD/DVD drive or a USB port for the installer media
- Internet access is helpful
download file now
Wednesday, September 6, 2017
Ubuntu 17 04 si chiamer� Zesty Zapus
Ubuntu 17 04 si chiamer� Zesty Zapus
Mark Shuttleworth ha annunciato il nome in codice della prossima release di Ubuntu che sar� rilasciata ad Aprile 2017.
Ubuntu 17.04 si chiamer� Zesty Zapus. Lo Zapus, lanimale totem di questo rilascio, � un roditore della famiglia dei Dipodidi comunemente noto come topo saltatore nordamericano.
 |
| Uno Zapus. Immagine via Wikipedia |
Largo dunque allo Zapus Piccante (e saltatore)!
Di seguito vi riporto il testo integrale del post di Mark Shuttleworth con lannuncio ufficiale
The naming of Ubuntu releases is, of course, purely metaphorical. We are a diverse community of communities � we are an assembly of people interested in widely different things (desktops, devices, clouds and servers) from widely different backgrounds (hello, world) and with widely different skills (from docs to design to development, and those are just the d�s).
As we come to the end of the alphabet, I want to thank everyone who makes this fun. Your passion and focus and intellect, and occasionally your sharp differences, all make it a privilege to be part of this body incorporate.
Right now, Ubuntu is moving even faster to the centre of the cloud and edge operations. From AWS to the zaniest new devices, Ubuntu helps people get things done faster, cleaner, and more efficiently, thanks to you. From the launch of our kubernetes charms which make it very easy to operate k8s everywhere, to the fun people seem to be having with snaps at snapcraft.io for shipping bits from cloud to top of rack to distant devices, we love the pace of change and we change the face of love.
We are a tiny band in a market of giants, but our focus on delivering free software freely together with enterprise support, services and solutions appears to be opening doors, and minds, everywhere. So, in honour of the valiantly tiny leaping long-tailed over the obstacles of life, our next release which will be Ubuntu 17.04, is hereby code named the �Zesty Zapus�.
PS: La domanda ora nasce spontanea. Ora che siamo arrivati alla Z che schema verr� usato per le versioni future? Si ricomincia lalfabeto daccapo?
PPS: Ecco un video che mostra la tipica camminata dello Zapus
PPS: Ecco un video che mostra la tipica camminata dello Zapus
download file now
Tuesday, August 22, 2017
Ubuntu 17 04 Zesty Zapus Beta 1 Flavors Available For Download
Ubuntu 17 04 Zesty Zapus Beta 1 Flavors Available For Download
The official Ubuntu 17.04 flavors are available for download. Heres a quick look at whats new in the latest 17.04 beta release of Ubuntu Budgie, Xubuntu, Ubuntu GNOME, and Kubuntu.
This article doesnt cover Lubuntu, Ubuntu Kylin and Ubuntu Studio, flavors that also had a 17.04 beta 1 release, but which dont seem to have any interesting changes, at least according to their release notes. Other flavors, such as Ubuntu MATE, as well as Ubuntu (with Unity) did not take part in the 17.04 beta 1 release.
All the Ubuntu 17.04 Zesty Zapus beta 1 flavors include Xorg server 1.18.4, Mesa 13.0.4 (17.0.0 is available in the proposed repositories) and the 4.10.0-8.10 Ubuntu Linux kernel, based on the upstream 4.10-rc8 Linux kernel.
Ubuntu Budgie 17.04 Zesty Zapus beta 1

Ubuntu Budgie is a newcomer among the official Ubuntu flavors. It uses Budgie Desktop by default, and it consists on a libmutter-based window manager and a customizable panel which includes an applet, notification and customization center, called Raven.
Ubuntu Budgie integrates tightly with the GNOME desktop, making use of its System Settings as well as the GNOME application stack, such as GNOME Files (Nautilus), Documents (Gedit), and so on.
Ubuntu Budgie 17.04 Zesty Zapus beta 1 includes the latest Budgie Desktop 10.2.9 along with:
- GNOME 3.22 for the most part, with various 3.24 beta bits;
- Budgie Welcome application comes with a browser ballot screen;
- AppIndicator is supported by default;
- Terminix is the default terminal emulator;
- compared to the unofficial Budgie Remix, Ubuntu Budgie 17.04 beta 1 includes quite a few extra GNOME applications by default. Among the applications included are: Files, Software, Books, Documents, Eye of GNOME (Image Viewer), System Monitor, Maps, Weather, Calendar, Contacts and Disks.
Here are a few more Ubuntu Budgie 17.04 screenshots:

 |
| A browser ballot is included with Budgie Welcome |
 |
| Terminix is available by default in Ubuntu Budgie 17.04 beta 1 |
Download Ubuntu Budgie Zesty Zapus beta 1 | release notes
Ubuntu GNOME 17.04 Zesty Zapus beta 1

Ubuntu GNOME is an Ubuntu flavor that tries to provide a pure GNOME experience. It uses GNOME Shell as the default shell, and ships with most GNOME applications by default.
Ubuntu GNOME 17.04 Zesty Zapus beta 1 includes:
- GNOME Shell 3.24 beta (3.23.90), which includes a Night Light, a new feature that can be used to automatically reduce the blue light emitted by your computer screen at sunset or whenever you choose;
- GNOME 3.24 beta bits, mixed with GNOME 3.22. Among the GNOME 3.24 beta packages included are: GNOME Control Center / Settings Daemon, Photos, Videos (Totem), Maps, Music, and Disks.
- there are a couple of applications that have not been updated from version 3.20: Files (Nautilus) and Terminal;
- the Software app has been updated to version 3.22 and now supports Flatpak;
- Flatpack 0.8 is installed by default (snapd is also available);
- Chrome GNOME Shell, a package that provides support for installing GNOME Shell extensions from Google Chrome, Chromium and other Chromium-based web browsers (Opera, Vivaldi) is installed by default;
- the tracker search indexing engine is now sandboxed;
- some applications are no longer installed by default: Brasero, Evolution, Seahorse and Xdiagnose. They continue to be available in the repositories though;
- for new installs, a swap file will be used by default instead of a swap partition;
- the default DNS resolve is now systemd-resolved.
Here is the new Night Light option available in GNOME Shell 3.24 beta:

Download Ubuntu GNOME 17.04 Zesty Zapus beta 1 | release notes
Xubuntu 17.04 Zesty Zapus beta 1

Xubuntu is an Ubuntu flavor which uses Xfce by default, a fast, lightweight desktop environment.
Xubuntu 17.04 Zesty Zapus beta 1 includes:
- Parole 0.9.0 which comes with a new mini mode and some other changes
- Thunar 1.6.11, which comes with quite a few bug fixes, including for crashes when cuting/pasting multiple files, renaming files, and more.
- Whisker Menu 2.1.0 now supports editing launchers from the context menu, supports desktop actions amd theres an option to hide category names;
- Xfce4 Task Manager now includes the ability to click on wondow to select process
- various other application updates.
Download Xubuntu 17.04 Zesty Zapus beta 1 | release notes
Kubuntu 17.04 Zesty Zapus beta 1

Kubuntu is an Ubuntu flavor which uses the KDE Plasma desktop as the default desktop environment.
Kubuntu 17.04 Zesty Zapus beta 1 includes KDE Applications 16.12.1 (see whats new in 16.12.0 , since .1 is a bugfix release) and Plasma 5.9.2 (see whats new in Plasma 5.9.0), which ships with quite a few changes:
- interactive previews for the desktop notifications;
- its now possible to switch between windows in Task Manager using the Meta + number shotcuts;
- the Task Manager now supports pinning different applications in each activity;
- application playing audio are now marked in the Task Manager similar to how this is done in most web browser; also, you can easily mute an application from the Task Manager context menu;
- the Quick Launch applet now supports jump actions;
- improved look and feel, including a more compact and beautiful design for the Breeze scrollbars;
- global menus have returned;
- new configuration module for network connections.
Here are a few more Kubuntu 17.04 Zesty Zapus beta 1 screenshots:
 |
| Global menu button |
 |
| Global menu widget |
 |
| New network configuration module |
 |
| The Quick Launch applet now supports jump list actions |
Download Kubuntu 17.04 Zesty Zapus beta 1 | release notes
Download links and release notes for the other Ubuntu flavors:
- Lubuntu 17.04 Zesty Zapus beta 1: download | release notes
- Ubuntu Studio 17.04 Zesty Zapus beta 1: download | release notes
- Ubuntu Kylin 17.04 Zesty Zapus beta 1: download | release notes


via Web Upd8 - Ubuntu / Linux blog http://ift.tt/2mjG4bD
download file now
Tuesday, August 15, 2017
Ubuntu 17 04 Beta 1 Released New Features And Download
Ubuntu 17 04 Beta 1 Released New Features And Download

Ubuntu 17.04 is scheduled to release in April. Before that, official Ubuntu derivatives (or flavors) have participated in the first beta release. As a result, Ubuntu 17.04 Zesty Zapus Beta 1 has landed and it�s available for testing.
On a side note, last year in December, I wrote about the next Ubuntu release, i.e., Ubuntu 17.04, its release schedule, expected features, etc. In case you missed that, you can read it here. Also, in the upcoming days, I�ll be updating that article with more updates and new features.
Coming back to the current Ubuntu 17.01 Beta 1 release, the favors participating in the release are Lubuntu, Kubuntu, Xubuntu, Ubuntu Budgie, Ubuntu GNOME, Ubuntu Kylin, and Ubuntu Studio. Ubuntu Unity and Ubuntu MATE hasn�t participated in this release. It should be noted that it�s the first beta release of Ubuntu Budgie since it became an official Ubuntu flavor.
Read ahead to find the download links and brief information regarding the Beta 1 releases of these flavors. The Beta 1 is based on Linux kernel 4.10.
Ubuntu GNOME 17.04 Beta 1 features and download:
- Based on GNOME 3.24 Beta
- Updated GNOME Software, Calendar, other apps
- New Night Light feature
- Flatpack 0.8
- Files app Nautilus at version 3.20
- Instant messaging app Empathy removed
- New Characters map utility installed by default
- Updated set of packages
Download Ubuntu GNOME 17.04 Beta 1
Ubuntu Budgie 17.04 Beta 1 features and download:
- Latest budgie-desktop stable release v10.2.9.
- TK+3.24 applications (in beta) with GTK+3.24 window manager
- Budgie-welcome app with browser ballot screen
- AppIndicator support is now default
- Terminix is the default terminal
- This snapshot is based on Linux v4.9 kernel.
Download Ubuntu Budgie 17.04 Beta 1
Kubuntu 17.04 Beta 1 features and download:
- KDE Plasma 5.8 LTS desktop environment
- KDE Applications 16.12.1
- Multiple improvements in KDE applications
Download Kubuntu 17.04 Beta 1
Find the release notes and download links of other flavors here:
- Lubuntu 17.04 Beta 1: Download & Release notes
- Ubuntu Kylin 17.04 Beta 1: Download & Release notes
- Ubuntu Studio 17.04 Beta 1: Download & Release notes
As these releases are development versions, I won�t advise you to install them on your primary computer. Feel free to download them and perform testing on secondary machines or VMs.
download file now
Subscribe to:
Posts (Atom)