Showing posts with label tool. Show all posts
Showing posts with label tool. Show all posts
Thursday, September 21, 2017
Udev Discover Tool for udev testers coders hackers and consumers
Udev Discover Tool for udev testers coders hackers and consumers
Udev discover aims for being a gnome-device-manager-like app using gudev instead of HAL, and to provide some fancy features for udev users and hackers.
Main features:
Browsing the sysfs tree via udev
Reports udev device info and udev properties
Filter and search devices
Monitorize udev device events
Install Udev Discover on ubuntu Natty
Open the terminal and run the following commnads
sudo apt-add-repository ppa:fontanon/udev-discoverYou can run this application using the following command from your terminal
sudo apt-get update
sudo apt-get install udev-discover
udev-discoverScreenshot

download file now

Try pentbox like honeypot tool with Fedora 25
Try pentbox like honeypot tool with Fedora 25
PenTBox is a Security Suite that packs security and stability testing oriented tools for networks and systems.
Programmed in Ruby and oriented to GNU/Linux systems, but compatible with Windows, MacOS and every systems where Ruby works. It is free, licensed under GNU/GPLv3.
First you need to install the ruby
[root@localhost pentbox]# dnf install ruby
Last metadata expiration check: 1:55:17 ago on Tue Mar 7 20:16:17 2017.
Dependencies resolved.
================================================================================
 Package Arch Version Repository Size
================================================================================
Installing:
 ruby x86_64 2.3.3-61.1.fc25 updates 76 k
 ruby-irb noarch 2.3.3-61.1.fc25 updates 94 k
 rubygem-bigdecimal x86_64 1.2.8-61.1.fc25 updates 87 k
 rubygem-did_you_mean x86_64 1.0.0-61.1.fc25 updates 219 k
 rubygem-io-console x86_64 0.4.5-61.1.fc25 updates 57 k
...
 rubygems.noarch 2.5.2-61.1.fc25
 rubypick.noarch 1.1.1-5.fc24

Complete![root@localhost pentbox]# dnf install svn
Last metadata expiration check: 1:59:41 ago on Tue Mar 7 20:16:17 2017.
Package subversion-1.9.5-1.fc25.x86_64 is already installed, skipping.
Dependencies resolved.
Nothing to do.
Complete!svn co https://pentbox.svn.sourceforge.net/svnroot/pentbox/trunk/ pentbox
cd pentbox
svn update
./pentbox.rb
[root@localhost pentbox]# ./pentbox.rb

 PenTBox 1.5
 __
 U00U|.@@@@@@`.
 |__|(@@@@@@@@@@)
 (@@@@@@@@)
 `YY~~~~YY
 || ||

--------- Menu ruby2.3.3 @ x86_64-linux

1- Cryptography tools

2- Network tools

3- Web

4- License and contact

5- Exit

 -> 2

1- Net DoS Tester
2- TCP port scanner
3- Honeypot
4- Fuzzer
5- DNS and host gathering
6- MAC address geolocation (samy.pl)

0- Back

 -> 3

// Honeypot //

You must run PenTBox with root privileges.

 Select option.

1- Fast Auto Configuration
2- Manual Configuration [Advanced Users, more options]

 -> 1

 HONEYPOT ACTIVATED ON PORT 80 (2017-03-07 22:20:30 +0200)
your_ip:90
 INTRUSION ATTEMPT DETECTED! from your_ip:40482 (2017-03-07 22:22:07 +0200)
 -----------------------------
GET / HTTP/1.1
Host: your_ip
User-Agent: Mozilla/5.0 (X11; Fedora; Linux x86_64; rv:51.0) Gecko/20100101 Firefox/51.0
Accept: text/html,application/xhtml+xml,application/xml;q=0.9,*/*;q=0.8
Accept-Language: en-US,en;q=0.5
Accept-Encoding: gzip, deflate
Connection: keep-alive
Upgrade-Insecure-Requests: 1download file now
Friday, September 1, 2017
Try Toggl A Cross Platform Time Tracking And Reporting Tool
Try Toggl A Cross Platform Time Tracking And Reporting Tool
I recently stumbled upon Toggl, a tool that provides online time tracking and reporting, and thought Id share it with those of you who need such an application and are not yet familiar with it.
Toggl offers free, as well as paid plans, and you need to register to be able to use it. The free plan offers time tracking, timeline, autotracker, team management features (for up to 5 members), exporting reports as PDF or CSV, and much more. Check out the Toggl plans HERE.
Furthermore, Toggl integrations with various services such as Wunderlist, GitHub, Trello, Google Docs, and many others.
You can use Toggle directly from its website or by using its desktop applications for Linux (64bit only binaries; source code available), Windows and Mac, Firefox and Chrome addons, as well as mobile (Android and iOS) apps.
Both the time entries and active timers are synchronized using the Toggl cloud service across all applications as well as the Toggl website, which also offers various detailed reporting features.
Heres the Toggl Linux desktop application:

And the online timer and reports pages (available on toggl.com):


Features available in the Linux desktop application (which uses Qt5 and is open source) include:
- syncs time entries and active timers with the Toggl cloud service;
- record timeline (it records websites and applications that you view for more than 10 seconds; this feature is not available the first day after signing up for Toggl);
- idle detection (notifies you about idle time and lets you choose whether to keep the time, discard it or add it to a new entry);
- option to remind to track time;
- pomodoro timer and break timer;
- global keyboard shortcuts to show or hide Toggl and to continue stop the timer;
- a tray/appindicator (the icon changes depending on the app state: recording/stopped);
- offline login after youve logged in at least once online;
- grouped time entries;
- proxy support.
A few features are missing in the Linux desktop application, like an option to show the timer in the panel, adding new tags or editing tags (you can only select already existing tags), as well as the autotracker feature (this feature allows defining applications or keywords that trigger the tracker).
Despite of this, Toggl is a great tool, especially for those who work on multiple computers / operating systems, thanks to its synchronization feature.
Getting started with Toggl Desktop application for Linux
To get started with Toggl, create an account (you can also sign up with Google), download the application and log in.
Note: for Linux, Toggl Desktop is available as a deb and generic tar.gz, both for 64bit only. If you want to use Toggl Desktop on 32bit, youll have to built it from source. Also, pay attention to the Linux download page - on Ubuntu 16.04 and newer, youll have to install gstreamer 0.10, which is no longer available in the Ubuntu repositories (exact instructions are provided for how to do this).
Arch Linux users can install Toggl Desktop via AUR: toggldesktop | toggldesktop-bin.
Before starting to track your time, you may want to take a look at the Toggl Desktop Preferences and enable the options you need, like global shortcuts to show or hide Toggl, continue/stop the timer, enable the Pomodoro time and so on:

Then simply enter a description for your task and click the "Start" button:


Right clicking a task allows accessing some advanced options, like assigning a project to the task, change its duration, start and end time, date, assign tags, as well as an option to delete it:

I should also mention that the Toggl Desktop application for Linux lacks an option to start automatically on system startup. To get it to start with your computer (assuming youve installed it using the .deb package), open Startup Applications, click "Add", enter "Toggl" under name and "/opt/toggldesktop/TogglDesktop.sh" under "Command".


via Web Upd8 - Ubuntu / Linux blog http://ift.tt/2khZr3N
download file now
Unbrick Xperia Ray using S1 Tool
Unbrick Xperia Ray using S1 Tool
Bricking is just another term which means your Xperia device dont start even after long pressing the start button. Normally your phone should vibrate a little bit and then the xperia animation followed by sony logo. But in the case of brick the phone never vibrates or may vibrate few times randomly, but the xperia logo never comes on screen. If xperia logo is present then it might be a bootloop and you might be intrested in how to fix boot loop in xperia phones.
You need a few files as we discuss hot to fix a bricked xperia ray :
- A bricked Xperia Ray
- A Computer with Windows
- USB cable
- S1 Tool ( credit : vikramam )
Steps you need to follow :
Note : before you try these steps please try SEUS - Sony Ericsson update service & PC Companion to update or repair your Bricked Xperia Ray.
1. Remove battery and reinsert the battery , please do not try to switch ON the phone.
2. Download S1 tool from above and extract to any folder.
3. Click on S1 TOOL.exe
4. Click on IDENTIFY button on the right side.
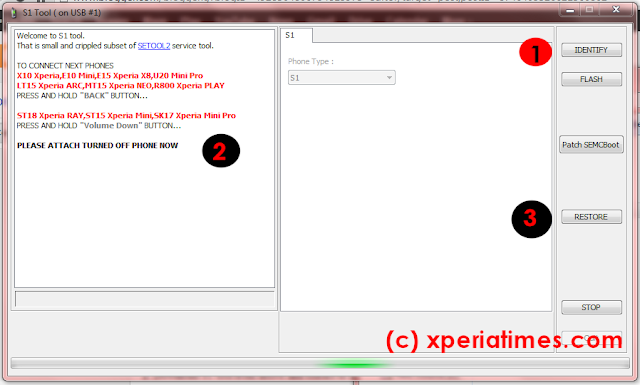
5. Connect your phone , In case of Xperia Ray just Press and Hold the Down button while connecting the usb cable. wait for the software to identify your phone.
6. Click the RESTORE button ( right side of the window )
7. Now either Flash the Original FTF file of desired version of Xperia Ray stock or custom ROM using flash tools. you can read how to root xperia ray as well in case you need to root your phone again.
Note : This is tested on phones which are unlocked using test point and unlocked using official method as well.
Please do comment if this doesnt work we will help you as much we can.
download file now
Sunday, August 27, 2017
UltraISO A Powerful tool to edit and Create Bootable images in Several Popular formats
UltraISO A Powerful tool to edit and Create Bootable images in Several Popular formats
 |  |
UltraISO is a CD/DVD image file creating/editing/converting tool , it can directly edit the CD/DVD image file and extract files and folders from it, as well as directly make ISO files from your CD/DVD drive or hard disk. At the same time, you can maintain the ISO bootable information, thus creating your own bootable CDs and DVDs. You now have the power to make and edit your own ISO files, and then burn them to CD or DVD for your own needs.
UltraISO is in sole possession of the intellectualized ISO document format analyzer, it can process at the present time almost all types of image files, including ISO and BIN, it may even support new image files which are yet to be created. UltraISO can open these image files, directly extract files and folders, edit it and convert other image files to the standard ISO format.
UltraISO uses the double window unification user contact interface, you have the choice to only use the quick buttons and/or the mouse Drag & Drops, you can handle any CD/DVD image file easily.
Features:
- Create New ISO file
- Edit and Existing ISO File
- Create ISO Image from CD/DVD
- Convert CD/DVD Image Format
- Make Bootable CD/DVD
- Burn CD/DVD Image

More Tags: Angry Bird, Blogger, Fate , Plants Vs Zombie, Special Force, Point Blank, Ai Maps, Deep Freeze UnFreezer, Ninja Saga, Deep Freeze, Samsung SGH, Guitar Pro, USB XP Install, Yahoo 443 Problem, Turtle Odyssey, GTA San-Andreas, PlayStation, Tips Tweaks Tricks, HTML, Facebook, Animated JPG, Counter-Strike, USB Windows Format, Screensaver, USB Security.
download file now
Tuesday, August 22, 2017
Tut hack Wireless v� LAN sử dụng tool Cain Abel
Tut hack Wireless v� LAN sử dụng tool Cain Abel
G?i l� hack th� h?i qu�, b�i n�y kh�ng b�n ??n vi?c b? kh�a WEP, WPA c?a wireless m� ch? d�ng trong tr??ng h?p k?t n?i wireless ?� c�
B? kh�a WEP, WPA c?a wireless xin vui l�ng search l?i tools Hack Wireless AIO ?� post , b�i vi?t h??ng d?n tham kh?o t?i ?�y :
- TUT n�y kenji h??ng d?n c�c b?n s? d?ng 1 tool r?t n?i ti?ng l� Cain & Abel ?? sniff pasword trong m?ng wifi, crack user, pass ?? chui v�o pc victim trong c�ng 1 m?ng; c�n chui v�o l�m g� th� t�y c�c b?n
- TUT demo t?i cafe wifi HS, qu?n B�nh Th?nh .
1. Giao di?n Cain & Abel

2. C?u h�nh card m?ng
- Ch?n menu Configure
- Ch?n card m?ng wifi ?ang s? d?ng

3. Start program
- Click v�o 2 button Start/Stop Sniffer, APR

4.
- Ch?n tab Sniffer tr�n thanh c�ng c?.
- Right click -> Scan MAC Adddresses

- Click OK ?? scan .

- OK, c� 3 victim ?ang ng?i trong qu�n

5.
- Ch?n tab Network, Quick List

- Right click -> Add to Quick List

- Add IP l�c n�y scan ???c v�o
6.
- Right click tr�n PC v?a add , ch?n Connect As -> click OK [ User , Pass = non ]


- Ok, c? 3 m�y ??u cho anonymous log v�o

*** T? b�y gi? s? ch?n pc 192.168.1.111 l�m demo ***
7.
- Right click tr�n User -> SID Scanner

- O�i, n� ko cho scan -> reconnect : User l� Administrator xem sao


- Ok, th?ng n�y g� th?t

- B�y gi? th? scan l?i SID xem n�o

- Xong, n� list ra h?t User trong c�i pc g� n�y r?i


- V�o m?c Share

- T?o ???ng d?n t?i ? D v� E c?a th?ng n�y xem

- Ok. V�o My Computer check th? xem, ?� hi?n ra ? D, E victim r?i

- B�y gi? th� chui v�o m�y n� th�i .


- Anh em xong vi?c nh? Disconnect ra kh?i m�y victim, k?o n� ?i ngang ph�t hi?n ra th� toi c�i laptop c?a m�nh


8. Sniff Password
Tool n�y c� t�c d?ng b?t l?i username + password khi ng??i d�ng tr�n m�y b?t k� trong m?ng login v�o website n�o ?� . C�c b?n c� th? d�ng c�ch n�y ?? b?t l?i username + pass ?? v�o hotspot ( h�n xui th�i )
- Tr�n menu c�ng c? ch?n Sniffer -> tab Passwords ( b�n d??i )
- Xem n�o, c� 1 em login v�o web, url , user, pass hi?n ra h?t ?�y n�y [ ph?i chi l� rapidshare th� hay bi?t m?y ]

download file now
Thursday, August 17, 2017
Tutorial Repair GRUB Using Tool Boot Repair
Tutorial Repair GRUB Using Tool Boot Repair
Boot-Repair is a free software (licensed under GNU-GPL) to repair boot loader GRUB in Ubuntu . This usually happen when you cant boot Ubuntu after installing Windows or another distro Linux, or when you cant boot Windows after installing Ubuntu, or when GRUB is not displayed anymore, some upgrade breaks GRUB, etc.
In the previous article, has written about How to Fix Broken Ubuntu Boot GRUB using terminal command. In this article, we will fix the problem boot GRUB with a simple click using Boot-Repair.
In the previous article, has written about How to Fix Broken Ubuntu Boot GRUB using terminal command. In this article, we will fix the problem boot GRUB with a simple click using Boot-Repair.
Boot-Repair also has advanced options to backup table partitions, backup bootsectors, create a Boot-Info, restore a Windows-compatible MBR, etc.
Install Boot-Repair
- Boot your computer on a Ubuntu live-CD or live-USB.
- Choose Try Ubuntu.
- Connect internet to your computer, because installation Boot-Repair need connect to repository server using internet connection.
- Run Terminal, then type the following command:
sudo add-apt-repository ppa:yannubuntu/boot-repair && sudo apt-get update
- Then press Enter.
- Then type this command in Terminal:
sudo apt-get install -y boot-repair && (boot-repair &)
- Then press Enter.
- Wait after finished installation.
Using Boot-Repair to repair GRUB in Ubuntu
- Run application Boot-Repair by typing "boot-repair" in a Terminal.
- After Boot-Repair is running, click "Recommended repair" button.
- After repair is finished, reboot your system.
- If repair didnt succeed, please try using "Advanced option"
- Look at "Advanced option" this screenshot:


download file now
Subscribe to:
Posts (Atom)