Friday, September 1, 2017
Unbrick Xperia Ray using S1 Tool
Unbrick Xperia Ray using S1 Tool
Bricking is just another term which means your Xperia device dont start even after long pressing the start button. Normally your phone should vibrate a little bit and then the xperia animation followed by sony logo. But in the case of brick the phone never vibrates or may vibrate few times randomly, but the xperia logo never comes on screen. If xperia logo is present then it might be a bootloop and you might be intrested in how to fix boot loop in xperia phones.
You need a few files as we discuss hot to fix a bricked xperia ray :
- A bricked Xperia Ray
- A Computer with Windows
- USB cable
- S1 Tool ( credit : vikramam )
Steps you need to follow :
Note : before you try these steps please try SEUS - Sony Ericsson update service & PC Companion to update or repair your Bricked Xperia Ray.
1. Remove battery and reinsert the battery , please do not try to switch ON the phone.
2. Download S1 tool from above and extract to any folder.
3. Click on S1 TOOL.exe
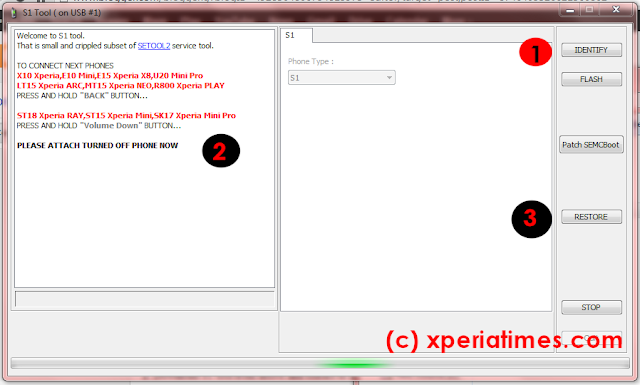
4. Click on IDENTIFY button on the right side.

5. Connect your phone , In case of Xperia Ray just Press and Hold the Down button while connecting the usb cable. wait for the software to identify your phone.
6. Click the RESTORE button ( right side of the window )
7. Now either Flash the Original FTF file of desired version of Xperia Ray stock or custom ROM using flash tools. you can read how to root xperia ray as well in case you need to root your phone again.
Note : This is tested on phones which are unlocked using test point and unlocked using official method as well.
Please do comment if this doesnt work we will help you as much we can.
download file now