Sunday, September 17, 2017
Transfer Photo Files without Wire Download without USB with WiFi File Transfer Application
Transfer Photo Files without Wire Download without USB with WiFi File Transfer Application
Wi-Fi File Transfer is great tool / application for Android and iOS users, which enables the users to transfer their photos, files and screenshots without wire to their computer or laptop. This is very easy to use, which can be downloaded for Android users from Google Play Store.
After installation, Just tap to the App Icon from your Mobile and Click START button. You will be prompted to Wifi File Transfer by giving you the specific IP / URL address like https://192.168.10.4:1234. Now go to your Computer or Laptop which has to be connected on the same Wi-Fi Network, from where your Cell Phone connected and write the given IP / URL in your PC / Laptop browser and press Enter. Now all your Mobile Phone file folders will be opened in your PC browser. Now you can copy your data between your both devices via this Tool.


download file now

Sunday, September 3, 2017
Ubuntu Encrypting Files With GPG
Ubuntu Encrypting Files With GPG
But I already Encrypt My Drives...
The latest Ubuntu 14 release makes it very easy to encrypt your hard drives at installation. However, encrypting a drive only protects your data if your computer is turned off. It will not protect your data whilst your computer is running, which for me is 90% of the time. We need a solution whereby our files remain encrypted, and we only decrypt them as and when we need them. This also protects your data, should you decide to transfer it to a friend or host it "in the cloud". For this, we are going to use the GPG (GNU Privacy Guard) tool to encrypt and decrypt our files.
Encryption Method 1 - Passphrase File
In this first method, we are going to write our passphrase to a file, and use that to encrypt/decrypt our files. The great thing about this is that it should not show your passphrase in the process list, which would be an issue if it is a multi-user system.
Create a passphrase for which you are going to encrypt your files with:
echo "my awesomely amazing passphrase goes here" > $HOME/passphrase.txt
history -c
rm ~/.bash_history
Now encrypt your files using the passphrase.
gpg
--cipher-algo AES256
--no-use-agent
--passphrase-file "$HOME/passphrase.txt"
--symmetric
[filename here]

Encryption Method 2 - Enter Passphrase Interactively
In my opinion, this is the simplest/recommended solution, and it removes the possibility of forgetting to delete the passphrase file which somebody else might find at a later date. It also does not require you to clear your history.
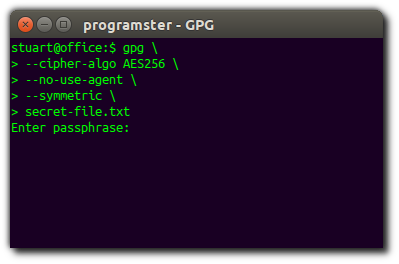
Encrypt your file and enter the passphrase when prompted:
gpg
--cipher-algo AES256
--no-use-agent
--symmetric
[filename here]

Encryption Method 3 - Specify Passphrase In Command
This method is useful for scripts whereby you cannot interactively enter the encryption password. However, this is unsafe to use on machines with multi-user access as the passphrase will appear in the currently executing process list.
Encrypt your file and enter the passphrase when prompted:
gpg
--cipher-algo AES256
--no-use-agent
--symmetric
--passphrase "my passphrase here"
[filename here]
Decryption Method 1 - Passphrase File
Here is how to decrypt files using a passphrase file.
gpg -d
--no-use-agent
--passphrase-file $HOME/passphrase.txt
secret-file.txt.gpg > secret-file.txt
Decryption Method 2 - Enter Passphrase
Decrypt without
gpg -d
--no-use-agent
secret-file.txt.gpg > secret-file.txt
Decryption Method 3 - Specify Passphrase In Command
gpg -d
--no-use-agent
--passphrase "my passphrase here"
secret-file.txt.gpg > secret-file.txt
history -c
rm ~/.bash_history
References
download file now
Saturday, August 12, 2017
Ubuntu synchronise Google calendar and contacts and view edit google drive files with GNOME applications
Ubuntu synchronise Google calendar and contacts and view edit google drive files with GNOME applications
Now fire up a terminal and put the following command into to install GNOME control center, Calendar, and Contact applications and GNOME online accounts package:
sudo apt-get install gnome-control-center gnome-contacts gnome-calendar gnome-online-accounts
If everything is installed properly, you should be able to find corresponding applications icons into Dash applications tab. Now, in the Dash search for Settings icon and click to launch All Settings window like shown below:

Now goto Online Accounts and click on the plus sign which will open Add Account dialog. Select Google and sign into your google account. Finally, click Allow button to give GNOME applications access to your Google services. Now you should see which Google services will be synchronised with the GNOME applications like shown below:

From here you can easily toggle the services you do not like to be synchronised with the Desktop applications. Turn on Calender, Contacts and Files which will in turn let you access Google Calender, Contacts and Drive from GNOME Calender, Contacts and File applications.
Accessing Google Calendar:
Search for Calendar icon in the Dash and open it. Click on the Manage your Calendar icon and select Calendar Settings from the popup menu. Now in the Calendar Settings dialog window click add button and select from web if your Google account calendars are not showing in the Calendars list like shown below:


Every time you change calendars you have to click Synchronize from the GNOME Calender application.
Accessing Google Contacts
Search for Contacts icon in the Dash and open it. From Change Address Book dialog window select your Google account, like shown below:

The application will automatically synchronise your contacts upon change.
Accessing Google Drive files:
When you open Nautilus file manager (GNOME Files), you should be able to see your Google account email with other storage drives like shown below:

With GNOME Files, you will be able to access Google Drive files just like any other local disk partitions. To reflect any changes to the Google Drive do not forget to Unmount from the GNOME Files application.
download file now
Friday, August 11, 2017
Ultimate Copy Protection for your Files
Ultimate Copy Protection for your Files
 The Ultimate Copy Protection for your Files!
Copy Protect lets you copy protect your audios, videos, documents and pictures so that they cannot be duplicated, copied or distributed by illegal means. Copy Protect converts all supported formats into executable applications that run only in the drives they are prepared for. If these files are copied to another drive, they do not run and become useless. With Copy Protect, you can allow other users to execute your files but not copy them to their own drive(s) making it possible for data in use security of your most previous files.
Once Copy Protect converts your media files into executable applications, they can run without the need of any software on the other hand, minimizing the chances of unavailability. Furthermore, since files run only in the drive they are prepared for, you have zero risks of data leaking from one place to another. The program comes with a special built-in picture and document viewer that lets you view and read your copy protected files; and a built-in player for your copy protected videos and audios. With Copy Protect�s playlist option, you can also organize and manage all your media files.


Features and Benefits:
- Copy Protection: Copy Protect uses advanced level of copy protection technology that cannot be tampered in any way which means your copy protected data is completely save from illegal copying and piracy.
- Easy to use: Copy Protect has a user-friendly graphical user interface that requires no expert technical know-how for operation. It is very easy to navigate and use.
- Accessibility: The program offers you a hassle free way to view, play and read your copy protected pictures, audios, videos and documents because it comes with special built-in player for your videos and audios, and a viewer for your pictures and documents.
- Peace of Mind: Total peace of mind from security leaks and privacy breaches. Never again fear of what�s happening to your CD, DVD or USB drive while it is being used by someone else.
- Portable Application: Copy Protect is unique because it creates copy protected applications which are portable. It means no need to install the program at the other end to run copy protected files.
- No Administrative Privileges Required: Copy Protect does not ask for any special privileges to run the copy protected application. It does not require administrative rights to play copy protected videos and audios or to read copy protected files and documents.
- Increased Revenue: Increase your revenue with Copy Protect by preventing illegal copying, piracy and duplication of your copyright materials.
- Prevent Image Theft: Now with Copy Protect, you are in full control to prevent your images and digital pictures from being theft or copied illegally. Now you can furnish a sample of your digital pictures, art work, graphic designs or plan draughts without the client being able to copy them.
download file now
Wednesday, August 9, 2017
TurboViewer Free 3D Viewer for DWF PDF Files
TurboViewer Free 3D Viewer for DWF PDF Files

TurboViewer Free 3D DWF & PDF Viewer and Markup Tool
TurboViewer is the fastest, easiest way to view, markup and share 2D and 3D DWF and PDF drawing and documents. The TurboViewer offers a powerful and innovative Android and iOS apps that is the first mobile DWG & PDF viewers and markup that support both 2D and 3D and a Macworld/iWorlds Top 5 App award winner. Built from the ground up -- and specifically optimized for smart devices -- TurboViewer sets the standard for mobile AEC viewing and markup.

TurboViewer features AutoShapes, that enables user to draw rough shapes with your finger automatically refines to accurate geometry. It allows 2D and 3D objects markup using line, circle, rectangle, revision cloud, text, rectangular text box and leader. Its Contact Management built on top of native Contacts (so all current contact info3d available). User can organize contacts into Groups for easy "one tap" sending of shared drawings or documents to large design and construction teams.
You will be able to restore saved AutoCAD views - it quickly display the best vision of your design. TurboViewer provides tactile sound feedback to confirmation for button and UI item selection. Autosense for 2D or 3D drawings option automatically sets appropriate gesture navigation of a drawing or model. TurboViewer allows to use two fingers to 3D rotate/tumble or constrain orbit
Download free TurboViewer for iPhone and iPad.
Download free TurboViewer for Android.
TurboViewer file size 100MB.
TurboViewer Website
2D and 3D DWF & PDF Viewer Features:
� Lightning-fast 2D and 3D environment
� Smooth multi-touch navigation; Pan, zoom, and 3D orbit effortlessly around document
� Hidden line, shaded, and wireframe viewing
� Isometric view
� AutoCAD SHX font support - Localized or custom SHX fonts
� TrueType font support - Improved visual fidelity with native TTF font file support
� Option to use default or model lights (if any in drawing)
� Option to render both inside and outside model (force two-sided rendering)
� Supports AutoCAD linetypes - Maintain visual fidelity as intended
perspective angles (human eye perspective or specify custom camera lens sizes in mm)
2D and 3D DWF & PDF File Management:
� Create sub-folders
� Cut/Copy/Paste/Rename files and folders
� Search files and folders by name, size, and date
� Sort by name, size, and date (ascending or descending)
� Send files to other apps using copy, AirDrop, Message, and Mail
� Diagnostic for missing xref and fonts
File format Supports and Cloud Localization:
� 2D and 3D DWG (AutoCAD and AutoCAD LT), DXF, DWF, DWFx, and TCW
� 2D PDF (single and multiple page) and 3D PD (U3D, including Bluebeam files)
� Import/Export support for mail, iCloud, Web downloads, Dropbox, Box, etc.
TurboViewer Related Software:
BricsCAD 3D CAD Software
AutoCAD LT 2012 Features
AutoCAD LT 2012 Download
Free Bike Designer Software
download file now
Monday, August 7, 2017
Tutorials Uploading files with FTP and Filezilla
Tutorials Uploading files with FTP and Filezilla
 FTP (or File Transfer Prorocol) is a popular way to transfer files between computers . Over the Internet.since almost very web host allows FTP access to their servers, its also a great way to upload files up to a website. this tutorial will walk you through the basics of FTP with Filezilla, an awsome (and Free!) open source FTP Client for Windows, Mac OS X, and Linux. if you dont have filezilla yet, download a free Copy here.
1. start filezilla and go to File > Site Manager.

2. Click on New Site and enter the Ftp Account details provided by Your web Host, once yourre done, click Connect ( The new site entry will be saved automatically).

3. once Connected, youll see two panes: the left one (first image below) Shows the files on Your computer, and the right one (second image below) shows the files currently on the Web Server, using the pane on the Right, Browse to the folder to which you want to Upload Your Files.


4. using the left pane, select the files you want to upload and drag them over to right pane. Filezilla wil now begin uploading the files to your web host.

5. And thats it! if youre done uploading files, just click the disconnect icon close the connection to the web server.

download file now